Advertisement
PRODUCT LIST
* Please confirm the following accessories are complete before installation and use.
(Batteries or screwdriver are not equipped and need to be purchased separately)

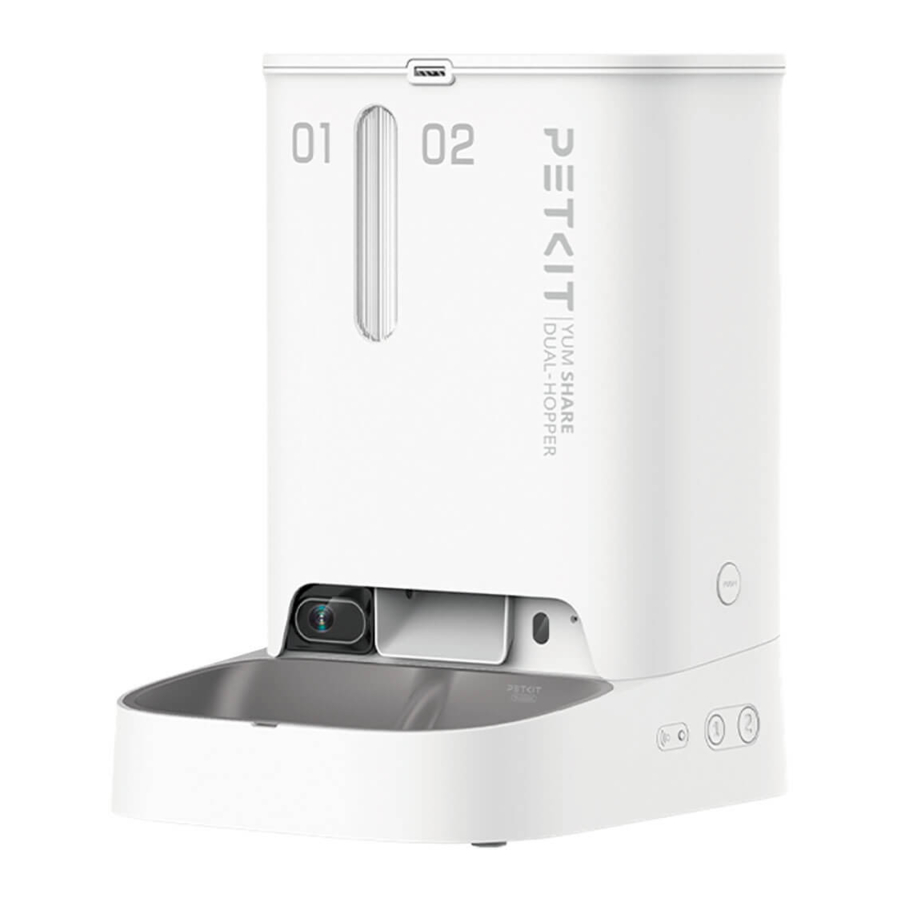
PRODUCT DESCRIPTION

* Note: in order to provide a better user experience, we will be implementing periodic product enhancements. Product images shown for illustration purpose only. Actual product may vary from the image shown on the box. For any discrepancies, please refer to the actual product.

PRODUCT INSTALLATION
Installing the Main Unit

- Place the main unit on the level ground or desk.
- Lift the hopper, align the notches on both sides with the PUSH button on the main unit, and place it vertically downwards.
- Press and hold the PUSH buttons until they are fully stuck into the notches.
- Place the stainless steel food bowl in the food bowl holder.
Connecting the Power Supply

Take out the power adapter cord and attach it to the power input on the back.
Installing the Backup Batteries

- Take out the screw and remove the battery cover.
- Take four D batteries and place them in the battery compartment. (Pay attention to the orientation of the positive and negative ends)
- Put the battery cover back on and tighten down the screw. Choose whether to install batteries based on personal actual usage needs. (Batteries need to be purchased separately, and only alkaline batteries can be used)
*Note: When the battery is low, please replace the batteries in time. Check and replace the batteries before leaving the device unattended for an extended period of time.
Installing the Desiccant
- Press and hold the lid release button to the right and lift up to remove the lid.

- Open the desiccant compartment, take the desiccant packet, and lay it down evenly in the compartment, Then close the desiccant.


HOW TO USE
Adding Pet Food
- Add pet food. (Do not exceed the MAX line) Two different pet foods can be placed in hopper 01 and hopper 02 according to your feeding needs.
* Note: Do not pull out the partition if there is food left inside.
* Recommended kibble size of dry food ≤12mm (0.47in)
* Recommended kibble size of freeze-dried food ≤9mm (0.35in)

- Cover the lid: Insert the rear side of the lid into the two holes above the hopper.


Indicator Light
The indicator light can be turned on/off in the App. The indicator light is not on in battery mode.

| Indicator light | Status |
| White light is flashing slowly | Device is not connected to Wi-Fi |
| White light is flashing quickly | Device is connecting to Wi-Fi |
| White light is constantly on | Device is connected to Wi-Fi (Camera is not working) |
| Green light is constantly on | Device is connected to Wi-Fi (Camera is working) |
Manual Feeding
Select 01 or 02 hopper button. Press the button to start dispensing; Release the button to end dispensing.

App Binding and Activation
- Download and install PETKIT App:
Download the PETKIT App in an App Store or Android Stores
![]()
![]()
![]()
![www.apple.com]()
![play.google.com]()
- Add a device
Open the PETKIT App and enter its homepage; click "+" on the top right corner of the page to select and add the "PETKIT YUMSHARE DUAL-HOPPER WITH CAMERA".

- Start connection In the startup state, long press the Wi-Fi setup button for 5 seconds until the indicator light on the device flashes rapidly; click Next to configure Wi-Fi and the App will start to connect to the device. Please wait until the App displays configuration succeeds.
* This product supports 2.4GHz Wi-Fi, but not 5GHz. Please make sure you have turned on the 2.4 band when connecting the device to the Internet.

![]()
- Read usage guidelines After the device successfully connects to the PETKIT App for the first time, to ensure pet safety and proper use of the product, please carefully read the usage guidelines and appropriately use the product according to the instructions.


* Note: To provide the best possible user experience and functional optimization, the product firmware will be irregularly upgraded. Please refer to actual situations and promptly upgrade the firmware via PETKIT App.
DESCRIPTION OF APP FUNCTIONS
Device Homepage

Description of function keys
Extra feeding

Click it to dispense food for your pets instantly. (Remote control is supported.)

Intercom

Long press "Intercom", and the feeder will broadcast what you said simultaneously, so as to have dialogues with your pets in real time.
 Your voice is only heard when playing back videos. (You need to turn on the microphone first via the App.)

Feeding plans

Set up the feeding time and portions to make sure your pet is fed on time.

* Note: To provide the best possible user experience and functional optimization, the product firmware will be irregularly upgraded. Please refer to actual situations and promptly upgrade the firmware via PETKIT App.
Play Videos
After subscribing the PETKIT Care+ Cloud Service, click the Timeline on the homepage of the device to play back full clips, highlight with speedup options.
- Highlight playback
You can preview 4-second videos that are sped up by clicking them in the Timeline.

- Full clips playback
Switch the tag to "Playback" to watch complete video clips.

- Speedup playback
When playing full video clips, click "![]() " on the top right corner to choose the speed as needed, or long press the center of video frame to directly switch to 2x play.
" on the top right corner to choose the speed as needed, or long press the center of video frame to directly switch to 2x play.


* Note: To provide the best possible user experience and functional optimization, the product firmware will be irregularly upgraded. Please refer to actual situations and promptly upgrade the firmware via PETKIT App.
Delete Video Clips
You are entitled to delete any video.
Methods
- Delete videos in the Timeline;

- Delete videos in VLOG. Click the video you want to remove, turn its play tag to "Full" and click the "
![]() " on the top right corner to delete the video.
" on the top right corner to delete the video.


* Note: To provide the best possible user experience and functional optimization, the product firmware will be irregularly upgraded. Please refer to actual situations and promptly upgrade the firmware via PETKIT App.
Privacy Protection
- Camera permissions
You are entitled to turn the camera on or off as needed.
![danger]() If it is turned off, any video footage fails to be captured.
If it is turned off, any video footage fails to be captured.

- Customize the detection time periods of the camera
You can personalize the time slots to turn on the camera, and beyond those, the camera is turned off automatically.

- Indicator light status
When the camera is turned on, the light is green; when off, the light is white.

- Customize the detection time periods of the camera
- Microphone permissions
You are entitled to turn on or off the microphone as needed.
![danger]() If it is turned off, there is no sound for any video footage.
If it is turned off, there is no sound for any video footage.

- Real-time frame privacy protection
After this function is turned on, any real-time video frame will be blurred to protect your privacy when you enter the device homepage.


* Note: To provide the best possible user experience and functional optimization, the product firmware will be irregularly upgraded. Please refer to actual situations and promptly upgrade the firmware via PETKIT App.
Additional Notes
- Cyclic videos stored in the Cloud
The playback contents are based on time-limited cyclic storage, and the data outside the time limit is periodically cleared. All videos can be downloaded and viewed in your phone's local and App albums. (e.g. 7-day video loop means that the videos or pictures stored in the last 7 days will be retained except for today's and meanwhile the contents of the day before the last 7 days will be automatically cleared.) - PETKIT Care+ Cloud Service
You can purchase the Service for every feeder with camera via the App to enjoy such services as pet detection, playing back full HD video stored in the Cloud and HD Moments, which are subject to actual description. Multiple purchases of the Service are supported. PETKIT staff will provide you service upgrade or extension according to the attributes of the service you have bought. The Cloud Service is allowed to be transferred to another device for once a year. Please note that the Cloud Service is a virtual product so that it is not refundable once purchased.
 Click to check items of PETKIT Care+ Cloud Service Agreement.
CLEANING AND MAINTENANCE
- Open the lid to remove the desiccant, pull out the partition vertically upward, and then remove the food bowl.

- Hold the PUSH buttons on both sides of the main unit with middle fingers, and lift it up at the same time to remove the hopper.

- Pull out the food dispensing vanes in the hopper. Rotate clockwise to remove the impeller cover and take out the impeller.

- Clean the hopper, vanes, impeller cover, impeller, upper lid and food bowl in turn, it is recommended to add appropriate amount of detergent and rinse well.
- After cleaning, wait for each part to dry completely and install them back in turn. (* For detailed steps of cleaning and maintenance, please watch corresponding video.)
![danger]() Please be sure to use a sponge or soft cloth to clean the inside of the hopper, do not use hard-material cleaning tools to avoid scratching the plastic parts and affecting the normal operation of the sensor. Main unit cannot be immersed or soaked in water, it can be wiped with a damp tissue.
Please be sure to use a sponge or soft cloth to clean the inside of the hopper, do not use hard-material cleaning tools to avoid scratching the plastic parts and affecting the normal operation of the sensor. Main unit cannot be immersed or soaked in water, it can be wiped with a damp tissue.


VIDEO GUIDE
Video of Installation and Usage
Please copy the video URL and open it in your browser to watch the video.
https://youtu.be/yYALvk-wNhY
Video of Cleaning and Maintenance
Please copy the video URL and open it in your browser to watch the video.
https://youtu.be/gyh2mUKjglY
BASIC SPECIFICATIONS
| Product Name | PETKIT YUMSHARE DUAL-HOPPER WITH CAMERA SMART PET FEEDER |
| Product Model | P591 |
| Product Material | ABS, 304 Stainless Steel |
| Product Dimensions | 362 *293 *247.5mm (14.2*11.5*9.7in) |
| Capacity | 5L (01 hopper 2L, 02 hopper 3L ) |
| Product Weight | about 2.5kg (5.5lb) |
| Rated Input | 6V 2A |
| Rated Power | 4W |
| Wireless Connection | Wi-Fi |
| Scope of Application | cats and small-breed dogs |
A MESSAGE TO OUR VALUED CUSTOMERS
- Please carefully read the User Manual before using the product. By setting up and using this product, you are acknowledged that you have already read and accepted the safety guidelines listed below.
- We are not liable and will not accept responsibility for any accidents or injuries that result from improper use of this product.
- PETKIT reserves the rights of interpretation and revision.
USER SAFETY GUIDE
* Failure to follow the safety guides outlined below can result in product malfunction or other unforeseen mishaps.
- Please install and use the product as instructed in the User Manual.
- Pets under three months of age are not recommended to use this product.
- Do not scratch or polish the camera with sharp objects.
- For indoor use only. Do not expose the product directly to sunlight for extended periods of time. Do not place it near an open flame.
- The device is using low voltages. However, pets can still cause electrical leakage if they chew on power cord. Please guide your pets use the product properly.
- Please use the original adapter, otherwise it may damage the device or cause safety hazards.
- Make sure the device is placed on a level surface. Do not overturn the device, or it may not function properly.
- Do not drop all items expect dry pet food into the food storage container, or the device will not function properly, and it may even endanger the safety of the pet.
- In order to prevent your pet from overturning this device, we recommend placing it in a corner or against a wall.
- To prevent the device from falling down and injuring your pet or damaging property, please do not place this device in an elevated location.
- The main unit of the product is prohibited from soaking or submerging in water, and the machine should not be used in damp environments.
- If you want to stop using the device, make sure to remove the battery and unplug the power adapter, and please clean and dry the device before storing.
- Please unplug the power cord before moving the device.
- Children should use this product under the guidance of adults.
- Repairs should be done under the guidance of a professional to avoid safety hazards.
- If you need to go out, please check the battery in the battery compartment to make sure the battery has sufficient charge (this device can only use alkaline batteries).
Documents / Resources
References
![youtu.be]() PETKIT YUMSHARE DUAL-HOPPER WITH CAMERA Smart Pet Feeder - Setup Tutorial - YouTube
PETKIT YUMSHARE DUAL-HOPPER WITH CAMERA Smart Pet Feeder - Setup Tutorial - YouTube![youtu.be]() PETKIT YUMSHARE DUAL-HOPPER WITH CAMERA Cleaning Tutorial - YouTube
PETKIT YUMSHARE DUAL-HOPPER WITH CAMERA Cleaning Tutorial - YouTube![www.apple.com]() App Store - Apple
App Store - Apple![play.google.com]() Google Play
Google Play
Download manual
Here you can download full pdf version of manual, it may contain additional safety instructions, warranty information, FCC rules, etc.
Download PETKIT YumShare Dual-hopper P591 - Smart Pet Feeder Manual
Advertisement


Need help?
Do you have a question about the YumShare Dual-hopper and is the answer not in the manual?
Questions and answers