
Related Manuals for iSinwheel M10


Summary of Contents for iSinwheel M10
- Page 1 EBIKE M10 US Based Support Powered by isinwheel Mon-Fri: 8AM-4PM (PDT) USER MANUAL www.isinwheel.com US:+1 (888) 496 8123...
-
Page 2: Table Of Contents
Contents 1. What’s Included in the Box 2. Installation Instructions 3. Charging Instructions 4. Product Overview (Bike & Computer) 5. Display and Buttons 6. For Your Safety 7. Battery Maintenance 8. Storage 9. Scrap Disposal 10. Specification 11. Warranty 12. Contact Us... -
Page 3: What's Included In The Box
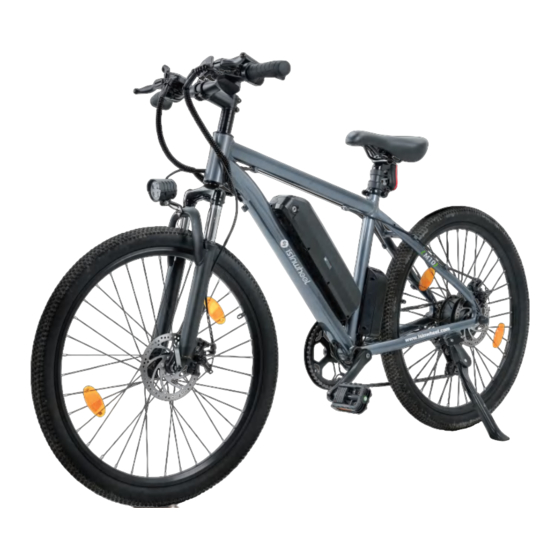
1.What’s Included in the Box Computer Mechanical Brake Seat Rear Light Front Light Hydraulic Suspension Fork Tire Chain Battery Pedal Disc Brake Rotor 1x Bike Frame 1x Front Wheel 2x Pedal 3x Hex Key 1x Bicycle Pump + Rear Wheel 1x QR Skewer User’s Manual... -
Page 4: Installation Instructions
2. Installation Instructions Before Installation ● Please read this manual thoroughly and follow its instructions. ● Make sure all parts are intact. ● Do not install the battery or start the computer until the bike is fully installed. ● If you have any questions or can't find the information you need in the manual, Please contact us via email. - Page 5 2.3 Install the kickstand 2. Align the screw holes of the kickstand with 1. Remove the two screws and nuts pre-in- the kickstand mounting holes on the chain stalled on the chain stay with an appropriate stay. Insert and tighten the two screws with hex wrench and open-ended wrench.
- Page 6 2.4 Assemble and install the front wheel 4. Place the wheel axle into the fork slots 3. Slide the QR skewer throught the axle. completely with the brake rotor sitting Lightly screw the thumb nut back on. inside the brake caliper. Make sure the QR lever and the brake Make sure the wheel axle is fully placed rotor are on the same side and the...
- Page 7 2.5 Install the front light 1. Loosen the screw that holds the light 2. Adjust the light and make it face forward. stand with an appropriate hex wrench and Make sure the gasket is between the screw open-ended wrench. head and the light stand. 2.6 Install the pedals 1.
- Page 8 2.7 Install the seat Safety Line 1. Open the seatpost clamp on the seat 2. Close the seatpost clamp to clamp the tube. Pull up or push down the seat to seatpost in place. adjust the height of the seat. Note: Keep the minimum insertion line at least below the top end of the seat tube.
-
Page 9: Charging Instructions
2.9 Remove the battery (For your convenience, isinwheel designed the battery to be removable.) When removing the battery, do not drop or damage the battery. To install the battery, align the battery terminals with the battery slots and then push down the battery. - Page 10 ● The charging time is about 8 hours. Prolonged charging may reduce battery life and perfor- mance. ● Only use the charger that comes with the M10 e-bike. If the official charger is lost or damaged, Please contact Customer Service for a replacement.
-
Page 11: Product Overview (Bike & Computer)
4. Product Overview (Bike & Computer) Mechanical Brake Power Switch Twist Throttle Speedometer Light Switch & 7-speed Shifter Horn Switch Full throttle mode: Speed Modes Full Throttle Pedal Assist After powering on the E-bike, you can twist the throttle to move forward and adjust the speed level from 1 to 5 by pressing the “+”... -
Page 12: Display And Buttons
5.Display and Buttons I. Computer Display Front view Speed Unit Metric: KM/H Imperial: MPH S866 AVG MAX SPEED DST Speed km/h PAS Level ASSIST Battery Level mile TRIP TIME Data and Units Side view... - Page 13 III. Function Description Functions: 1. On the screen Speed, Battery Level, Error Code, Total Distance, and Trip Distance 2. Controls and settings Power on/off, set wheel diameter, set auto sleep time, set backlight brightness, set power on method, set drive mode, set voltage level, set controller current limit 3.
- Page 14 3.4 Pedal assist level adjustment: displayed in the form of numbers 0-9 and 10 level bars; ASSIST 3.5 Bike status section Motor Fault fault brake applied front light on 4. Settings P01: backlight brightness (1 means the weakest and 3 means the brightest) P02: travel distance unit (0 means KM and 1 means MILE) P08: speed limit, range: 0-100 km/h (100 means no speed limit) The number means the top speed, e.g., when you input 25, then the bike’s...
-
Page 15: For Your Safety
IV. Buttons 1. In the power-off state, press and hold to power on the bike; after power-on, press to switch between ODO, TRIP, VOL, and TIME. 2. In the power-on state, press and hold to power off the bike, press to increase the PAS level by 1 and to decrease the PAS level by 1. - Page 16 Notice Wear an approved helmet and other protective equipment to reduce any possible injury. ● ● Helmets can reduce serious head injuries by 85%. ● Elbow pads can reduce elbow injuries by 82%. ● Knee pads can reduce knee injuries by 32%. Warning ●...
-
Page 17: Battery Maintenance
7. Battery Maintenance A well-maintained battery performs well even after high mileage. Charge the battery after each ride to prevent the battery from draining from a full charge. Batteries perform best when used at room temperature (70°F [22°C]). However, Using it at temperatures below 32°F (0°C) will degrade performance. -
Page 18: Storage
Which could result in serious injury. The substances inside the battery pose a chemical risk to the environment. The end-of-life disposal recommendation for any iSinwheel product is to dispose of the entire device at an e-waste recycling center or through an e-waste recycling center, Project or facility. -
Page 19: Specification
10. Specification Item Meaning Model Name 47.4LBS / 21.5KG Net Weight 70*24.8*40.6 IN / 178*63*103 CM Product Dimensions 58.3x10.2x29.9 IN / 148*26*76 CM Package Dimensions Max. Incline 11° (Rider Weighs 220.4 LBS / 100KG) 330 LBS / 150 KG Max. Capacity 20 MPH / 32 KM/H Max. -
Page 20: Warranty
Immersion, High temperature, And earthquake. 7. Loss of wearing parts, Such as packaging materials and various technical materials. 8. Other failures or damages not caused by product design, Technology, manufacturing, Quality, or other issues. 9. Not purchased from the isinwheel online store. -
Page 21: Contact Us
12. Contact Us Contact us if you experience issues relating to riding, Maintenance and safety, Or errors/faults with your isinwheel M10 Electric Bike. E-mail Service: support@isinwheel.com www.isinwheel.com YouTube: isinwheelOfficial ins: isinwheel_official Facebook: @isinwheelOfficial...
Need help?
Do you have a question about the M10 and is the answer not in the manual?
Questions and answers
What size screw holds the computer or speedometer
How can I turn off pedal assist and still have throttle
To turn off pedal assist on the iSinwheel M10 and still use the throttle, reduce the PAS (Pedal Assist System) level to 0 using the control buttons. In PAS level 0, the pedal assist is off, but the throttle can still be used independently.
This answer is automatically generated
How do I change the speed on my e bike how to get to settings
J'ai un isinwheel m10 plus je veux savoir quel est son. Contrôler ses kelke modèle 48 v jexactenent et combien
Come si accende la bici?
What inside dimensions of pedal shaft
How do I turn off the assist and still have throttle
is there a way to make it go over 20
Is there a reset button by chance on the battery?
What is the circumference of the handlebars and stem on my Isinwheel M10 electric bike? Thank you!