
Related Manuals for iSinwheel U2


Summary of Contents for iSinwheel U2
- Page 1 Electric Bike USER MANUAL The manufacturer reserves the right to make changes to the product, and update this manual at any time. support@ebikelab.eu...
-
Page 2: Table Of Contents
CONTENTS 1. Product Overview 2. What’s Included 3. Installing Instructions 4. Charging Instructions 5. Riding Modes 6. Display and Settings 7. For Your Safety 8. Battery Maintenance 9. Cleaning 10. Storage 11. End-Of-Life Disposal 12. Parameters 13. Warranty 14. Contact Us NEED HELP?? Please contact us: Email: support@ebikelab.eu... -
Page 3: Product Overview
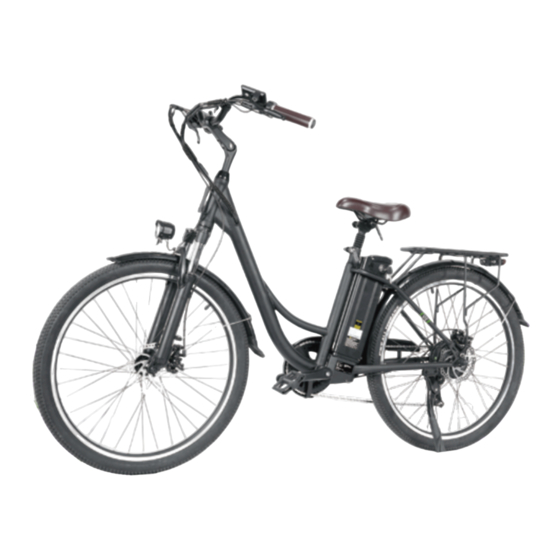
1. Product Overview LCD Display Shifter Grip Display Throttle Control LCD Display Stem Saddle Front Light Suspension Fork Seat Post Battery Motor Disc Brake Crankset Wheel Chain Pedals Tyre 2. In the Box 1x Bike Frame 1x Stem 1x Front wheel 1x Quick Release 1x Front fender + Rear Wheel... - Page 4 User’s Manual 3x Open-end 1x Charger 1x User Manual 2x Key 3x Hex Spanner Spanner Check the parts and accessories carefully. If there are missing or damaged parts/accessories, please contact online customer service support. 3. Assembly Instructions Before Assembly ● Please read this manual thoroughly and follow its instructions. ●...
- Page 5 3.2 Install the front wheel ● Find the front wheel. ● Remove the QR skewer from the fork. ● Loosen the thumb nut of the QR skewer and remove it. Make sure the small ends of the two cone springs face inwards. ●...
- Page 6 3.3 Install the front fender and light ● Pass the fender through the fork's lower ● Find the fender, and remove the legs and then tighten the bolts holding the bolts and spacers on the fork arch and the lower part of the fender. bolts at the bottom of the fork legs.
- Page 7 ● Place the handlebar correctly on the ● Use an appropriate hex spanner to gently stem. Trace the front brake cable directly unscrew the top cap that holds the stem to from the front brake caliper to the left the handlebar. handlebar and make sure the cables and wires are not twisted.
- Page 8 ● Adjust the seat so that the seat is parallel to the top tube. Close the QR lever to lock the seat with your palm or fingers. 3.6 Install the pedals ● Identify the correct sides by locating the 'R' and 'L' marks on the pedals. ●...
- Page 9 ● Find the rack and put it over the rear fender. Find the screw holes and tighten the screws and nuts on the seat stays. Pass the screws through the holes of the rack bottom eyelets and the fender brace eyelets in sequence, and tighten the screws on both sides.
- Page 10 3.9 Remove and install the battery For your convenience, the battery of U2 is designed to be removable. ● Find the flip lever and flip up the seat. ● Push and spin the key to the unlocked position. ● Pull out the battery carefully and lift it from the bike frame.
-
Page 11: Charging Instructions
● The charging time is about 6 hours. Prolonged charging may reduce battery life and perfor- mance. ● Only use the provided charger comes with U2 bike. If the official charger is lost or damaged, please contact Customer Service to obtain a replacement. -
Page 12: Riding Modes
5. Riding Modes Shifter Bike Computer Brake Lever Throttle Handlebar Front Light & Horn Button Thumb throttle Speed Modes Full Throttle Pedal Assist Turn on the E-bike and the smart display and you can switch the speed from 1 to 5 by pressing the thumb throttle . - Page 13 6. Display and Buttons Battery Level Speed Unit + Button Metric : KM/H Power Button Imperial : MPH - Button Value and Unit PAS Level Buttons Power/+/- Buttons Press to switch speed mode from 1 to 5 Hold for 2 seconds to power on/off Press to switch speed mode from 5 to 1 Front Light &...
- Page 14 2. Control and settings Power on/off control, front light on/off control, 6km/h inching control, wheel diameter setting, top speed setting, standby auto sleep time setting, backlight brightness setting, voltage level setting 3. UART Communication protocol: UART Full display information within 1 sec after power on front light battery level Multifunction display area...
- Page 15 Fault codes fault code note fault name (decimal) normal status retain brake PAS sensor fault (riding icon) Not implemented here 6km/h cruise control real-time cruise control battery undervoltage motor fault throttle fault control fault communication receiving fault communication transmitting fault BMS communication fault front light fault Customize settings...
-
Page 16: For Your Safety
7. For Your Safety For safe riding, please read the following information carefully. Before riding, be sure to check that your brakes are working normally. Before Your First Ride Check whether the quick-release screws and seat are firm and whether the brakes ●... -
Page 17: Battery Maintenance
● For your own safety and the safety of others, obey the speed limit, ride at a speed you are comfortable with, and be prepared to stop at any time. ● Keep a safe distance from other riders to avoid collisions. ●... -
Page 18: Cleaning
Notice ● Do not perform any maintenance while the e-bike is powered on or charged. ● Store or charge the battery within the temperature range of 20°C-25°C / 68°F-77°F. Do not pierce the battery. ● Do not attempt to disassemble the battery to avoid fire. ●... -
Page 19: End-Of-Life Disposal
11. End-of-Life Disposal ● This product cannot be disposed of by incineration, landfilling or mixing with household waste. Improper handling of the battery in this product may cause the battery to heat, rupture, or ignite, which could result in serious injury. The substances inside the battery pose a chemical risk to the environment. -
Page 20: Warranty
Item Parameters Charging Temperature 32~104 °F / 0~40 °C Warranty 1 Year Limited 13. Warranty Dear Customers Thank you for purchasing our lithium battery bicycle! After purchasing our products, please provide correct, complete, and true personal information and fill in the warranty card to ensure that you receive high-quality service. -
Page 21: Contact Us
14. Contact Us If you have problems related to riding, maintenance and safety, or errors/- failures with the U2 electric bike, please contact us. support@ebikelab.eu E-mail Service:...
Need help?
Do you have a question about the U2 and is the answer not in the manual?
Questions and answers
Can the front wheel quick release axle be replaced with a non- quick release axle?