Table of Contents
Advertisement
Quick Links
Table of Contents
1-1
1-2
1-3
1-4
2-1
2-2
2-3
2-4
2-5
2-6
2-7
3-1
3-2
3-3
3-4
3-5
OSD Language
3-6
4-1
4-2
4-3
4-4
2
4-5
2
4-6
3
4-7
3
4-8
4-9
4-5
6
6
7
8
8-9
5-1
9-10
5-2
5-3
10-11
5-4
11-12
5-5
12-13
13
6-1
14
6-2
14
6-3
14
14
6-4
15
-1-
Driver for PC
Installing the Applications
for PC
English
15-16
16-17
17
17
17-18
18-19
19
19
20
20-23
23-26
26-28
28-29
29-32
32-33
33-35
35-36
36-37
Advertisement
Table of Contents

Related Manuals for Genius G312


Summary of Contents for Genius G312
-
Page 1: Table Of Contents
Your Camera Images 16-17 Caution When MENU/ENTER Button Using the Camera Deleting Still Image Package Contents /Video Clip Chapter 2 Getting to Know Your Flash Button 17-18 Camera Digital Zoom 18-19 Names of Parts 4-10 Mode Display Button LED indicators... -
Page 2: Chapter 1 Attention
(such as a wedding ceremony or on vacation), do test the camera beforehand to ensure that it functions well. Any additional loss caused by the malfunction of this product (such as costs of photography or any loss of benefit generated by the photography) is not the responsibility of our company and no compensation will be given for it. -
Page 3: Caution When
● If water has entered the camera, immediately turn the power OFF and remove the batteries. ● How to maintain your camera: 1. If the lens, LCD monitor or viewfinder surface is dirty, please use a lens brush or soft cloth to wipe the surface clean instead of touching the lens with your fingers. -
Page 4: Chapter 2 Getting To Know Your Camera
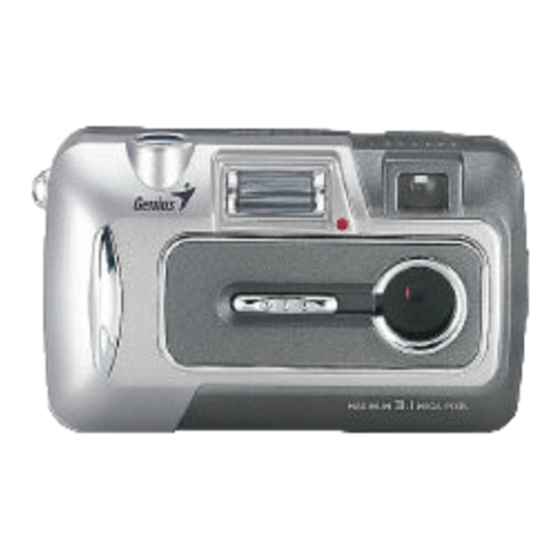
English Chapter 2 Getting to Know Your Camera 2-1 Names of Parts Front & Side View Shutter Button Lens Flash Macro mode Lens Cover/ Power Button Portrait and Landscape mode Viewfinder window Terminal Cover Self-timer LED... -
Page 5: Rear View
English Rear View Power LED Mode Dial Flash LED MENU/ENTER Button LCD Monitor Multi-Select Button Flash Button (10) Battery Cover Mode Display /Power Button Strap Holder... -
Page 6: Led Indicators
English 2-2 LED Indicators This is what the LED indicators located on the top of LCD monitor mean: Power Mode Flash Mode (Green LED) (Red LED) 2-3 LCD Monitor Display White balance display Current working mode (Single, Self-timer photography, Multi Shot) -
Page 7: Power Supply
English 2-4 Power Supply ● Slide the lens cover toward the left gently, the camera will turn on after you hear two beeps. ● Slide the lens cover toward the right gently to turn off the camera. ● Use the lens cover located on the front of the camera to turn on/off camera. After you turn on the camera, the red LED will be blinking, and then the last image recorded appears on the LCD monitor. -
Page 8: Mode Dial
English 2-5 Mode Dial You can select the working mode by using this Mode Dial: Mode Description Use this mode to adjust camera settings. 1. SET Setup mode Use this mode to record video (movie) clips. Movie mode Use this mode to view images / video clips, delete... -
Page 9: System Requirements
Dimensions: 95.8 x 56.6 x 37. 9 mm (WxHxD) (without protruding parts) Weight: About 120g (batteries excluded) 2-7 System Requirements Please refer to the minimum system requirements for the digital camera. We recommend that you use a co mputer syste... -
Page 10: Chapter 3 Getting Started
English System requirements (Windows) Pentium 166 MHz processor or higher Windows 98/98SE/Me/2000/XP 32MB RAM (64MB recommended) Memory Free Space on 128MB hard disk space Hard Disk Required A CD-ROM drive, An available USB port Devices Color monitor (800x600, 24-bit or higher... -
Page 11: Loading Batteries
Slide the switch on the ba ttery cover in the direction indicated by the arrow. ● Insert the batteries a indicated on the inner side of the cover. -
Page 12: Loading And Removing
English NOTE not open the cover roughly to avoid damaging the battery compartment cover. If the battery power indicator shows only one black block that means that power is vailable, and you can continue to use the flash. When the battery indicator turns red, you cannot take still pictures or movies any more. -
Page 13: The Memory Card
● There is 16MB internal memory built-in to the camera to save your data: If there is a memory card inserted, it will be the top priority for saving data. If you want to store data in the internal memory, please remove the memory card first. -
Page 14: Date/Time
English Before using the camera, please turn the Mode Dial to Setup Mode and then select "Language" to set the OSD language. -6 Date/Time Before using the camera, please turn the Mode Dia l to Setup Mode and then select "Date/Time"... -
Page 15: Imaging Tips
For a successful image, please follow these suggestions. Hold the camera level with both hands and brace your elbows lightly against your body. Take care to keep your fingers, hair and the camera strap away from the camera lens Use th e viewfinder or image LCD display to frame your shot. -
Page 16: Displaying Thumbnail Images
LCD display. NOTE The VIDEO OUT function is highly power consumptive. So the batteries may need to be replaced sooner than normal. 4-5 Displaying Thumbnail Images This function allows you to view nine thumbnail images on the image LCD display simultaneously s u may search for a particular image. -
Page 17: Menu/Enter Button
3. To delete the pictures recorded in the camera (internal memory), do not insert any memory card or the camera will not be able to read the internal data with an external memory card attached. 4. External memory (memor y card) always has priority over internal memory –... -
Page 18: Digital Zoom
Select this mode for general photography. ﹝ ﹞ The flash emits a precursor-flash before the main flash fires. This causes the pupil in the human eye to constric Red-eye Reduction ﹝ ﹞ reducing the red-eye. Select this mode when taking pictures of people and animals in low-light conditions. -
Page 19: Mode Display Button
4. Press the shutter button to capture a “ zoomed” image. 4-10 Mode Display Button 1. This button is only working in the Record Mode. Press this button and you can change the LCD monitor to several displays. Full Display... -
Page 20: Portrait And Landscape Button
English -12 Portrait and Lan dscape Button 1. Open the lens cover, then the mode dial to mode, and power on the camera. 2. Move the focus switch loc ated on the front side of the camera to the position. -
Page 21: Image Resolution
English 6. After ten seconds, the camera takes an image. In the first 7 seconds, the self-timer indicator blinks at a relatively slow rate and then blinks rapidly for the last 3 seconds. Multi-Shot This function allows you to capture the continuous moving images. After photography is... -
Page 22: White Balance
English image and how many images can be stored in the internal memory or on the memory card. The higher q uali ty pro es a less compressed image but takes up more m emory space. Lower quality takes up... -
Page 23: Play Mode
1. Turn the Mod e Dial to Play Mode 2. Use the lens cover located on the front of the camera to turn on the camera. After you turn on the camera, the last image recorded appears on the LCD monitor. Auto Play... -
Page 24: Delete All
To stop the slid eshow display, press the MENU/ENTER button. elete One 1. Click on the Power button to turn on the camera, and toggl the MODE butto n to select the mode. 2. Select the image/video... - Page 25 DPOF allows you to embed printing information on your memory card. Using DPOF you can select an image to be printed and then specify how many prints you would like. You connect your memory card to a DPOF enabled printer that accepts SD memory cards.
-
Page 26: Setup Mode
Use the lens cover loca ted on the front of the camera to turn on/off camera. After you turn on the camera, the red LED will be blinking, and the Setup screen will be shown on the LCD monito LANGUAGE Sets the OSD menu language. -
Page 27: Auto Power Off
2. When you use this function; please use the video cable provided with the camera to connect the camera and output device. 3. You can turn on the camera. There will no images shown on the LCD Monitor. All the -27-... -
Page 28: Movie Mode
While using the camera, after you connect the video cable to the camera, the images will be no longer shown on the LCD Monitor. If you want to restore the display status on the LCD Monitor, please disconnect the video cable from the camera. -
Page 29: Using This Camera As A Pc Camera
4. Turn the Mode Dial to Movie Mode 5. Use the lens cover located on the front of the camera to turn on the camera. After you turn on the camera, the last image recorded appears on the LCD monitor. - Page 30 PC CAMERA is displayed on the image LCD display. Position the camera steadily on top of your computer monitor Turn your PC on if it isn’t already on. Click the Start button in the Windows Taskbar, and select Programs > ArcSoft VideoImpression > VideoImpression. The following VideoImpression main screen will appear.
- Page 31 English Click the New button and the following Album screen will appear. Click on Capture and the Capture screen will appear. -31-...
-
Page 32: Chapter 6 Driver Installation
Chapter 6 Driver Installation 6-1 Installing the Camera Driver to the PC You can use the PC Camera and Mass Storage functions of the camera via PC. To install the proper camera driver, just follow this: 1. Insert the software CD-ROM supplied with the package into the CD-ROM drive. - Page 33 2. The Auto-run program will be executed and the welcome screen appears. If your CD-ROM drive doesn't support the auto-run function, double click on the "My Computer" icon on the desktop. Then double click on the CD-ROM drive icon and click the Setup.exe file in the root directory.
- Page 34 English 6. Enter Software License Agreement window. Please click Yes to continue the installation. 7. Please follow the instructions of the installation Wizard to select a destination folder and the components you need. -34-...
-
Page 35: Downloading Photos/Video From Camera
English 8. Please select the program folder you want to install 9. When the installation is completed, the window below will appear. Click Finish to end the installation. 6-3 Downloading photos/video from camera Turn on your PC if it isn’t on already. Click on the PhotoImpression icon in the Windows Desktop, or choose Start >... -
Page 36: Transferring Recorded Images To Your Computer
You can share recorded images/video clips with your family or friends via e-mail or post them on the Web. Before doing those things, you need to connect the camera to your computer by using the USB cable and then transfer the images/video clips. To transfer... - Page 37 7. Your recorded images/video clips will be in a folder on this “removable disk”. Step 3: Downloading Images/Video Clips When the camera is turned on and connected to your computer, it is considered to be one disk drive. You can download images/video clips by copying them from the “removable disk”...
Need help?
Do you have a question about the G312 and is the answer not in the manual?
Questions and answers