Table of Contents
Advertisement
Quick Links
Download this manual
See also:
Service Manual
Table of Contents
1-1
1-2
1-3
1-4
2-1
2-2
2-3
2-4
2-5
2-6
2-7
3-1
3-2
3-3
3-4
3-5
3-6
4-1
4-2
4-3
2
4-4
2
4-5
3
4-6
3
4-7
4-8
4-5
4-9
6
6
7
8
8-9
9-10
5-1
5-2
10-11
5-3
11-12
5-4
5-5
12-13
13
6-1
14
14
6-2
14
6-3
14
15
-1-
Driver for PC
Installing the Applications
for PC
English
15-16
16-17
17
17
17-18
18-19
19
19
20
20-23
24-27
27-30
30
30-36
36
37-39
39-40
Advertisement
Table of Contents

Subscribe to Our Youtube Channel
Related Manuals for Genius G511


Summary of Contents for Genius G511
-
Page 1: Table Of Contents
Your Camera Displaying Thumbnail Caution When Images 16-17 Using the Camera MENU/ENTER Button Package Contents Deleting Still Image Chapter 2 Getting to Know Your /Video Clip Camera Flash Button 17-18 Names of Parts Digital Zoom 18-19 LED indicators 4-10 Mode Display Button... -
Page 2: Chapter 1 Attention
(such as a wedding ceremony or on vacation), do test the camera beforehand to ensure that it functions well. Any additional loss caused by the malfunction of this product (such as costs of photography or any loss of benefit generated by the photography) is not the responsibility of our company and no compensation will be given for it. -
Page 3: Caution When
● If water has entered the camera, immediately turn the power OFF and remove the batteries. ● How to maintain your camera: 1. If the lens, LCD monitor or viewfinder surface is dirty, please use a lens brush or soft cloth to wipe the surface clean instead of touching the lens with your fingers. -
Page 4: Chapter 2 Getting To Know Your Camera
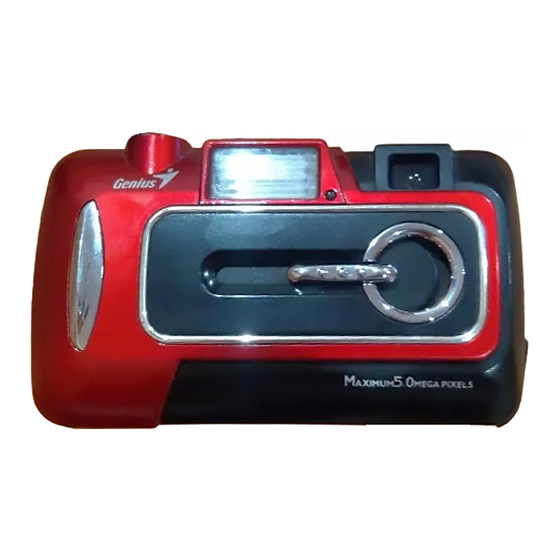
English Chapter 2 Getting to Know Your Camera 2-1 Names of Parts Front & Side View Shutter Button Lens Flash Macro mode Lens Cover/ Power Button Portrait and Landscape mode Viewfinder window Terminal Cover Self-timer LED... -
Page 5: Rear View
English Rear View Power LED Mode Dial Flash LED MENU/ENTER Button LCD Monitor Multi-Select Button Flash Button (10) Battery Cover Mode Display /Power Button Strap Holder... -
Page 6: Led Indicators
English 2-2 LED Indicators This is what the LED indicators located on the top of LCD monitor mean: Power Mode Flash Mode (Green LED) (Red LED) 2-3 LCD Monitor Display White balance display Current working mode (Single, Self-timer photography, Multi Shot) -
Page 7: Power Supply
English 2-4 Power Supply ● Slide the lens cover toward the left gently, the camera will turn on after you hear two beeps. ● Slide the lens cover toward the right gently to turn off the camera. ● Use the lens cover located on the front of the camera to turn on/off camera. After you turn on the camera, the red LED will be blinking, and then the last image recorded appears on the LCD monitor. -
Page 8: Mode Dial
English 2-5 Mode Dial You can select the working mode by using this Mode Dial: Mode Description Use this mode to adjust camera settings. 1. SET Setup mode Use this mode to record video (movie) clips. Movie mode Use this mode to view images / video clips, delete... -
Page 9: System Requirements
Movie File: Recording 200 sec. continuous movie file with QVGA (320 x 240) format (16MB internal memory) The table below shows the approximate number of shots that you can take at each setting based on 16MB internal memory. Quality/Resolution 1024 x 768 1600X1200 2048X1536 2592x1944... -
Page 10: Chapter 3 Getting Started
Color monitor (80 0x600, 24-bit or higher Color Monitor recommended) Chapter 3 Getting Started 3-1 Attaching the Strap ● Insert t he thin end of strap into the strap holder. ● Pass the other end of strap thro ugh the loop. -10-... -
Page 11: Loading Batteries
● Turn off the power of camera. Insert 2 x AA alkaline batteries or a rechargeable battery. Please make sure the batteries are full of power. If the batteries are low, please change new batteries as soon as possible to keep the camera operating normally. -
Page 12: Loading And Removing The Memory Card
English When the battery indicator turns red, you cannot take still pictures or movies any more. Any pre-setting date/time value will be retained in the camera's memory for about 3 minutes when replacing the batteries. We still suggest you to double check the date/time setting after changing new batteries. -
Page 13: The Memory Card
● The specification of a memory card applicable to this camera is SD or MMC (4/8/16/32/64/128/256/512MB). ● If inserting the memory card in the wrong direction, it will not fit. Do not insert the card roughly to avoid damage. ● If the camera detects no memory card, please gently wipe the metal interface of the card with a soft cloth and reload the card again. -
Page 14: Date/Time
English 3-6 Date/Time Before using the camera, please turn the Mode Dial to Setup Mode and then select "Date/Time" to set the date and time. Chapter 4 Basic Operation 4-1 Recording a Still Image To record a still image, perform the following: 1. -
Page 15: Viewing Still Image
In the mode, you can view still images/video clips stored in the camera’s internal or card memory on the image LCD display. You can also connect the camera to a TV monitor in this mode to playback the still images/video clips. -
Page 16: Displaying Thumbnail Images
1. Set the appropriate video output mode (NTSC/PAL) corresponding to your TV standard. From the SETUP, select VIDEO MODE. 2. Connect one end of the video cable to the video output connector of your camera. 3. Connect the other end of the video cable to the video port of your television. -
Page 17: Menu/Enter Button
Delete One and Delete All 1. Recorded images in the memory card cannot be deleted when it is write-protected. 2. To delete the pictures recorded in the memory card, make sure to insert the card before deletion. 3. To delete the pictures recorded in the camera (internal memory), do not insert any memory card or the camera will not be able to read the internal data with an external memory card attached. -
Page 18: Digital Zoom
3. Compose the picture and press the shutter button. This button is only working in the Record Mode. The camera has four flash modes: Automatic Flash, Red-Eye Reduction, Fill Flash (on), and Flash Off (default). The modes appear cyclically when you press the button on the rear side of the camera. -
Page 19: Digital Zoom
4X digital zoom function. 4. Press the shutter button to capture a “zoomed” image. 4-10 Mode Display Button 1. This button is only working in the Record Mode. Press this button and you can change the LCD monitor to several displays. Full Display... -
Page 20: Portrait And Landscape Button
4-12 Portrait and Landscape Button 1. Open the lens cover, then the mode dial to mode, and power on the camera. 2. Move the focus switch located on the front side of the camera to the position. 3. Compose the picture. -
Page 21: Image Resolution
6. Press the shutter button. The self-timer function is activated. 7. After ten seconds, the camera takes an image. In the first 7 seconds, the self-timer indicator blinks at a relatively slow rate and then blinks rapidly for the last 3 seconds. -
Page 22: Image Quality
MENU/ENTER button to confirm the selection. Image Quality The image quality determines the compression ratio of your image and how many images can be stored in the internal memory or on the memory card. The higher quality produces a less compressed image but takes up more memory space. -
Page 23: White Balance
English WHITE BALANCE Automatic white balance is recommended for most cases. For particular circumstances, you may manually select another white balance preset according to the ambient lighti ng con dition Click the Power button on camera, and toggle the MODE dial to select the mode. -
Page 24: Play Mode
English 5-2 Play Mode In Play Mode, users can review the recorded still and movie pictures. To review the pictures, perform the following: 1. Turn the Mode Dial to Play Mode 2. Use the lens cover located on the front of the camera to turn on the camera. After you turn on the c amera, the last image recorded appears on the LCD monitor. -
Page 25: Delete One
English Delete One Click the Powe r button to turn on the camera, and toggle the MODE button to select mode. Press the button until thumbnail screen appears on the display screen. 3. Press the MENU/ENTER bu on, then se... - Page 26 A memory card cannot be formatted if it is write-protected. DPOF (Digital Print Order Format) DPOF allows you to embed printing information on your memory card. Using DPOF you can select an image to be printed and then specify how many prints you -26-...
-
Page 27: Setup Mode
English would like. You connect your memory card to a DPOF enabled printer that accepts SD memory cards. The DPOF/card-compatible printer will read the embedded information on the memory card and print your images as specified. Click the Powe r button to turn on the camera, and toggle the MODE button to select mode. -
Page 28: Auto Power Off
English turn on the camera, the green LED will be bright, and the Setup screen will be shown on the LCD monitor. LANGUAGE Sets the OSD menu language. 1. Use the button to highlight LANGUAGE Press the MENU/ENTER button to confirm the selection. - Page 29 Setup Mode and select the correct video output type for your selection: NTSC or PAL. 2. When you use this function; please use the video cable provided with the camera to connect the camera and output device. You can turn on the camera.
-
Page 30: Movie Mode
4. Turn the Mode Dial to Movie Mode 5. Use the lens cover located on the front of the camera to turn on the camera. After you turn on the camera, the last image recorded appears on the LCD monitor. -
Page 31: Using This Camera As A Pc Camera
3. Connect one end of the USB cable to an available USB port on your computer. 4. Connect the other end of the USB cable to the USB connector on the camera. 5. Position the camera stead ily on top of your computer monitor... - Page 32 Step 3:Running software application (for example: ArcSoft ideoImpression) urn your PC on if it isn’t already on. Click the Start button in the Windows Taskbar, and elect Programs > ArcSoft VideoImpression > VideoImpression. The following ideoImpression main screen will appear.
- Page 33 Capture and the Capture screen will appear. Then click on Record and you can capture the video. If you want to stop capturing, press ESC or click on Pause Function description for the major icon (Genius TWAIN UI) -33-...
- Page 34 Exit the Genius VideoCAM Series UI. Convert AVI files into MPEG-1 format NOTE Make sure to install the USB driver before connecting the device otherwise unable to install properly. If you encounter problems, uninstall the driver and software then follow the proper installation.
- Page 35 Function description for the security monitoring system icon. (Genius TWAIN UI) You can record any movements that appear in front of your monitor automatically. It can also record anytime until the HD is full. If there’s no movement, it will shut down automatically...
-
Page 36: Chapter 6 Driver Installation
Chapter 6 Driver Installation 1 Installing the Camera Driver to the PC can use the PC Camera and Mass Storage functions of the camera via PC. To install proper camera driver, just follow this 1. Insert the software CD-ROM supplied with the package into the CD-RO M drive. - Page 37 Auto-run program will be executed and the welcome screen appears. If your CD-ROM drive doesn't support the auto-run function, double click on the "My Computer" icon on the pc. Then double click on the CD-ROM drive icon and click the Setup.exe file in the root directory.
- Page 38 English 7. Please follow the instructions of the inst alla tion Wizard to select a destination folder and the components you need. 8. Please select the program folder you want to install -38-...
-
Page 39: Transferring Recorded Images To Your Computer
English 9. When the installation is completed, the window below will appear. Click Finish to end the installation. 6-3 Transferring Recorded Images to Your Computer You can share recorded im ages/video clips with your family or friends via e-mail or post them on the Web. - Page 40 Your recorded images/video clips will be in a folder on this “removable disk”. Step 3: Downloading Images/Video Clips When the camera is turned on and connected to your computer, it is considered to be one disk drive. You can download images/video clips by copying them from the “removable disk”...
Need help?
Do you have a question about the G511 and is the answer not in the manual?
Questions and answers