Table of Contents
Advertisement
Quick Links
Advertisement
Table of Contents

Related Manuals for ADVANCED SIMRACING ASR4


Summary of Contents for ADVANCED SIMRACING ASR4
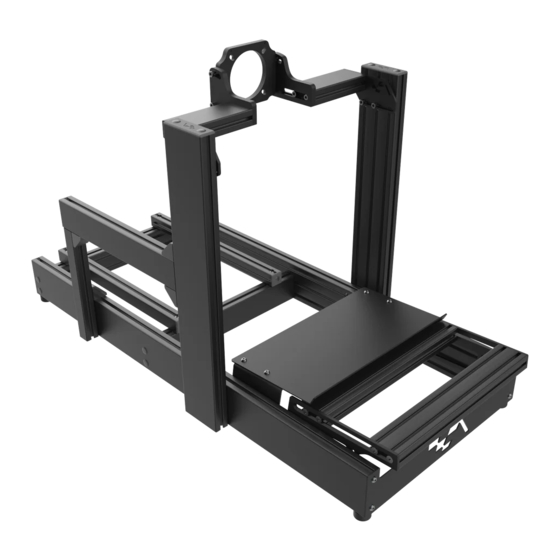
- Page 1 ASR4 Chassis ASSEMBLY AND USER GUIDE...
-
Page 2: Table Of Contents
Table of Contents Required Tools ............................1 Content of packages .......................... 2 Common Content ........................... 2 Wheel Deck Components ......................4 Assembly guide ............................. 5 Main Chassis ............................ 5 Pedal Tray ............................18 Wheel Deck ............................ 19 Seat Install ............................20 Adjustable feet Add-on ...................... -
Page 3: Required Tools
Required Tools 6mm Allen key 5mm Allen Key Flathead screwdriver Tape Measure For questions, issues or comments, feel free to reach our support team! https://www.advancedsimracing.com/pages/advanced-help-center... -
Page 4: Content Of Packages
Content of packages Boxes 3X Chassis boxes, 1X Hardware box ,1X Pedal tray box ,1X Wheel deck box Common Content Front Plate – 1X M8 X 12 button Corner Gusset & Cover head screw – 4X 16X each M8 X 16 M8 T-Nuts –... - Page 5 Pedal Tray Components Steel Pedal Tray specific components Steel Pedal Plate – 1X Aluminium Pedal Tray/heel rest/adjustable feet combo specific components 3” X 18.5” Extrusion – 2X Pedal Tray Side Plate Pedal Tray Side Plate Left – 1X Right – 1X M8 Flat Head M8 X 12 Socket M8 T-Nuts –...
-
Page 6: Wheel Deck Components
Wheel Deck Components Deck to Up Post plate – 2X 3” X 7.5” Extrusion – 2X Push Pin – 4X 3” End Cap – 2X M8 X 16 Flat Head Screw - 8X Option 1: Standard Wheel Deck Standard Mount – 1X Option 2: Direct Drive Wheel Deck Asetek plate –... -
Page 7: Assembly Guide
Assembly guide Main Chassis Assemble 8 X corner gussets with 2 M8 screws and 2 M8 T-Nuts. Screw in the T-Nuts no more than ½ a turn. Make sure to respect the shown orientation of the T-Nuts for trouble-free assembly. Slide the gussets on either side of the 19”... - Page 8 Measure 22” as shown and tighten fully. You can cap up the Corner gussets. If using adjustable legs, follow the “Adjustable feet Add-on” instruction at the end of the manual and skip to step 7 Loosely assemble the rubber feet with the M6 X 20 screw and M6 T-Nut.
- Page 9 7. Follow the Pedal Tray Assembly section. The Steel pedal tray is shown, installation is also valid for the aluminium pedal tray. Assemble 4 X M8 X 16 Socket screws and 4X M8 T-Nuts on the pedal tray sides. Screw in the T-Nuts no more than a turn. Slide the pedal tray through the 50”...
- Page 10 Assemble the up-post plate using 4X M8 X 20 flat head screws through the conical holes, 4X M8 X 20 socket screws from the opposite side and 8X M8 T- Nuts. Repeat for both plates. Slide the plate through the bottom of the 4.5” X 30” extrusion. Repeat for both 30”...
- Page 11 Slide the assembled posts from the front, through the sides of the 4.5” X 50” extrusion. Place the posts at 19” from the front. Don’t tighten yet!
- Page 12 Prepare 4 corner gussets with the following twist : Using the flathead screwdriver, slide the flathead under the small tab on the bottom, and pry out the tab. It will snap at the base. Snap off both tabs on one side. Prepare the snapped gussets with 1X M8 T-Nut and 1X M8 X 16 socket screw each, on the side where the...
- Page 13 Place 2X T-Nuts on each of the 3” X 19” that run across. Use the technique at the page “T-Nut install tip” Further in this manual if you struggle with placing the t-nut! Loosely screw the 1.5” X 22” extrusions to the chassis using 4X M8 X 16 socket screws.
- Page 14 19. Follow the Wheel Deck Assembly Section. Installation is the same wether you have the standard or Direct Drive Wheel Deck. Prepare the Wheel Deck with 4X T-Nuts and 4X M8 X 16 socket screws. Screw in the T-Nuts no more than ½ a turn. Slide the Wheel Deck through the top of the Up Post Channels.
- Page 15 Fully tighten the up-post plates. Prepare 2X corner gussets with 2X M8 X 16 socket screws and 2X M8 T-Nuts. Slide them on either side of the 3” X 19” extrusion.
- Page 16 Slide the assembled extrusion through the top of the desired up-post (depending if you want a RHD or LHD setup, a LHD setup is shown). Slide it down to about the middle, don’t tighten yet. Prepare the shifter arm lower bracket with 1X M8 X 20 flat head screw, 2 M8 X 20 socket head screws and 3X M8 T-Nuts.
- Page 17 Attach the shifter arm bracket to the 1.5” X 16” extrusion. Tighten at 3” from the end of the extrusion. Then prepare and place a corner gusset at 3” from the other end on the extrusion, as shown. Tighten fully to the extrusion. Slide the corner gusset through the bottom of the 3”...
- Page 18 Install the front plate using 4X M8 button head screws. Tighten Fully. For the finishing touches, cap all the visible open extrusion ends using the corresponding endcap and pushpins.
- Page 19 Congratulations on your new ASR4 Simracing Chassis!
-
Page 20: Pedal Tray
Pedal Tray The steel pedal tray requires no assembly. Can’t say that about the aluminium one though! Follow the steps here before completing your ASR4 if you’ve got the aluminium pedal tray. Assemble the Pedal Tray sides with the 3” X 18.5” extrusions using 8 M8 flat head screws. -
Page 21: Wheel Deck
Wheel Deck Standard Wheel Deck 1. Assemble the side plate to the 3” X 7.5” extrusion using 2X M8 X 16 flat head screws. Repeat for both sides, tighten fully. 2. Using 4X M8 X 12 flat head screws and 4X M8 T-Nuts, install the wheel plate as shown below. -
Page 22: Seat Install
Front Mount Wheel Deck 1. Assemble the side plate to the 3” X 7.5” extrusion using 2X M8 X 16 flat head screws. Repeat for both sides, tighten fully. 2. Assemble the center plate to the 3” X 7.5” extrusion using 2X M8 X 16 flat head screws. -
Page 23: Adjustable Feet Add-On
Adjustable feet Add-on The Aluminium pedal tray package also includes adjustable feet. They slightly improve ingress in the cockpit by raising the chassis higher and allows level compensation for an uneven man cave floor. The feet will assemble as such. Assemble them at the same height first, Make sure to have 2 mirrored and not all 4 on the same side! -
Page 24: T-Nut Install Tip
T-Nut install tip Insert an M8 T-Nut in the desired slot of the extrusion. Insert the T-nut perpendicular, and with the help of a small allen key in your attire such as a 3mm, pry the T-nut straight with the allen key through the hole. The t-nut will snap into place when in position. -
Page 25: User Guide
User Guide Pedal tray adjustment Both aluminium and steel pedal tray are adjusted in the same fashion. You can slide the T-nut/screw assembly either through the bottom, middle or top channel of the extrusion, and you can position it however high or low. Make sure to have your pedals already properly setup before placing the pedal tray! Tighten fully the 4 screws holding the pedal tray before use, you may want to verify a second time just to be sure. -
Page 26: Wheel Deck Adjustment
Wheel deck adjustment The standard wheel deck can be adjusted using the Up Post brackets. With your wheel installed, loosen 3 out of the 4 screws and place yourself in the rig. Slowly loosen the last screw until you feel the wheel deck moving. It will most probably drop with the weight of the wheel so be careful! You can then place the wheel according to your preference in height and angle and tighten when the position is satisfactory. -
Page 27: Accessories
Accessories Have you thought about accessories? Mounting plates for your shifter or handbrake, keyboard tray, cable management brackets, etc. We got you. Have a look through our catalog! https://www.advancedsimracing.com/collections/accessories-parts-for-the-chassis...
Need help?
Do you have a question about the ASR4 and is the answer not in the manual?
Questions and answers