Table of Contents
Advertisement
Quick Links
Advertisement
Table of Contents

Related Manuals for Videx 4812/4G


Summary of Contents for Videx 4812/4G
- Page 1 4G DIGITAL GSM 4000 Series Vandal Resistant Digital GSM Audio Intercom with Proximity 4812/4G and 4812R/4G VR4812/4G and VR4812R/4G Technical Manual We recommend 66251750-4G-EN This equipment is installed by a V2.0 - 10/05/22 Competent Electrician, Security or Communications Engineer.
- Page 2 This technical manual has been written and revised carefully. The guidance and the descriptions which are included in it are in reference to VIDEX parts and are correct at the time of print. However, subsequent VIDEX parts and technical manuals, can be subject to changes without prior notice.
-
Page 3: Table Of Contents
4000 Series Vandal Resistant Digital GSM Audio Intercom with Proximity Contents Introduction.......................................4 System Components and Available Versions ..........................6 Digital 4G GSM Technical Information............................10 Wiring Diagrams..................................... 12 Auxiliary Input & Output ................................14 USB & RS485 Connection to a PC..............................16 Connection to a Reader, Keypad or Relay............................. -
Page 4: Introduction
Alternatively a limited number of programming features can be carried out using the Videx SMS Wizard (for administrators) or for more in depth programming using the Videx SMS Wizard PRO (for installers), refer to notes the GSM mobile Apps on page 68. - Page 5 SIM card and telephone number on the existing account. For more information regarding this contact the SIM card provider or visit their website, as this is a service is not provided by Videx.
-
Page 6: System Components And Available Versions
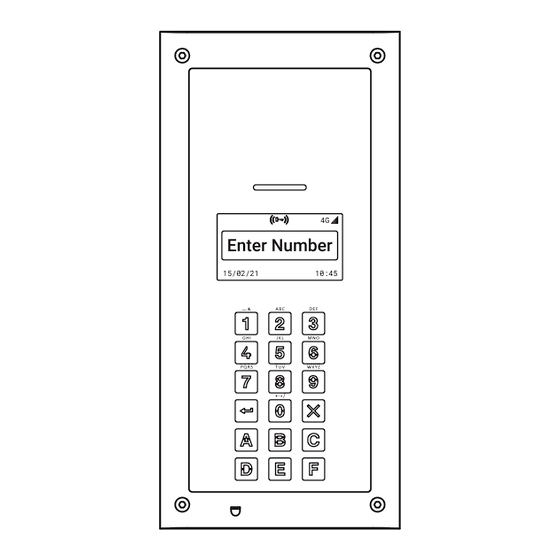
Fig. 2 Fig. 3 Fig. 4 The Art.4812/4G and Art.VR4812/4G has 18 back lit buttons, 6 of which are alpha buttons (A - F), 10 of which are numeric buttons (0 - 9), plus an “ENTER” and a “CLEAR” button. The Art.4812R/4G and Art.VR4812R/4G has 15 back lit buttons, 10 of which are numeric buttons (0 - 9), plus an “ENTER”... - Page 7 Alternatively a limited number of programming features can be carried out using the Videx SMS Wizard (for administrators) or for more in depth programming using the Videx SMS Wizard PRO (for installers), refer to notes the GSM mobile Apps on page 68.
- Page 8 4000 Series Vandal Resistant Digital GSM Audio Intercom with Proximity System Components and Available Versions ART. 434 GSM ANTENNA & ART. 434 BLOCK ANTENNA The Art.434 GSM antenna, Fig.8, connects to the SMA female bulkhead connection on the rear of the 4G digital GSM panel. A GSM antenna with an SMA male connector should be used (see Fig.8 inset).
- Page 9 IMPORTANT NOTE: ALTHOUGH ALL THE FEATURES AND GENERAL INSTALLATION INSTRUCTIONS MENTIONED IN THIS TECHNICAL MANUAL MAKE REFERENCE TO THE ART.4812/4G AND ART.4812R/4G DIGITAL GSM INTERCOMS THE SAME FEATURES AND INSTRUCTIONS CAN ALSO BE APPLIED WHEN INSTALLING THE VR4812/4G AND VR4812R/4G DIGITAL GSM INTERCOMS RESPECTIVELY.
-
Page 10: Digital 4G Gsm Technical Information
4000 Series Vandal Resistant Digital GSM Audio Intercom with Proximity Digital 4G GSM Technical Information ART. 4812/4G & 4812R/4G DIGITAL GSM PANEL 103mm Enter Number Enter Number Or Search Art. VR4812/4G Art. VR4812R/4G 24/07/21 08:35 24/07/21 08:35 Art. 4812/4G Art. 4812R/4G Fig. - Page 11 DESCRIPTION There are two vandal resistant 4000 series digital 4G GSM panels available, see Fig.9 - Art.4812/4G with standard input keypad (1-9, ENTER, 0 and CLEAR) and alpha-numeric (A-F) buttons and also the Art.4812R/4G with standard input keypad (1-9, ENTER, 0 and CLEAR) and name search and scroll facility buttons.
-
Page 12: Wiring Diagrams
4000 Series Digital GSM Audio Intercom with Proximity Wiring Diagrams LOCK RELEASE AND VOLT FREE CONNECTIONS Fig.11 below shows connections for a fail secure and a fail safe lock release and also volt free contacts. RS485 RS485 Fail Safe Volt Free Lock Release Contacts Art.434 or... - Page 13 4000 Series Digital GSM Audio Intercom with Proximity Wiring Diagrams TRADE INPUT AND PUSH TO EXIT INPUT CONNECTIONS Fig.12 below shows connections for the trade input using an Art.701T timeclock (in timeclock mode) and Fig.13 shows connections for the push to exit input using a push-to-make (normally open going closed) switch/button. Digital GSM intercom with registered SIM inserted &...
-
Page 14: Auxiliary Input & Output
4000 Series Digital GSM Audio Intercom with Proximity Auxiliary Input & Output AUXILIARY OUTPUT (AO) WHEN SET TO MODE 000 (ON DURING A CALL) Fig.14 below shows the connection for auxiliary output AO when the AOM mode is set to 000. The auxiliary output AO will activate once a call to an apartment has been made and will stay activated for the duration of the call. - Page 15 4000 Series Digital GSM Audio Intercom with Proximity Auxiliary Input & Output AUXILIARY OUTPUT (AO) WHEN SET TO MODE 002 (CALL ACTIVATED) Fig.16 below shows the connection for auxiliary output AO when the AOM mode is set to 002. The auxiliary output AO will activate once a call to an apartment has been made and will stay activated for the programmed auxiliary output time A1T.
-
Page 16: Usb & Rs485 Connection To A Pc
4000 Series Digital GSM Audio Intercom with Proximity USB & RS485 Connection to a PC CONNECTIONS TO A PC The digital GSM intercom also includes two options for connecting to a PC: via a USB connection or via an RS485 connection. Both methods of connection are to allow for ease of programming and monitoring using the GSMSK PC software. -
Page 17: Connection To A Reader, Keypad Or Relay
GSMSK_66251720-EN_V2-2 (or later) if using the GSMSK PC software or by using the GSM mobile apps: the Videx SMS Wizard (for administrators) or for more in depth programming using the Videx SMS Wizard PRO (for installers). - Page 18 4000 Series Digital GSM Audio Intercom with Proximity Connection to a Reader, Keypad or Relay ART. 2813 NETWORK CONNECTION USING RS485 Like both the Art.4850R reader and the Art.4903 keypad the Art.2813 remote relay, Fig.21 can also be connected to the digital 4G GSM module via the RS485 bus terminals, Fig.22.
-
Page 19: General Directions For Installation
Videx DO NOT recommend these types of cable. GENERAL INSTALLATION NOTES •... - Page 20 The system MUST be installed in accordance with the current I.E.T. regulations (in particular I.E.T. Wiring Regulations, Eighteenth Edition BS7671:2018 for the UK), or the appropriate standards of your country if installing overseas, in particular Videx recommends: • Connecting the system to the mains through an all-pole circuit breaker (refer to Fig.28) which shall have contact...
- Page 21 IMPORTANT NOTE: IT IS IMPORTANT TO REGULARLY MAINTAIN THE “UP KEEP” OF THE GSM PANEL (CLEANING AND GENERAL MAINTENANCE ETC.) ANY FAULT OR DAMAGE THAT MAY OCCUR TO THE GSM PANEL DUE TO THE LACK OF CLEANING AND MAINTENANCE IS NOT THE RESPONSIBILITY OF VIDEX. 4000 Series Vandal Resistant Digital GSM - Technical Manual - 21 - 66251750-4G-EN - V2.0 - 10/05/22...
-
Page 22: Fitting The Sim & Connecting Power
Fig. 38 firmware version number, as shown in Fig.38. 4. After a further 10 seconds the GSM will emit a beep and below the Videx logo it will indicate the digital GSM is registering with the network, as shown in Fig.39. -
Page 23: Reset Procedure
4. After a brief delay the display will show the Videx GSM logo and current firmware version number, as shown in Fig.42. Fig. 42 5. After another delay the GSM will emit a beep and below the Videx logo it will indicate the digital GSM is registering with the network, as shown in Fig.43. VIDEX 6. -
Page 24: 4000 Series Back Box Installation
4000 Series Vandal Resistant Digital GSM Audio Intercom with Proximity 4000 Series Back Box Installation EXAMPLE: INSTALLING A 4000 SERIES TWO MODULE SURFACE BACK BOX (ART. 4882) Fig. 47 Fig. 48 Fig. 49 Fig. 50 Fig. 51 Fig. 52 Fig. 53 Fig. - Page 25 4000 Series Vandal Resistant Digital GSM Audio Intercom with Proximity 4000 Series Back Box Installation INSTALLING A SURFACE MOUNT DOOR STATION 1. Place the surface box against the wall (165-170cm between the top of the box and the floor level as shown in Fig.47) and mark the fixing holes for the wall plugs and the hole for the cables...
- Page 26 4000 Series Vandal Resistant Digital GSM Audio Intercom with Proximity 4000 Series Back Box Installation EXAMPLE: INSTALLING A 4000 SERIES TWO MODULE FLUSH BACK BOX (ART. 4852) Fig. 59 Fig. 60 Fig. 61 Fig. 62 Fig. 63 Fig. 64 Fig. 65 Fig.
- Page 27 4000 Series Vandal Resistant Digital GSM Audio Intercom with Proximity 4000 Series Back Box Installation INSTALLING A FLUSH MOUNTING DOOR STATION 1. It is recommended that the flush box is mounted into the wall approximately 165-170cm between the top of the box and the floor level as shown in Fig.59.
-
Page 28: Programming Via Alpha-Numeric Keypad
Example: When entering an apartment name, to type the name “VIDEX” the following buttons can be pressed on the keypad: Press button “8” , , 3 times = “V”; Press button “4” , , 3 times = “I”;... -
Page 29: Programming Flowcharts
4000 Series Vandal Resistant Digital GSM Audio Intercom with Proximity Programming Flowcharts ACCESSING MAIN PROGRAMMING MENU 4812 4812R Enter Number Enter Number DEFAULT WELCOME SCREEN Or Search 15/08/21 10:28 15/08/21 10:28 ENTER MASTER CODE First press ‘0’ . Enter the 4 digit master code ENTER A CODE (the default master code is ‘1111’), press the ENTER button... - Page 30 4000 Series Vandal Resistant Digital GSM Audio Intercom with Proximity Programming Flowcharts 1. APARTMENT MENU PROG. MENU VER DG5.2.2 To exit from the main programming menu MAIN PROGRAMMING MENU press the CLEAR button to return to the default welcome screen. to exit APARTMENT MENU Press ‘1’...
- Page 31 4000 Series Vandal Resistant Digital GSM Audio Intercom with Proximity Programming Flowcharts 1. APARTMENT MENU (CONTINUED) 1.APT: 2.CODE: 3.DTO: 4.TB: 1. ADD/MODIFY APT 5.NAME: If no details require modifying to return back 2. DELETE APT 6.TEL 1: 7.TEL 2: to the apartment menu press the CLEAR 8.TEL 3: button 9.TEL 4:...
- Page 32 4000 Series Vandal Resistant Digital GSM Audio Intercom with Proximity Programming Flowcharts 2. PROXIMITY MENU PROG. MENU VER DG5.2.2 To exit from the main programming menu MAIN PROGRAMMING MENU press the CLEAR button to return to the default welcome screen. to exit PROXIMITY MENU Press ‘1’...
- Page 33 4000 Series Vandal Resistant Digital GSM Audio Intercom with Proximity Programming Flowcharts 3. GENERAL SETTINGS PROG. MENU VER DG5.2.2 To exit from the main programming menu MAIN PROGRAMMING MENU press the CLEAR button to return to the default welcome screen. to exit GENERAL SETTINGS MENU 1.
- Page 34 4000 Series Vandal Resistant Digital GSM Audio Intercom with Proximity Programming Flowcharts 3. GENERAL SETTINGS (CONTINUED) 1. AUX MODE:1 8. GATE: 2. SPK VOL:10 9. LANG:ENG 3. MIC VOL:5 If no settings require adjusting then to return 4. SB VOL:85 GENERAL SETTINGS MENU to the main programming menu press the 5.
- Page 35 4000 Series Vandal Resistant Digital GSM Audio Intercom with Proximity Programming Flowcharts 4. CODE MENU PROG. MENU VER DG5.2.2 To exit from the main programming menu MAIN PROGRAMMING MENU press the CLEAR button to return to the default welcome screen. to exit CODE MENU On the main code menu it is possible to...
- Page 36 4000 Series Vandal Resistant Digital GSM Audio Intercom with Proximity Programming Flowcharts 5. TIME SETTINGS MENU PROG. MENU VER DG5.2.2 To exit from the main programming menu MAIN PROGRAMMING MENU press the CLEAR button to return to the default welcome screen. to exit TIME SETTINGS MENU On the time settings menu it is possible to setup...
- Page 37 4000 Series Vandal Resistant Digital GSM Audio Intercom with Proximity Programming Flowcharts 5. TIME SETTINGS MENU (CONTINUED) 1. CALL TIME:040 2. DIVERT TIME:015 If no time settings require adjusting then to 3. OPEN TIME:005 4. AUX TIME:005 TIME SETTINGS MENU return to the main programming menu press 5.
-
Page 38: Programming Screens
4000 Series Vandal Resistant Digital GSM Audio Intercom with Proximity Programming Screens MAIN PROGRAMMING MENU From the main programming menu (refer to Fig.71) it is possible to access the following sub menus: PROG. MENU VER DG5.2.2 1. Apartment menu 2. Proximity menu 3. - Page 39 4000 Series Vandal Resistant Digital GSM Audio Intercom with Proximity Programming Screens 1.1.2 DOOR/GATE ACCESS CODE The door/gate access code can be entered on the code screen (refer to Fig.76) and can be made up of a maximum of 6 digits (no letters). CODE: IMPORTANT NOTE: Remember if programming an access code into memory location ‘000’...
- Page 40 4000 Series Vandal Resistant Digital GSM Audio Intercom with Proximity Programming Screens TEL 2: TEL 3: TEL 4: to confirm to confirm to confirm to cancel to cancel to cancel Fig. 82 Fig. 83 Fig. 84 1.2 APARTMENT MENU (DELETE APT) Selecting option 2 from the apartment menu will access the memory location MEMORY LOCATION...
- Page 41 4000 Series Vandal Resistant Digital GSM Audio Intercom with Proximity Programming Screens 3 GENERAL SETTINGS MENU From the general settings menu (refer to Fig.92) it is possible to adjust the following panel settings: 1. AUX MODE:1 8. GATE: 2. SPK VOL:10 9.
- Page 42 4000 Series Vandal Resistant Digital GSM Audio Intercom with Proximity Programming Screens 3.4 SPEECHBOARD VOLUME (SB VOL) Selecting option 4 from the general settings menu will access the speechboard volume control screen (refer to Fig.96). On this screen the speechboard volume of the SB VOL: (0-99) GSM panel can be adjusted.
- Page 43 4000 Series Vandal Resistant Digital GSM Audio Intercom with Proximity Programming Screens 3.8 GATE MODE (GATE) Selecting option 8 from the general settings menu will access the gate mode screen (refer to Fig.100). On this screen the gate mode of the panel can be set. The current GATE: (0-1) setting will be indicated on the second line of the screen with or without a tick in the...
- Page 44 4000 Series Vandal Resistant Digital GSM Audio Intercom with Proximity Programming Screens 4.2 ADMIN CODE Selecting option 2 from the code menu will access the admin code screen (refer to Fig.104). On this screen the admin code of the GSM panel can be changed. The current ADMIN CODE (4 DIGITS) setting will be highlighted on the second line of the screen (see Fig.104).
- Page 45 4000 Series Vandal Resistant Digital GSM Audio Intercom with Proximity Programming Screens 5.3 OPEN TIME Selecting option 3 from the time settings menu will access the open time screen (refer to Fig.109). On this screen the door/gate open time of the GSM panel can be adjusted. OPEN TIME: (1-255 Sec) The current setting will be highlighted on the second line of the screen (see Fig.109).
- Page 46 4000 Series Vandal Resistant Digital GSM Audio Intercom with Proximity Programming Screens 5.6 LCD TIME Selecting option 6 from the time settings menu will access the LCD time screen (refer to Fig.114). On this screen the switch time of the GSM’s LCD display can be adjusted. LCD TIME: (1-255 Sec) The LCD time of the GSM is the time delay of when the GSM display switches between...
-
Page 47: Programming Via Text Message
4000 Series Vandal Resistant Digital GSM Audio Intercom with Proximity Programming via Text Message PROGRAMMING THE DIGITAL GSM INTERCOM Programming the 4G digital GSM can also be carried out by sending text (SMS) messages. IMPORTANT NOTE: When you are required to use “ in a text message it is important to use the correct symbol and not for example ‘... - Page 48 4000 Series Vandal Resistant Digital GSM Audio Intercom with Proximity Programming via Text Message Trigger the relay 1111RLY Trigger auxiliary output AO 1111A1O Store balance check dial string 1111SDL”*#1345#” 55 - 56 Check credit balance 1111BAL? Store a master telephone no. 1111STM”07771234567”...
- Page 49 4000 Series Vandal Resistant Digital GSM Audio Intercom with Proximity Programming via Text Message UTC Time Zone for countries 1111TZ+nnn? nnn = 000 - 048 ahead of UTC UTC Time Zone for countries 1111TZ-nnn? nnn = 000 - 048 66 - 67 behind UTC Daylight savings time 1111DSTnnn?
- Page 50 Note that quotation marks “ and commas , are used where appropriate and the > character is used to insert a space between the words Videx and Tech for the username. The optional ? is included at the end so a confirmation text is sent back to the sender.
- Page 51 4000 Series Vandal Resistant Digital GSM Audio Intercom with Proximity Programming via Text Message 1111STCn:”” Delete a door/gate access code cccccc for apartment n, where cccccc = code (up to 6 digits max.) and n = apartment number. 1111STCn:””? Delete a door/gate access code cccccc for apartment n, where cccccc = code (up to 6 digits max.) and n = apartment number.
- Page 52 APT = 321 NAME = Mr Smith OK VIDEX 4G STORE OR CHANGE THE APARTMENT TELEPHONE NUMBERS (STN, STD, STE AND STF) Telephone numbers can be stored for the 750 available apartments. Each apartment can have up to four telephone numbers (if the first is busy or not answered in a certain time it can call a 2nd, 3rd and 4th number).
- Page 53 TEL (DIVERT 1) = 01912241558 TEL (DIVERT 2) = 07771234567 TEL (DIVERT 3) = 01912241559 OK VIDEX 4G Remember to include “ and , where appropriate. SET CALL TIME (SPT) The call time is the maximum time in seconds that a call can last before the GSM panel automatically clears the call down. The time can be from 1 second up to 255 seconds and begins from when the call is made from the panel.
- Page 54 4000 Series Vandal Resistant Digital GSM Audio Intercom with Proximity Programming via Text Message 1111A1Tnnn? Store the AO time nnn = time in seconds. Also send a confirmation text back to the sender. 1111A1T? Query the current stored AO time. A text message will be sent back to the sender showing the stored AO time.
- Page 55 For UK customers other useful numbers which can be used with this feature are as follows. For other countires please check the service provider’s web sites for other useful codes. IMPORTANT NOTE: Although the following codes have been confirmed to work with the GSM intercom Videx offers no guarantee that other codes from other network providers will work.
- Page 56 4000 Series Vandal Resistant Digital GSM Audio Intercom with Proximity Programming via Text Message Check dial string codes for other networks are currently unavailable at this time. Please also note that this programming function is only applicable for pay as you go SIM cards. CHECK CREDIT BALANCE (BAL) The balance can only be checked if the correct balance check string has previously been stored using the SDL code explained above.
- Page 57 TB 1 06002330 OK VIDEX 4G Any apartment which is then assigned to timeband 1 will only receive calls between the hours of 06:00 in the morning until 23:30 at night, calls after 23:30, i.e. 23:31 onwards will stop.
- Page 58 4000 Series Vandal Resistant Digital GSM Audio Intercom with Proximity Programming via Text Message panel or just hearing beeps to indicate a call is in progress. • Ringing heard during calling: nnn = 001 • Beeps heard during calling: nnn = 000 The following text messages can be sent to the digital GSM intercom to enable (000), disable (001) or query the setting of the silent dialling feature.
- Page 59 The digital GSM can store up to 2000 fobs/cards (0000 - 1999). The reader can be programmed with any one of the following fobs: • 955/T or 955/C = Videx fobs or cards. These fobs and cards have no site code and have a 5 digit user code, so the PBY function must be set to 002 (the default setting, checking for 2 bytes).
- Page 60 The digital GSM intercom will reply with the following text: STORED IN nnnn OK VIDEX 4G where nnnn = memory location (0000 - 1999) of where the fob/card is stored. DELETE A FOB OR CARD WITHOUT KNOWING ITS LOCATION (DEF) This feature allows the user to delete a fob or card without knowing the memory location of where it is stored.
- Page 61 The digital GSM will reply with the following text: FA4 =09451045,Mo,Tu,Fr,L,RL OK VIDEX 4G In this example the reply from the digital GSM confirms the relay has been setup to latch for Monday, Tuesday and Friday only for free access timeband number 4 between 9:45am until 10:45am.
- Page 62 The digital GSM intercom will reply with the following text: STORED IN nnnn OK VIDEX 4G where nnnn = the memory location between 0000 - 0499 of where the number is stored.
- Page 63 For the application of these commands please contact Videx Technical on tel: 0191 224 3174. For overseas customers please contact Videx customer support on tel: (+39) 0734 631 699.
- Page 64 • The first is to allow a user to be able to remotely monitor the GSM’s events online using the web browser based events application or remotely monitor the GSM’s events via either of the two mobile apps - the Videx SMS Wizard (for users) and the Videx SMS Wizard PRO (for installers and engineers), also refer to the GSM moble apps notes on page 68.
- Page 65 4000 Series Vandal Resistant Digital GSM Audio Intercom with Proximity Programming via Text Message online or via either of the two GSM mobile apps - the Videx SMS Wizard (for users) and the Videx SMS Wizard PRO (for installers and engineers).
- Page 66 The ? is included in the example for a confirmation back from the GSM. The GSM intercom will reply with the following text: TZ+004 OK VIDEX 4G UTC TIME ZONE FOR COUNTRIES BEHIND UTC (TZ-) If the GSM module is being installed in a Time Zone behind Time Zone (UTC+0) then the command 1111TZ-nnn can be used to set the correct time behind.
- Page 67 The ? is included in the example for a confirmation back from the GSM. The GSM intercom will reply with the following text: TZ-020 OK VIDEX 4G DAYLIGHT SAVINGS TIME ADJUSTMENT (DST) If the GSM module is being installed in a time zone that allows for daylight savings time then the automatic DST adjustment feature can be enabled or disabled.
-
Page 68: The Gsm Mobile Apps
• Model of the GSM intercom module - e.g. Art.4812/4G or Art.4812R/4G (digital GSM) etc. • Firmware level of the GSM intercom - e.g. for the Art.4812/4G GSM the firmware might be DG5.2.3 (the current firmware version of the GSM module can usually be found on the label on the back of the GSM intercom or by sending the text message 1111VER? to obtain the firmware version, also refer to notes on page 54). -
Page 69: System Operation
4000 Series Vandal Resistant Digital GSM Audio Intercom with Proximity System Operation STANDBY MODE When the digital GSM intercom is in standby the display will show the standard welcome message, refer to Fig.116 Enter Number (Art.4812) and Fig.117 (Art.4812R). The date and time is Enter Number shown along the bottom of the display and the signal is Or Search... - Page 70 4000 Series Vandal Resistant Digital GSM Audio Intercom with Proximity System Operation ENTERING A DOOR/GATE AND TRADE ACCESS CODE If an access code is programmed into the GSM intercom ENTER A CODE ENTER A CODE first press the ‘0’ button, the ‘ENTER A CODE’ screen will appear on the display, see Fig.125.
- Page 71 4000 Series Vandal Resistant Digital GSM Audio Intercom with Proximity System Operation USING AN ART. 4850R EXPANSION READER, ART. 4903 OR ART. 2813 (IF CONNECTED VIA RS485 BUS) If an Art.4850R expansion reader, an Art.4903 keypad or an Art.2813 remote relay is connected (refer to Fig.20, Fig.21 and notes on pages 17 and 18) and if the speech board is switched ON the digital GSM panel will announce one of the following, but only if the respective module (i.e.
-
Page 72: User Commands
4000 Series Vandal Resistant Digital GSM Audio Intercom with Proximity User Commands USER COMMAND TABLES Table 1 shows the user commands that can be carried out during a call. Successful commands are signalled by two beeps from the telephone, errors are signalled by four beeps. IMPORTANT NOTE: When the ED# function has been enabled the user must press the # button on their phone before pressing any of the following user commands (also refer to page 58 for further information). -
Page 73: Additional User Information
Art.434 block antenna is repositioned, where permissible, at the highest point to achieve the best signal. Where this is not possible an alternative high gain antenna can be used, in particular Videx recommends using the Art.434/HG/5M or Art.434/ HG/15M high gain antennas or another suitable 4G GSM antenna with a standard SMA male connector. - Page 74 4000 Series Vandal Resistant Digital GSM Audio Intercom with Proximity Additional User Information UNDERSTANDING THE BEEPS Functions and errors are indicated by beeps from the digital GSM panel. The following will help you understand the different beeps heard and what, if anything, needs to be done in response to the beeps. BEEP REASON SOLUTION...
-
Page 75: User Management
MANAGING GSM EVENTS REMOTELY Users can also remotely monitor events in real-time from the digital GSM intercom using Videx’s latest web browser based events application. These events can then be viewed on any device such as a tablet, smartphone, laptop and PC. -
Page 76: Troubleshooting
UNICODE and is set to either GSM alphabet or Automatic. This can ususally be done via the etc. settings icon on the smartphone. If you are unsure of how to do this Videx recommend consulting with the user’s manual that came with the smartphone or consulting directly with the manufacturer of the smartphone. - Page 77 3. After the digital GSM intercom has rebooted test the door opening feature from the telephone during a call. If none of the solutions above resolve the problem then please contact Videx technical on tel: 0191 224 3174 for further assistance. For overseas customers contact Videx customer support on tel: (+39) 0734 631 699 for further assistance.
-
Page 78: General Information
• ART.4903_66251800-EN_V1-2 (or later) • ART.2813_66251545_V1-0 (or later) Additional port forwarding, server setup and configuration information can be found in Videx application note: • AN0046_RemotelyProgramming4GIntercomsViaPCSoftware. Additional information regarding connection to mains supply voltage can be found in the following regulations (for the UK only): •... - Page 79 4000 Series Vandal Resistant Digital GSM Audio Intercom with Proximity DISPOSAL In accordance with the Legislative Decree no. 49 of 14 March 2014 “Implementation of the Directive 2012/19/EU on waste electrical and electronic equipment (WEEE)”. The crossed-out bin symbol on the equipment or on the packaging indicates that when the product reaches the end of its lifetime, it must be collected separately from mixed municipal waste.
- Page 80 MANUFACTURER VIDEX ELECTRONICS S.P.A. FABBRICANTE Via del Lavoro, 1 FABRICANT 63846 Monte Giberto (FM) Italy FABRICANTE Tel (+39) 0734 631669 FABRIKANT Fax (+39) 0734 632475 www.videx.it - info@videx.it FABRICANTE الرس كة المص ن ِّ عة CUSTOMER SUPPORT VIDEX ELECTRONICS S.P.A.
Need help?
Do you have a question about the 4812/4G and is the answer not in the manual?
Questions and answers