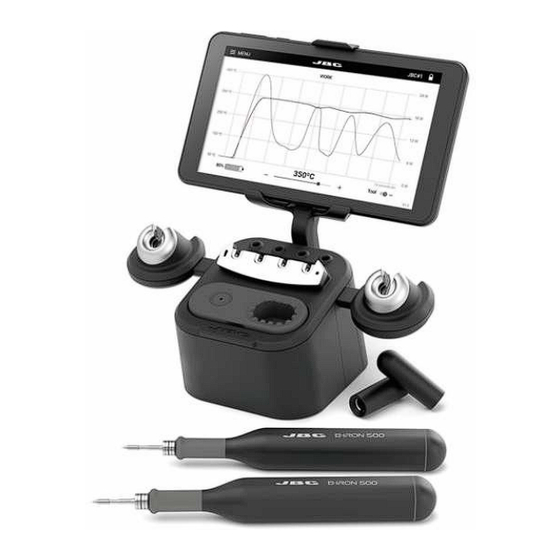
jbc B-IRON 500 DUAL Instruction Manual
Battery-powered soldering station
Hide thumbs
Also See for B-IRON 500 DUAL:
- Instruction manual (29 pages) ,
- Instruction manual (29 pages) ,
- Instruction manual (28 pages)
Advertisement
Advertisement
Table of Contents

Related Manuals for jbc B-IRON 500 DUAL


Summary of Contents for jbc B-IRON 500 DUAL
- Page 1 INSTRUCTION MANUAL B·IRON 500 DUAL Battery-Powered Soldering Station...
-
Page 2: Table Of Contents
This manual corresponds to the following references: BISS-5A * according to purchased station model, suitable for: 120V - N. America / Taiwan 230V - India / Europe / United Kingdom Packing List The following items are included: B·IRON Handle Portable Display 7” for B·IRON ..... 1 unit Dual Charging-Base ........ - Page 3 B·IRON Display Holder 5” to 7” ..... 1 unit USB Cable ....1 unit (USB A to Micro USB) Ref. 0030723 Ref. 0028092 Includes fixing knob Brass Wool for Power Cord * ..........1 unit B·IRON Charging-Base ......1 unit Ref.
-
Page 4: B·iron Handle
Please read this manual and its safety guidelines thoroughly before using the product. Features and Connections Portable Display 7” for B·IRON Cartridge Exchanger Ref. 0032464 Left-Side Cartridge Holder Handle Charger Ref. 0032465 Right-Side CL0300 Brass Wool Handle Charger for B·IRON Charging-Base (inside) CL0301... -
Page 5: B·iron 500 Tool Precision Handle
Features and Connections Portable Display 7” for B·IRON Ref. 0030723 B·IRON Display Holder 5” to 7” B·IRON 500 TOOL B·IRON 500 TOOL Precision Handle Precision Handle Display Support Safety Cap Holder C210 C210 Cartridge Cartridge USB Connector Range Range Power Socket Ref. - Page 6 Quick Start 1. Display Holder Assembling 2. Display Holder Setting Display Holder Insert the thin end of the display holder into the Insert the fi xing knob (3) and tighten it just enough upper area of the rear rail of the charging base so that it stays in its place but the display holder (1).
- Page 7 5. Turning on the Portable Display Power Button Turn on the display by holding down the power button and then open the B·IRON app*: * Note: The app can also be downloaded to your own devices. To know how, see section “Installing and Updating the B·IRON App”.
- Page 8 Tool Selection 7. Tool Selection Tools shown on the display can be selected to 8174 work with. It is possible to connect up to two tools at the same time. To work with two tools, select one from the left-hand column and one from the right-hand column (6).
- Page 9 Safety Cap Thanks to their safety cap, the B-IRON handles can be transported safely even with the cartridge inserted. Handle When the cap is placed onto the handle, the cartridge stops heating immediately, data transfer is cut off and the handle is disconnected from the station.
- Page 10 Operation The JBC Most Efficient Soldering System This revolutionary technology can recover tip temperature extremely quickly. This allows the user to work at a lower temperature. Work Charge Mode Sleep Mode When the tool is lifted from While the tool remains on the...
- Page 11 The Work screen shows a graph of the tip temperature and power supplied to the tip updated in real time. It allows to modify the tool working temperature, check the battery status and turn on and off the tool in use. Temperature and Power Graph JBC#1 MENU CHARGE 450 ºC 24 W 348ºC...
- Page 12 Work Screen Connected Tool and Tool Selector JBC#1 MENU CHARGE 24 W 450 ºC 348ºC 18 W 350 ºC 12 W 250 ºC 150 ºC 50 ºC 10 seconds/div 350ºC Tool V1.2 When the tool is not in use the graph stops recording Stopping Data Display When the tool is placed on the tool holder or when it enters Hibernation Mode, the data display stops.
-
Page 13: C210 Cartridge
Cartridge Exchanger The cartridge exchanger saves time and allows to change cartridges safely without switching the tool off. 1. Removing Cartridges 2. Inserting Cartridges Cartridge Exchanger Place the cartridge over one of the slots of the Place the handle over a cartridge and press the cartridge exchanger and press down (1) until handle down to insert the cartridge. - Page 14 3. Fixing Cartridges Depending on the shape of the tip, use the holes on the sides of the cartridge exchanger Holes to properly adjust the cartridge. Important: Push the cartridge in as far as it will go, making sure that it is firmly assembled*. Compatible Cartridges B·IRON 500 TOOL works with C210 Cartridges.
- Page 15 It also includes a temperature-resistant wiper for removing excess solder by gently tapping or wiping the cartridge tip on it. If the tip is very dirty, JBC recommends cleaning it first Wiper with the wiper to remove excess solder and then with the brass wool.
- Page 16 Replacing Brass Wool 1. Lifting 2. Replacing Lift the wiper by using the recess on the edge. Remove the wiper and replace the brass wool with a new one. 3. Reassembling 4. Pressing on Assemble the new wiper onto the charging base. Press the wiper down at the 4 corners until Make sure that the brass wool is on the far left you feel it click into place.
- Page 17 Replacing Grips Cutting Removing Assembling New Grips B0001 Cutter Worn Grip Grip for B·IRON Handles Make a length-ways cut on the Remove the worn grip. Firmly slide the new grip onto worn grip. Be careful not to the handle until it locks into damage the handle.
- Page 18 Tool Charger Disassembly and Replacement Disassembling the Tool Charger Loosen the screws (1) at the bottom of the charging base. Hold the tool charger with your hand in place, to prevent it from falling down, and pull the slide band down (2). Side Band Replacing the Tool Charger To install a new charger, insert it into the top of...
- Page 19 Menu Menu JBC#1 JBC#1 MENU MENU MENU MENU MENU MENU Devices Devices Work Work 450 ºC 450 ºC 450 ºC 450 ºC Documents Documents Settings Settings ameters ameters mode mode ature ature ool1 ool1 Light Theme Light Theme Counters Counters ºC...
- Page 20 Settings Parameter Description Tool ID Allows to modify the tool identifier. Lock parameters Allows to lock the parameters of the station using a four-digit code. The default code is 0105, but a new code can be set by simply entering some other four digits of choice when locking the parameters.
- Page 21 Tool light blinks in blue color for five seconds. Lock P ool1 Documents econds) Minimum T User manuals related to the station or to the tools can be consulted in this section or on JBC’s website: www.jbctools.com Status Temper ging king...
- Page 22 Updates are not executed automatically. They must be carried out by the user. To update the firmware proceed as follows: - Download the JBC update file to your PC from: https://www.jbctools.com/software.html. - Connect the tablet/device via USB connection to the PC.
- Page 23 For more information on the entire B-IRON product range that goes beyond the information in this manual, please visit www.jbctools.com. Display Holder In addition to the display holder supplied with the B·IRON station, JBC offers a holder for tablet sizes between 10” to 13”. Assemble the display holder at the rear part of the charging-base.
- Page 24 - Do not use liquids such as alcohol, thinner or benzene to clean the tablet. - Repairs should only be performed by a JBC authorized technical service. Clean the contact surfaces regularly to...
- Page 25 Safety It is imperative to follow safety guidelines to prevent electric shock, injury, fire or explosion. - Do not use the units for any purpose other than soldering or rework. Incorrect use may cause a fire. - The power cord must be plugged into approved bases. When unplugging it, hold the plug, not the wire. - Do not attempt to dismantle or open the housing of the tool as it may cause damage.
- Page 26 - In the event of damage, leakage, or overheating of the batteries, discontinue use immediately and contact customer support or JBC technical service facility. - Dispose of devices with batteries inside, responsibly according to regulations. They must be disposed of in accordance with local regulations so that they can be recycled.
- Page 27 Specifications B·IRON 500 DUAL Battery-Powered Soldering Station Ref. BISS-5A Charging-Base - Input: 100 V - 240 V 50 / 60 Hz - Nominal Power: 40 W - Tool Output: 12 V / 1000 mA - USB Output: 5 V / 1000 mA B·IRON 500 TOOL - Peak Power (Tool): 24 W...
- Page 28 In order for the warranty to be valid, equipment must be returned, postage paid, to the dealer where it was purchased. Get 1 extra year JBC warranty by registering here: https://www.jbctools.com/productregistration/ within 30 days of purchase. This product should not be thrown in the garbage.
Need help?
Do you have a question about the B-IRON 500 DUAL and is the answer not in the manual?
Questions and answers