Table of Contents
Advertisement
Available languages
Available languages
Quick Links
Advertisement
Chapters
Table of Contents

Subscribe to Our Youtube Channel
Related Manuals for Chefman RJ38-10-RDO-V2-NR-CA


Summary of Contents for Chefman RJ38-10-RDO-V2-NR-CA
- Page 1 Multifunctional AIR FRYER USER GUIDE • Safety Instructions • Features • Operating Instructions • Air Fryer Cooking Tips • Troubleshooting FAQs • Cleaning and Maintenance • Notes • Terms and Conditions • Warranty Registration RJ38-10-RDO-V2-NR-CA...
- Page 2 COOKING FORWARD Welcome! Whether this is your first Chefman® appliance purchase or you’re already part of our family, we’re delighted to be cooking with you! With your new Multifunctional Air Fryer, you can air fry foods, using little to no oil, to crisp, healthy perfection! You can also bake, dehydrate and roast foods rotisserie style.
-
Page 3: Table Of Contents
CONTENTS Safety Instructions Features Operating Instructions Air Fryer Cooking Tips Troubleshooting FAQs Cleaning and Maintenance Notes Terms and Conditions Warranty Registration... -
Page 4: Safety Instructions
6. Do not operate any appliance with a damaged cord or plug, or after the appliance malfunctions or has been damaged in any manner. Should this occur, contact Chefman® Customer Support. The use of accessory attachments not recommended by Chefman® may cause injuries. 8. Do not use outdoors. - Page 5 SAFETY INSTRUCTIONS IMPORTANT SAFEGUARDS 14. When using this appliance, provide adequate ventilation above and on all sides for air circulation. Do not allow the appliance to touch curtains, wall coverings, clothing, tea towels, dishcloths or other flammable materials during use. Do not cover the air fryer and ensure the air vents, located on the back of the fryer, are not covered.
- Page 6 SAFETY INSTRUCTIONS IMPORTANT SAFEGUARDS WARNING: This appliance has a polarised plug (one blade is wider than the other). This plug is intended to fit into a polarised outlet only one way. If the plug does not fit fully into the outlet, reverse the plug. If it still does not fit, contact a qualified electrician. Do not attempt to modify the plug in any way or force it into the outlet.
- Page 7 3. To disconnect the appliance, grasp the plug and remove it from the socket. 4. Never use the product if the power cord shows signs of abrasion or excessive wear. Contact Chefman® Customer Support for additional guidance and support. 5. Never wrap the cord tightly around the appliance as this could place undue stress on the cord where it enters the appliance and cause it to fray and break.
-
Page 8: Features
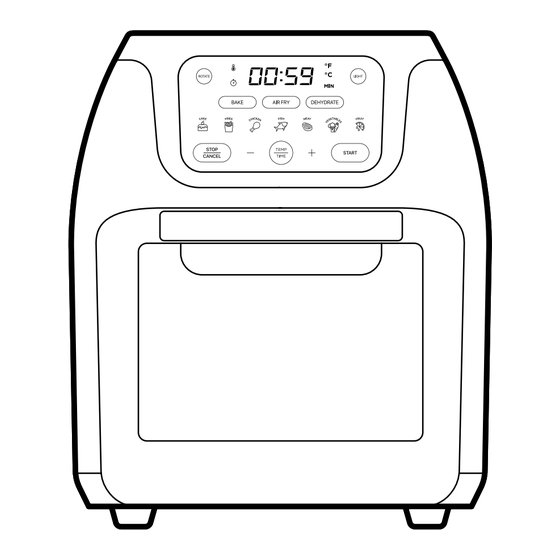
FEATURES Capacitive touch control panel Rotisserie spit Rack holders Spit forks and screws (2 of each) Wire cooking racks (3) Rotisserie gear (in oven, not shown) Rotisserie holder (in oven, not shown) 10. Removable drip tray/baking pan Door with viewing window 11. - Page 9 FEATURES CONTROL PANEL ROTATE – Turns rotisserie spit Temperature/Cook Time Display – Automatically alternates between the two LIGHT – Turns on interior light Cooking Functions – BAKE, AIR FRY, DEHYDRATE Cooking Presets – Sets suggested time and temperature for favourite foods (see charts on pages 10 and 11) STOP/CANCEL –...
- Page 10 FEATURES PRESET SETTINGS NOTE: These are guidelines only; always check food is sufficiently cooked, according to proper food safety guidelines. AIR FRYER Preset Default Time Default Temp Rotate Option Manual 15 min. 200˚C (400°F) Fries 18 min. 200˚C (400°F) Chicken 30 min.
- Page 11 FEATURES DEHYDRATE* Preset Default Time Default Temp Rotate Option Manual 10 hours 75˚C (165°F) Meat 4 hours 75˚C (165°F) Vegetables 6 hours 50˚C (130°F) Fruit 8 hours 55˚C (135°F) * When dehydrating, follow a trusted recipe and follow food safety guidelines. NOTE: To change Celsius to Fahrenheit and vice versa: Press and hold the TEMP button until your desired unit illuminates on the top right part of the control panel.
-
Page 12: Operating Instructions
OPERATING INSTRUCTIONS BEFORE FIRST USE For best results, follow these steps before using your air fryer for the first time. Remove all packaging materials, such as plastic bags and foam inserts. 2. Read and remove all stickers on unit except for rating label on base, which should remain on unit. - Page 13 OPERATING INSTRUCTIONS 5. Select cooking function (Bake, Air Fry, or Dehydrate) by pressing function button. The cooking function will turn blue and food icons will appear below on the control panel. Note: When the unit is first turned on, it defaults to Air Fry function. 6.
- Page 14 OPERATING INSTRUCTIONS 10. Carefully remove food. Use potholders or oven mitts when removing hot pans, racks or trays. If using the rotisserie spit, use the fetch tool in one hand and a potholder or oven mitt in the other to remove the hot spit (see p. 15 for more detailed directions).
- Page 15 OPERATING INSTRUCTIONS 4. Guide the spit into the rotisserie position by placing the left shaft into the rotisserie gear located on the left interior wall. Once in place, lift and lay the right shaft on the rotisserie holder located on the right interior wall. Ensure meat or chicken can rotate freely in the air fryer.
-
Page 16: Air Fryer Cooking Tips
AIR FRYER COOKING TIPS • Most prepared foods do not need to be tossed in oil before air frying. Most already contain oil and other ingredients that enhance browning and crispiness. (Frozen appetizers and hors d’oeuvres air fry very well.) •... -
Page 17: Troubleshooting Faqs
CAUTION: Black smoke indicates a more serious problem. In the rare event that you see black smoke coming from the unit, immediately unplug the fryer, contact Chefman® Customer Support and do not use the fryer until the issue is resolved. -
Page 18: Cleaning And Maintenance
CLEANING AND MAINTENANCE Unplug the unit and allow it to cool completely before cleaning. 2. Gently wipe down the exterior and interior with a damp cloth or paper towel. Never immerse the air fryer or its plug in water or any other liquid. The housing of the air fryer is NOT dishwasher safe. -
Page 19: Notes
NOTES... -
Page 20: Terms And Conditions
Chefman®. Any changes to the Terms and Conditions of this Warranty must be in writing, signed by a representative of Chefman®. No other party has the right or ability to alter or change the Terms and Conditions of this Warranty. - Page 21 • Altered Products – Damage that occurs from alterations or modifications by any entity other than Chefman® such as the removal of the rating label affixed to the product; • Catastrophic Events – Damage that occurs from fire, floods, or natural disasters; or...
- Page 22 NOTE: Label depicted here is an example. How do I register my product? All you need to do is fill out a simple Chefman® registration form. You can easily access the form in one of the two ways listed below: Visit Chefman.com/register.
- Page 23 FAILURE TO PERFORM THIS WARRANTY OBLIGATION. THE REMEDIES PROVIDED HEREIN ARE THE EXCLUSIVE REMEDIES UNDER THIS WARRANTY, WHETHER BASED ON CONTRACT, TORT OR OTHERWISE. Chefman® is a registered trademark of RJ Brands, LLC. Cooking Forward is a trademark of RJ Brands, LLC.
- Page 25 Fri t euse à Ai r Chaud GUIDE DE L’UTILISATEUR • Consignes de sécurité • Caractéristiques • Consignes d’utilisation • Conseils de cuisson avec la friteuse à air chaud • Dépannage/FAQ • Nettoyage et entretien • Remarques • Conditions • Enregistrement de la garantie RJ38-10-RDO-V2-NR-CA...
- Page 26 COOKING FORWARD Bienvenue! Qu’il s’agisse de votre premier appareil Chefman ou que vous fassiez déjà partie de notre famille, nous sommes ravis de cuisiner avec vous! Avec votre nouvelle Multifonctionnelle Friteuse à Air Chaud, vous pouvez frire les aliments à l’air chaud et les rendre croustillants à...
- Page 27 TABLE DES MATIÈRES Consignes de sécurité Caractéristiques Consignes d’utilisation Conseils de cuisson avec la friteuse à air chaud Dépannage/FAQ Nettoyage et entretien Conditions Enregistrement de la garantie...
-
Page 28: Consignes De Sécurité
à des dommages quels qu’ils soient. Communiquez avec le support à la clientèle de Chefman pour l’examen, la réparation ou le réglage. Tout accessoire utilisé qui n’aurait pas été recommandé par Chefman peut entrainer des blessures. 8. N’utilisez pas cet appareil à l’extérieur. - Page 29 CONSIGNES DE SÉCURITÉ IMPORTANTES CONSIGNES DE SÉCURITÉ 14. Quand cet appareil est utilisé, assurez une ventilation suffisante au-dessus et sur tous ses côtés pour permettre à l’air de bien circuler. Ne laissez pas cet appareil entrer en contact avec des rideaux, des revêtements muraux, des vêtements, des torchons ou d’autres matériaux inflammables pendant son utilisation.
- Page 30 CONSIGNES DE SÉCURITÉ IMPORTANTES CONSIGNES DE SÉCURITÉ AVERTISSEMENT : cet appareil possède une fiche polarisée (une lame est plus large que l’autre). Cette fiche a été conçue pour ne s’insérer dans une prise polarisée que dans un sens. Il suffit d’inverser la fiche si elle ne rentre pas complètement dans la prise. Si elle ne rentre toujours pas, contacter un électricien qualifié.
- Page 31 3. Pour débrancher l’appareil, saisissez la fiche et retirez-la de la prise. 4. N’utilisez jamais le produit si le cordon d’alimentation montre des signes d’abrasion ou d’usure excessive. Contactez le support client Chefman pour obtenir des conseils et un support supplémentaires.
-
Page 32: Caractéristiques
CARACTÉRISTIQUES Panneau de contrôle 4. Support du 8. Fourchettes et vis tactile capacitif tournebroche (dans le pour tournebroche four; non illustré) (2 de chaque) 2. Supports pour grilles 5. Porte avec fenêtre 9. Grilles de cuisson (3) 3. Engrenage du d’observation tournebroche (dans le 10. - Page 33 CARACTÉRISTIQUES PANNEAU DE CONTRÔLE ROTATE (Tourner) – Tourne la broche Écran avec affichage de la température et de la durée de cuisson – Affiche automatiquement en alternance ces deux paramètres LIGHT (Lumière) – Allume la lumière intérieure Fonctions de cuisson – BAKE (Cuire au four), AIR FRY (Frire à air chaud), DEHYDRATE (Déshydrater) Préréglages de cuisson–...
- Page 34 CARACTÉRISTIQUES PRÉRÉGLAGES REMARQUE : ces informations ne sont qu’à titre d’indication; toujours vérifiez la cuisson des aliments selon les directives de sécurité alimentaire. AIR FRY Préréglage Durée par défaut Temp. par défaut Option de rotation Manuel 15 min 200 °C (400 °F) FRIES (Frites) 18 min 200 °C (400 °F) CHICKEN (Poulet)
- Page 35 CARACTÉRISTIQUES DEHYDRATE* Préréglage Durée par défaut Temp. par défaut Option de Rotation Manuel 10 heures 75 °C (165 °F) MEAT (Viande) 4 heures 75 °C (165 °F) VEGETABLES 6 heures 50 °C (130 °F) (Légumes) FRUIT 8 heures 60 °C (135 °F) *Pour la déshydratation des aliments, suivre une recette de confiance et les directives de sécurité alimentaire. REMARQUE : pour passer de Fahrenheit à...
-
Page 36: Consignes D'utilisation
CONSIGNES D’UTILISATION AVANT LA PREMIÈRE UTILISATION Pour de meilleurs résultats, suivez ces étapes avant d’utiliser la friteuse à air chaud pour la première fois. Retirez tous les éléments d’emballage, comme les sacs en plastique et les protections en mousse. 2. Lisez et retirez toutes les étiquettes collées sur l’appareil, sauf la plaque signalétique à la base qui doit rester sur l’appareil. - Page 37 CONSIGNES D’UTILISATION 4. Placez la ou les grilles, le plat, ou la broche dans le four et fermez la porte. 5. Choisissez la fonction de cuisson (Cuire au four, Frire à air chaud, ou Déshydrater) en appuyant sur le bouton correspondant. Le bouton de la fonction de cuisson s’allumera en bleu et les icônes d’aliments apparaitront en dessous sur le panneau de contrôle.
- Page 38 CONSIGNES D’UTILISATION 8. Pour une cuisson avec ou la broche (voir p. 15), appuyez sur le bouton ROTATE (Tourner). Remarque : la broche ne tournent pas automatiquement quand ils sont utilisés. Le bouton ROTATE (Tourner) s’allume en bleu à son appui et cette fonction peut être activée ou désactivée à...
- Page 39 CONSIGNES D’UTILISATION enfoncer profondément dans la poitrine du poulet d’un côté et dans la cuisse de l’autre. Verrouillez les fourchettes en place avec les vis en laissant au moins 2,5 cm (1 po) de libre de chaque côté de la tige. Le poulet doit être bien attaché et ne doit pas pouvoir glisser sur la broche.
- Page 40 CONSIGNES D’UTILISATION Utilisation de l’outil de récupération L’outil de récupération est pratique pour sortir la broche chaud de la friteuse à air chaud. Tenez l’outil de récupération par son manche d’une main. Tenir une poignée ou un gant de cuisine dans l’autre main. 2.
-
Page 41: Conseils De Cuisson Avec La Friteuse À Air Chaud
CONSEILS DE CUISSON AVEC LA FRITEUSE À AIR CHAUD • La plupart des plats préparés ne nécessitent pas d’être arrosés d’huile avant d’être frits à l’air. Ils contiennent déjà de l’huile et d’autres ingrédients qui les rendent dorés et croustillants pendant la cuisson. (Les amuse-gueules et les hors-d’œuvre cuisent très bien dans la friteuse à... - Page 42 Si votre friteuse à air affiche E1 ou E2, cela signifie une présence de mauvais contact dans les fils ou un court-circuit, et l’arrêt du fonctionnement de l’appareil. Si cela a lieu, communiquez avec le service à la clientèle de Chefman pour un remplacement.
-
Page 43: Nettoyage Et Entretien
NETTOYAGE ET ENTRETIEN Débranchez l’appareil et le laissez complètement refroidir avant de le nettoyer. 2. Essuyez doucement l’extérieur et l’intérieur avec un chiffon ou un essuie-tout humide. Ne plongez jamais la friteuse à air chaud ou sa fiche dans de l’eau ou dans tout autre liquide. -
Page 44: Conditions
Chefman . Toutes les modifications apportées aux Conditions de cette Garantie doivent être faites par écrit et signées par un représentant de Chefman Aucune autre partie n’a le droit ou la capacité de modifier ou d’altérer les Conditions de cette Garantie. - Page 45 Chefman afin que vous puissiez en profiter au maximum. Veuillez consulter les directives de nettoyage et d’entretien dans le Guide de l’utilisateur de Chefman pour obtenir plus d’informations sur l’entretien approprié; • Usage commercial – Dommages suite à une utilisation à des fins commerciales;...
-
Page 46: Enregistrement De La Garantie
REMARQUE : l’étiquette présentée ci-contre est un exemple. Que dois-je faire pour enregistrer mon produit? Il vous suffit de remplir un simple formulaire d’enregistrement Chefman Vous pouvez accéder facilement et de deux manières au formulaire : Consultez Chefman.com/register. Scannez le code QR pour accéder au site :... - Page 47 ENREGISTREMENT DE LA GARANTIE CHEFMAN Pour plus d’informations sur le produit, consultez Chefman.com SAUF DANS LE CAS OÙ UNE TELLE RESPONSABILITÉ EST REQUISE PAR LA LOI, CETTE GARANTIE NE COUVRE PAS, ET CHEFMAN NE SERA PAS TENUE RESPONSABLE DE DOMMAGES DIRECTS OU INDIRECTS, OU SPÉCIAUX, INCLUANT ET SANS LIMITATION, DOMMAGES, OU PERTE DE JOUISSANCE DU PRODUIT, OU PERTE DE VENTES OU DE BÉNÉFICES, OU ENCORE RETARD OU...
- Page 48 C H E F M A N .C O M | @ M YC H E F M A N © C H E F M A N 2 0 2 4 RJ38-10-RDO-V2-NR-CA_UG_FINAL_OTP_032724...
Need help?
Do you have a question about the RJ38-10-RDO-V2-NR-CA and is the answer not in the manual?
Questions and answers