Advertisement
Quick Links
March 24, 2017
What's in the Box?
1. DCU 210E
2. ProConnect C1 Harness with key
switch
3. USB Stick
4. Quick Installation Guide
Caution!
Handle with care when opening
the bag and installing the unit.
Installation Steps
1. Remove the unit from the ESD bag. Use
the submitted Cabinet Frame and mount it
in a suitable enclosure.
2. Attach harness connectors C1, C2 and C3
to the corresponding connector on the
DCU 210E.
3. Use the submitted RJ45 Connector kit to
ensure the IP-rating.
4. Install key switch in desired location and
connect to ProConnect Harness.
5. Install remote start/stop switch (RSS) if
used. RSS uses normally open (NO)
switches. Pin 1 is power to both switches.
Pin 2 is Start, and Pin 3 is Stop.
6. Connect the remaining Connectors to the
appropriate location for your installation
7. Connect the Battery Positive(+) and
Negative(-).
Publication P/N: 1100712
Quick Installation Guide
ProConnect C1
P/N 1100711
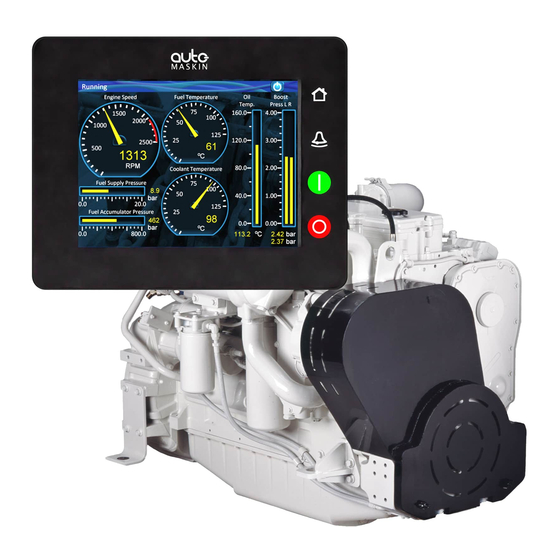
Engine Monitor and Control Panel
"Plug and Play"
Predefined
control system for
configuration files
Cummins
means no
QSB6.7, QSC, QSL9
programming
The DCU 210E
and QSM11
propulsion engines
features and
Includes connection
functions
harness, connectors
compliment the
and DCU 210E
engine capability
Copyright © Auto-Maskin AS, 2017
Advertisement

Related Manuals for auto maskin Marine Pro 200 ProConnect C1


Summary of Contents for auto maskin Marine Pro 200 ProConnect C1
- Page 1 March 24, 2017 Publication P/N: 1100712 Installation Steps What‘s in the Box? 1. Remove the unit from the ESD bag. Use the submitted Cabinet Frame and mount it in a suitable enclosure. 1. DCU 210E Quick Installation Guide 2. ProConnect C1 Harness with key 2.
- Page 2 March 24, 2017 Publication P/N: 1100712 Configuration Steps Configuration Steps Configuration Steps After Completing the Setup Wizard. 4. After selecting Configuration Files the Then the following Dialog will appear. 1. Insert the supplied USB-stick in the USB- available files will appear. port on the DCU 210E.
Need help?
Do you have a question about the Marine Pro 200 ProConnect C1 and is the answer not in the manual?
Questions and answers