Advertisement
Advertisement
Table of Contents

Subscribe to Our Youtube Channel
Related Manuals for Circuitmess Wacky Robot BiT


Summary of Contents for Circuitmess Wacky Robot BiT
- Page 1 CREATOR’S BOOKLET...
- Page 2 Enhance your STEM knowledge with the CircuitMess toy collection! Wacky Robots are a quirky group of mini-robots that will help you master the basics of robotics and electronics. Collect all the Wacky Robots and unlock new games for the BIT!
- Page 3 Connect your robots to Sparkly, a robot car that follows the source of light. Sparkly, BIT, and Wacky Robots are sold separately.
-
Page 4: How Does It Work
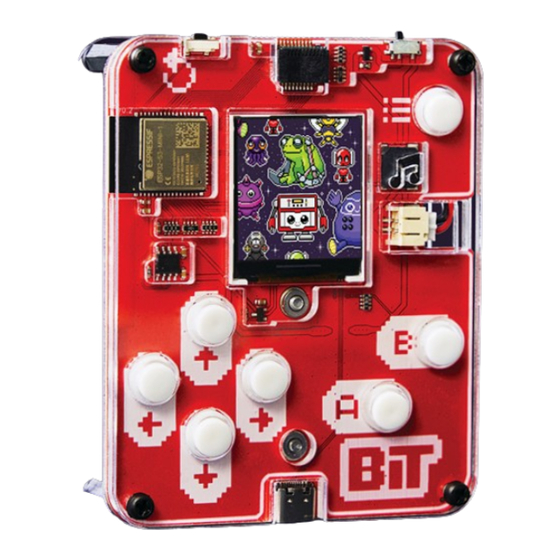
Meet CircuitMess Introducing CircuitMess BIT, a DIY game console that will help you enter the exciting world of robotics and programming. Although it is named after the most fundamental computing and digital communication unit, BIT is much more. BIT will... - Page 5 What is CircuitMess? Albert CircuitMess started in 2016 when Albert (our CEO) was 17. Albert loved tinkering with electronics, and one of his first projects was a DIY game console. People liked the idea, so he launched it on Kickstarter,...
- Page 7 The mission Everybody knows how important technology is, but less than 1% of the population knows HOW TO MAKE new technology. We’re here to change that! With our kits, we want to inspire people to be CREATORS instead of just consumers.
-
Page 8: What's Inside The Box
What’s inside the box? Acrylic casings Plastic standoffs Metal screws Plastic caps for Battery holder pushbuttons AA batteries Plastic bolts USB–C cable You’ll learn about: Electronics and different electronic components Pixel Art and video game creation Programming... - Page 10 Gaming through time 1972 Pong™ was the first commercially successful video game. 1977 Mattel Auto race™ was the first handheld electronic game. 1981 Donkey Kong was released. Jumpman, one of the characters, will go on to become Super Mario. 1989 Nintendo Game Boy...
- Page 11 1991 Sonic the Hedgehog 2001 Xbox 2016 Pokemon 2022 CircuitMess CircuitPet...
- Page 12 Unexpected global sensation Pong, the first video game, was inspired by a tennis match. Atari, a well-known American computer company, created the first video game. The game was created after the company’s founder, Nolan Bushnell, assigned an exercise task to Allan Alcorn.
- Page 13 Pong on the BIT game console Bushnell was so impressed with the game and Allan’s work that he decided to develop and market it. Pong is a two-dimensional table tennis simulation game that you’ve most likely played a hundred times (if not you, your parents have!).
- Page 14 New (old) art Have you ever heard of the term “Pixel Art”?
- Page 15 The art of bringing otherwise inanimate objects or illustrated / 3D–generated characters to life is known as animation. It is created by rapidly projecting sequenced images one after the other to create the illusion of life.
- Page 16 Pixel art is a type of digital art created with graphical software in which images are built entirely from pixels. Pixel art was born in the 1970s, and some of the earliest examples were simply squares and rectangles. SuperPaint was the precursor to modern graphic programs like Photoshop, and it was used by NASA as a way to illustrate its discoveries and data.
-
Page 19: Safety First
Handling a screwdriver is not recommended for children under the age of 7! Keep CircuitMess BIT away from young children! This product contains small components that are dangerous to children under the age of 3. - Page 20 BIT Build Guide ACRYLIC CASINGS You’ll need to break one large acrylic piece in the kit to get a bunch of smaller casings. Finally, you must have five separate casings. The casings sheet has been pre-cut, you just need to gently crack the casings into individual pieces;...
- Page 21 Also, if you have excessive acrylic in the holes on the casings, simply push it out. Remove the protective foil from both sides of the casings now:...
- Page 22 After removing the foil, the casings should be transparent. For the next step, we’ll need the casing with a BIT cut-off, four plastic standoffs, and four bolts. Thread the bolts through the casing like this: Plastic standoffs Plastic bolts...
- Page 23 Pay attention to putting the bolt on the correct side (BIT has to be written towards you). Then, using your fingers, fasten the standoff.
- Page 24 Repeat this step for the remaining bolts and standoffs.
- Page 25 BATTERY CASING In this stage, we’ll attach the battery holder to the back of the BIT. To begin with, take the PCB and the casing: Put the casing on the backside of the PCB like this:...
- Page 26 Now is the time to take the battery holder and two metal screws: Battery Metal holder screws Put the battery holder on the PCB like this:...
- Page 27 Take the metal screws and put them in the battery holder, as shown in the photo below. Use the screwdriver to fasten it. Now turn the BIT around and connect the holder’s cable to the white connector on the front.
- Page 28 Insert the batteries into the holder. Batteries Pay attention to placing the batteries on the correct side. If you put the batteries in backwards, your BIT will not work. The battery’s + and - marks indicate polarity!
- Page 29 SUIT UP! After adding the batteries and one casing at the back, it’s time to put the rest at the front. This is the next casing you’ll need: This casing will be added to the front, and the holes must match the PCB buttons.
- Page 30 Place the caps into the holes, and don’t worry if they are a bit crooked at first. This is what BIT should look like when you add all caps: Take the next casing - identical to the one we just used.
- Page 31 The casing that will go on the top at the front side is the one with the note.
- Page 32 Place the casing so that there is an opening on the side of the battery connector. Take four plastic bolts: These four bolts will be placed on the front of the BIT.
- Page 33 Take the casing we used in the first step (the one with the BIT carved out). That part will be added on the back, above the battery holder.
- Page 34 YOU HAVE SUCCESSFULLY BUILT YOUR BIT! It’s time to turn it on! The switch is located here: If everything is in order, you should see the video games loading. If you have any issues with the assembly, contact us at contact@circuitmess.com and we’ll assist you!
- Page 35 Build guide for the plastic stand We’ve prepared a plastic stand to hold all of your Wacky Robots. We’ll put the stand together in a few simple steps. The following items are required to assemble the stand: Two pieces of acrylic casing Four big standoffs Eight plastic bolts...
- Page 36 First, we must break the acrylic parts into seven smaller casings. Don’t use too much strength for this step; the parts that need to be broken are clearly marked. To make the casings transparent, remove the protective foil from both sides.
- Page 37 Remove the protective foil from both sides. LET’S START WITH THE ASSEMBLY! For the first part, take two acrylic casings, two standoffs, and four plastic bolts. Be careful because, while the casings appear to be identical, they differ in length, and one has a little extension on one end.
- Page 38 Place the bolt through one of the casings as shown in the photo below. Then, add the standoff and fasten it with your fingers.
- Page 40 Repeat this step for the second bolt and the standoff.
- Page 41 The second casing will go on the opposite side, and it will be secured with the remaining two bolts.
- Page 42 Repeat this step for the other casings that look identical to those two. This is what the final product should look like:...
- Page 43 The shorter casings will be looking to the inside while assembling the stand. Take one of the three long casings with the cut-off slots. These parts need to be aligned with the slots on the shorter vertical casings.
- Page 44 After putting the first long casing on, the stand should look like this. Repeat the procedure for the remaining casings.
- Page 45 AMAZING! YOU SUCCESSFULLY ASSEMBLED THE STAND FOR YOUR WACKY ROBOTS. It’s time to put all of the robots where they belong. *Wacky Robots are sold separately.
- Page 47 Thank you for purchasing Please turn off CircuitMess Bit after use CircuitMess Bit. and store it in a safe and dry location. For more information and detailed The included battery must be recycled instructions on assembling and using appropriately and/or disposed of your device, visit our official website: separately from household waste.
- Page 48 To achieve this, do not carry the included device in your pockets. 3. Check from time to time if CircuitMess Bit is damaged or worn out in any way to Do not use CircuitMess Bit near...
- Page 49 Do waste disposal service, the store where not leave CircuitMess Bit on stairs or you purchased the kit, or our customer on the floor in your home or classroom support (contact@circuitmess.com).
- Page 50 • If the defect is not remedied within a reasonable period after receiving the The rights under this warranty are product for repair, CircuitMess d.o.o. the exclusive and final rights of will replace it with a new product. the customer unless otherwise provided by national law.
-
Page 51: Warranty Sheet
WARRANTY SHEET CircuitMess do-it-yourself educational Product name: set for electronics and programming Warranty on components and 24 months parts contained in this set is: Date of purchase: Seller and point of sale stamp: Invoice number: Information on interventions during warranty period is entered by a repair shop technician at an authorized repair shop. - Page 52 To create your own games, go to:...
Need help?
Do you have a question about the Wacky Robot BiT and is the answer not in the manual?
Questions and answers