Table of Contents
Advertisement
Quick Links
VOLTERA
INSTALLATION AND SETUP GUIDE
INSTALLATION CONSIDERATIONS
• Install the device away from heat sources, such as vents, radiators, heat registers, and stoves.
• Do not exceed the maximum ambient operating temperature of 32 - 104 F (0 - 40 C).
• Avoid installing near water or steam.
• See the product datasheets on Biamp.com for each Voltera device's specification.
• See pages 11 and 12 for information on where to access software, training, and support for
the amplified loudspeaker controller.
INCLUDED IN THE BOX
• Voltera-D Series device
• 2x M6x15mm mounting screws
• Audio input mating plugs
▫
4 plugs for 4 channel amps
▫
8 plugs for 8 channel amps
• Euroblock connector plugs for the amplified outputs (yellow)
▫
4 plugs for 4 channel amps
▫
8 plugs for 8 channel amps
Biampinfo@biamp.com
™
• Detachable IEC power cord
• Rear Rack support brackets
• GPIO mating plugs
D SERIES
D 1200.4
D 1200.8
D 2400.4
D 2400.8
AMPLIFIED LOUDSPEAKER
CONTROLLER
www.biamp.com
Advertisement
Table of Contents

Related Manuals for Biamp VOLTERA D Series


Summary of Contents for Biamp VOLTERA D Series
- Page 1 • Do not exceed the maximum ambient operating temperature of 32 - 104 F (0 - 40 C). • Avoid installing near water or steam. • See the product datasheets on Biamp.com for each Voltera device’s specification. • See pages 11 and 12 for information on where to access software, training, and support for the amplified loudspeaker controller.
-
Page 2: Device Layout
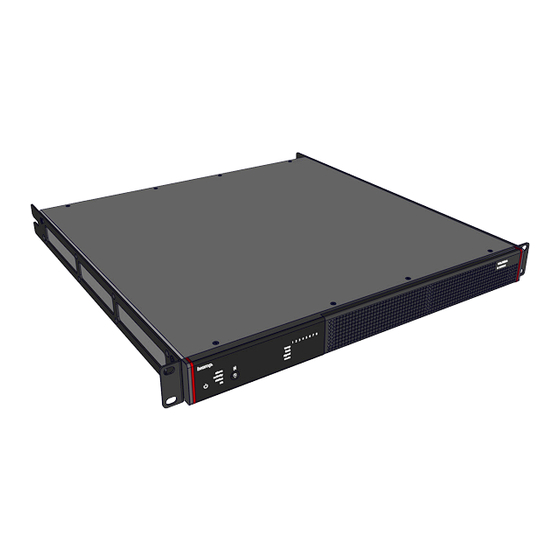
DEVICE LAYOUT FRONT PANEL LAYOUT FRONT PANEL INDICATORS AND DESCRIPTIONS 1. Power indicator 2. System indicators 3. Channels status display. (The number of channels varies by amplifier type) 4. Detachable grille 5. Amplifier type indentifier POWER LED INDICATOR Off: The device is off Green: The device is powered Yellow:... -
Page 3: System Led Indicators
DEVICE LAYOUT SYSTEM LED INDICATORS Off: Yellow: Red: Green: Unit is booting Received all Ready to receive Unit is not ready to Status: configuration configuration receive configuration information and information information ready Not in any other Unit is an active Unit is a “standby”... - Page 4 DEVICE LAYOUT REAR PANEL LAYOUT: D 1200.4 & D 2400.4 REAR PANEL PORTS AND DESCRIPTIONS 1. Power inlet 2. Logic input / output connectors 3. Line level inputs 4. Factory reset pinhole 5. RJ-45 Ethernet ports 6. Loudspeaker outputs REAR PANEL LAYOUT: D 1200.8 & D 2400.8 REAR PANEL PORTS AND DESCRIPTIONS 1.
-
Page 5: Installation
INSTALLATION 19 - INCH SERVER RACK Perform the procedures described to install the device in an AV equipment rack. 1. Verify the installation rack space meets the listed requirements in the Installation Considerations section of the title page. Note: The included rear support brackets are designed to work in racks that have a rear rack rail that is 280 to 600mm behind the front rail. - Page 6 INSTALLATION 19 - INCH SERVER RACK 4. Place the device in the rack using the slotted ends of the mounting backets and securing the device to the rear support brackets using the M6 mounting screws. 5. Secure the mounting plate to the server rack. Advance to the Connections procedures on page 7.
- Page 7 CONNECTIONS PORTS / TERMINALS Connect the amplified loudspeaker controller to the input and output devices in the AV system, as well as any voltage control, and input / output logic. See the descriptions in this section for details. CONNECT THE INPUT DEVICES TO THE LINE LEVEL INPUTS Connect input AV devices to the 3-pin inputs.
- Page 8 CONNECTIONS OPTIONAL: CONNECT THE LOGIC INPUT / OUTPUT Pitch: 3.5mm Pin Functions Note - the pin functions are factory set. • Pin 1 Input: Mute all / Active low • Pin 2 Output: Health output / Fault exists if low •...
- Page 9 CONNECTIONS OPTIONAL: CONNECT THE GENERAL PURPOSE INPUT / OUTPUT These GPIO connections can be used as either inputs or outputs. They can be assigned to actions within Tesira software using Logic Input and Logic Output. CONNECT THE RJ - 45 ETHERNET PORTS Connect network port 1 to a PoE+ switch to enable quick recovery of audio when the mains supply is temporarily lost.
- Page 10 CONNECTIONS PLUG IN THE AMPLIFIED LOUDSPEAKER CONTROLLER Always use the suppiled detachable power cord, or an identical replacement, with the amplified loudspeaker controller. 1. Attach the power cord to the power receptacle on the back of the device. 2. Plug the connected power cord into a grounded power outlet. Installation &...
-
Page 11: Device Setup
Design software. It is typically embedded on digital Tesira system devices and can also be found online. • Tesira Help System (Online) SUPPORT ARTICLES Technical support articles for Tesira Software can be found on Biamp’s Cornerstone knowledgebase support site. • Click here: Tesira - Biamp Cornerstone TRAINING Training courses for Tesira products and system core concepts are available online. - Page 12 VenueTune Design software. • VenueTune Help System (Online) • (Coming Soon) SUPPORT ARTICLES Technical support articles for VenueTune Software can be found on Biamp’s Cornerstone knowledgebase support site. • Click here: VenueTune - Biamp Cornerstone • (Coming Soon) Note: A device configured with VenueTune software must be controlled using VenueTune software.
-
Page 13: Maintenance
MAINTENANCE DETACHABLE GRILLE Use the detchable grille to access and clean the 2x dust filters. 1. Begin by pressing the grille on the side that includes the amplifier type indicator text. 2. The opposite side of the grille lifts away from the device for easy removal. 3. -
Page 14: Cleaning The Dust Filters
MAINTENANCE CLEANING THE DUST FILTERS 1. Remove the filters from the device. 2. Use a dry cloth to clean the chassis and the front panel. 3. Clean the filters using compressed air or wash with clean water to remove dust. If water is used, let the filters dry completely before reinstalling. - Page 15 ™ www.biamp.com www.support.biamp.com Support@biamp.com 9300 SW Gemini Drive Beaverton, OR 97008 USA Warranty: Biamp.com/legal/warranty-information Safety & Compliance: biamp.com/compliance April 29, 2024...
Need help?
Do you have a question about the VOLTERA D Series and is the answer not in the manual?
Questions and answers