Table of Contents

Related Manuals for Exsys EX-1112HMS


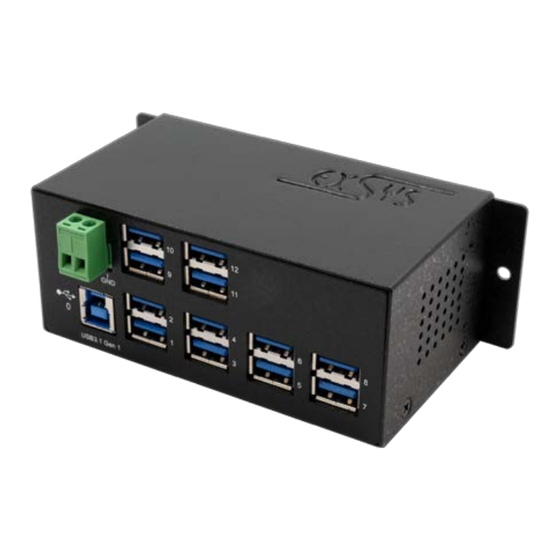
Summary of Contents for Exsys EX-1112HMS
- Page 1 Manuale EX-1112HMS HUB USB 3.2 Gen 1 in metallo a 12 porte con protezione da sovratensione ESD da 15 KV 12-port USB 3.2 Gen 1 metal HUB with 15KV ESD surge protection Vers. 1.1 / 31.03.22 Manual...
-
Page 2: Table Of Contents
Pulizia Dati Tecnici Disegno Tecnico Index Description Extent of Delivery Layout, Connections & Jumper Settings 10-11 Layout Connections 10-11 Jumper Settings Hardware Installation Driver Installation Cleaning Technical Information Technical Drawing © Copyright 2022 by EXSYS Vertriebs GmbH. All Rights Reserved... -
Page 3: Descrizione
1. Descrizone L'EX-1112HMS è un HUB metallico USB 3.2 Gen 1 per un massimo di dodici dispositivi. L'hub è dotato di 12 porte per dispositivi terminali e 1 porta per il collegamento al PC. Supporta tutte le porte USB da 1.1 a 3.2. -
Page 4: Struttura, Attacchi & Installazione Jumper
GND (Ground) +7V - 24V USB 3.2 Gen 1 Type-A: GND_DRAIN StdB_SSTX + StdB_SSTX+ Attenzione! StdB_SSTX - StdB_SSTX - Non inserire mai la spina al contrario né forzarla. © Copyright 2022 by EXSYS Vertriebs GmbH. All Rights Reserved... -
Page 5: Installazione Jumper
L'EX-1112HMS viene fornito con l'impostazione di alimentazione del bus USB. Avete però la possibilità di staccare la tensione all'EX-1112HMS sulla linea dati verso il PC, cioè sulla presa USB Type-B. Per fare ciò, devi prima aprire l'alloggiamento con le quattro viti sui lati. Ora bisogna impostare il jumper JP1 da ENA (Abilita) a DIS (Disabilita). -
Page 6: Installazione Hardware
PC. Possiamo fornirvi solamente delle istruzioni in generale per l'installazione dell'EX-1112HMS. Se qualcosa non è chiaro, fare riferimento al manuale d’istruzioni per l'uso del proprio computer. 1. Installare l'EX-1112HMS a parete utilizzando la staffa di montaggio a parete inclusa. Fori per il fissaggio a parete 2. -
Page 7: Installazione Driver
Nella zona dei collegamenti, assicurarsi che non rimangano fibre del panno nella presa. Non utilizzare in nessun caso un panno umido o bagnato per la pulizia! © Copyright 2022 by EXSYS Vertriebs GmbH. All Rights Reserved... -
Page 8: Dati Tecnici
Temp. di conservazione: Umidità Rel. : Dal 5% fino al 95% Alimentazione: Da +7 fino a +24 Volt Dimensione: 132,50 x 65,00 x 48,20 mm Peso: 1000g 8. Disegno Tecnico © Copyright 2022 by EXSYS Vertriebs GmbH. All Rights Reserved... -
Page 9: Description
1. Description The EX-1112HMS is a USB 3.2 Gen 1 metal HUB for up to twelve end devices. The hub is equipped with 12 ports for end devices and 1 port for connection to PC. It supports all USB ports from 1.1 to 3.2. -
Page 10: Layout, Connections & Jumper Settings
Hardware!!! GND (Ground) +7V - 24V USB 3.2 Gen 1 A-Port: GND_DRAIN StdB_SSTX+ StdB_SSTX + StdB_SSTX - StdB_SSTX - Attention! Never plug in with force or in wrong direction. © Copyright 2022 by EXSYS Vertriebs GmbH. All Rights Reserved... -
Page 11: Jumper Settings
VBus or in wrong direction. 3.3 Jumper Settings The EX-1112HMS will be delivered with the setting USB-Bus-Power. But you have the possibility to cut the power at the data line. For this you open the case with the four screws on both sides. -
Page 12: Hardware Installation
Installation to DIN-Rail DIN-Rail Clip 2. Connect the USB 3.2 Gen 1 cable with the USB 3.2 Gen 1 Upstream B-Port at the EX-1112HMS. 3. Connect the optional power supply to the Terminal Block at the Hub. 4. Now connect the other end from the USB 3.2 Gen 1 cable (A-Plug) to the USB A-Port at your... -
Page 13: Driver Installation
For cleaning please use only a dry fluff less cloth and remove the dirt with gently pressure. In the area of the connectors please make sure that no fibres from the cloth remain in the connectors. Attention! Never use a moist or wet cloth for cleaning! © Copyright 2022 by EXSYS Vertriebs GmbH. All Rights Reserved... -
Page 14: Technical Information
32° to 131°Fahrenheit Storage Temperature: -40° to 185°Fahrenheit Rel. Humidity: 5% to 95% Power: +7 to +24 Volt Size: 132,50 x 65,00 x 48,20 mm Weight: 1000g 8. Technical Drawing © Copyright 2022 by EXSYS Vertriebs GmbH. All Rights Reserved...
Need help?
Do you have a question about the EX-1112HMS and is the answer not in the manual?
Questions and answers