Advertisement
Quick Links
MonoFlat LIN-X600 Instruction Manual
Thank you for purchasing this MonoFlat LIN-X hinge by SUGATSUNE. Before proceeding with the installation,
please read this instruction manual carefully for the best possible result and ensure your safety.
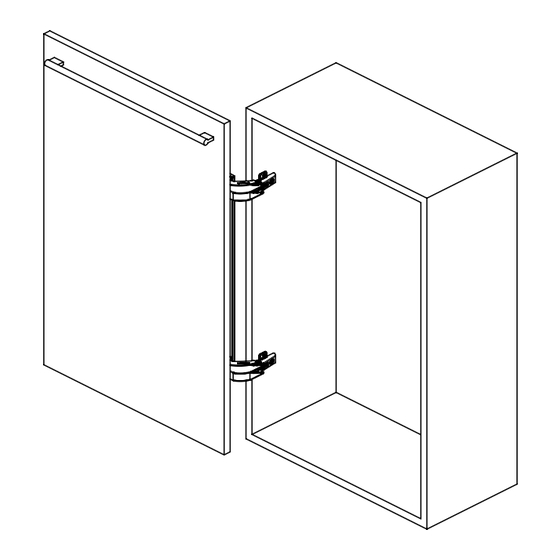
■ Parts List
① LIN-X body ・・・・・ 2 pcs.
④ Connecting plate
cover
・・・・・ 2 pcs.
② Mounting plate ・・・・・ 2 pcs.
⑤ Cup cover
・・・・・2pcs.
!
WARNING
●
Failure to observe the following precautions may
result in injury and/or lead to damage to surrounding
cabinets or fittings.
●
Choose suitable screws to ensure of proper
installation of the cabinet and door.
●
Ensure that door size, weight and material
correspond to the specifications stated in this manual.
●
Do not disassemble or modify the system.
■ Product Specification
Door width
21-5/8"~ 25-9/16" (550~650 mm)
23-5/8"~ 35-7/16" (600~900 mm)
Door height
Door thickness
Door weight
⑥ Countersunk head
tapping screw 3.5x15
・・・・・ 6pcs.
R
9/16"~ 15/16" (15~24 mm)
MAX 19.8 lbs (9 kg) (per door)
③ Connecting plate
L= 21-1/4" (540 mm)
⑦ Binding & tapping
screw 3.5x15
PAT.P
・・・・・ 1 pc.
・・・・・ 8pcs.
1
Advertisement

Subscribe to Our Youtube Channel
Related Manuals for SUGATSUNE MonoFlat LIN-X hinge LIN-X600


Summary of Contents for SUGATSUNE MonoFlat LIN-X hinge LIN-X600
- Page 1 MonoFlat LIN-X600 Instruction Manual PAT.P Thank you for purchasing this MonoFlat LIN-X hinge by SUGATSUNE. Before proceeding with the installation, please read this instruction manual carefully for the best possible result and ensure your safety. ! WARNING ● Failure to observe the following precautions may result in injury and/or lead to damage to surrounding cabinets or fittings.
- Page 2 ...
- Page 3 ■ Installation Mounting plate installation: Connecting plate installation: ② Mounting plate Tighten ⑥ Side board Countersunk head ③ Connecting tapping screw 3.5x15 plate Cup cover installation: Insert Door end Connecting plate Cup hole Connecting nut (o) Shaped ④ Connecting Door ⑤...
- Page 4 ■ Adjustments Adjustment screw (Horizontal) Adjustment screw Turn screw to adjust. (Depth) Loosen screw, adjust the door and retighten screw. Adjustment screw (Vertical) Loosen screw, adjust the door and retighten screw. Leveling ajustment screw Front Loosen both screws, adjust the door and retighten screws.
Need help?
Do you have a question about the MonoFlat LIN-X hinge LIN-X600 and is the answer not in the manual?
Questions and answers