Table of Contents
Advertisement
Quick Links
Advertisement
Table of Contents

Related Manuals for Kaysun KCTAQ-03


Summary of Contents for Kaysun KCTAQ-03
- Page 1 Installation & Owner’s Manual Wired Controller KCTAQ-03 Read this manual carefully before using the product, and keep it for future reference. All the pictures in this manual are for illustration purposes only. The screen of the wired controller is with seven touch keys instead of a touchscreen.
-
Page 2: Table Of Contents
CONTENTS 1 GENERAL SAFETY PRECAUTIONS......01 • 1.1 Safety Signs ............01 • 1.2 Notice to Users..........01 2 DOCUMENTATION.............04 3 USER INTERFACE ............05 • 3.1 Names and Functions ........05 • 3.2 Interface Switch..........06 • 3.3 Interface Layout..........07 4 BASIC OPERATIONS ..........16 • 4.1 Screen Lock/Unlock .........16 •... - Page 3 5 OTHER FUNCTIONS AND SETTINGS ....20 • 5.1 Schedule............20 • 5.2 Weather Temperature........31 • 5.3 DHW ............... 37 • 5.4 Settings ............40 • 5.5 Unit Status ............48 • 5.6 Error Info ............52 • 5.7 FAQ ..............54 6 INSTALLATION CONFIGURATION......
-
Page 4: General Safety Precautions
1 GENERAL SAFETY PRECAUTIONS • This document is applicable only to the wired controller. Read this document and follow the instructions carefully before operating the wired controller. • Always observe all the operating instructions. • Hand these instructions and all other applicable documents to the end user. - Page 5 • This appliance can be used by children aged from 8 years and above and persons with reduced physical, sensory or mental capabilities or lack of experience and knowledge provided that they have been given supervision or instruction concerning the use of the appliance in a safe way and understand the hazards involved.
- Page 6 Warning and troubleshooting of networking failures When connecting the product to a network, please keep the product as close to your phone as possible. At present, the product only supports 2.4 GHz band routers. Special characters, such as punctuation and space, are not recommended as a part of the WLAN name.
-
Page 7: Documentation
2 DOCUMENTATION This document is part of a documentation set. The complete set consists of: • Installation Manual Brief installation instructions Format: paper (included with the outdoor unit) • Installation, Operation and Maintenance Manual Preparation for installation, good practices (more information contained, for installers and advanced users only) Format: digital file. -
Page 8: User Interface
3 USER INTERFACE 3.1 Names and Functions Zone1 Icon Name Definition Press to access the menu page (from the Menu/Return* home page) / return to the previous page (from a page other than the home page) Confirm a selection / Save settings / Confirm Access the next page Turn on/off zone 1/zone 2/DHW... -
Page 9: Interface Switch
3.2 Interface Switch Page A Page B Zone 1 Press Press Zone1 Press Press Mode Press Press Page C Page D * To switch from Page A to Page B, select an appliance first. ** To switch from Page C to Page D, select a target icon first. ***To switch from Page D to Page C, press several times (depending on the page level). -
Page 10: Interface Layout
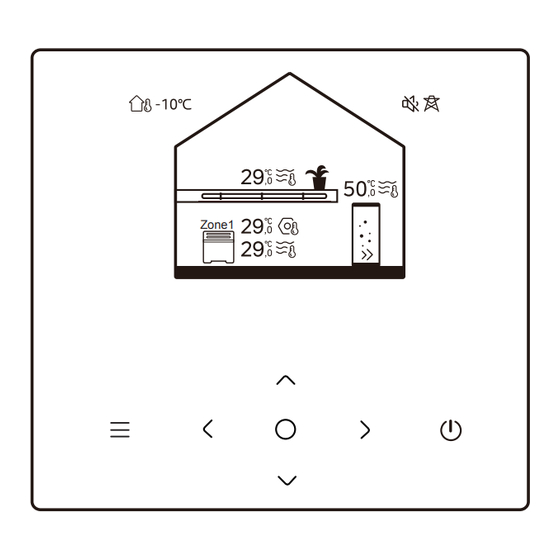
3.3 Interface Layout Page A – Home page ⑦ ① ⑧ ② ③ ⑨ ④ ⑩ ⑤ Zone1 ⑥ Name Icon Note Outdoor ambient Current outdoor ambient temperature temperature The indicator lights up when Zone Temperature 2 is ON and turns gray when Zone Current 2 is OFF. - Page 11 When Zone 2 is selected, the zone indicator and set temperature temperature are visible. Displays Radiator depending on the installer setting. The icon color is orange Zone 2 Underfloor when Zone 2 is in heating applian heating mode. -ces The icon color is blue when Zone 2 is in cooling mode.
- Page 12 Displays Radiator depending on the installer setting. The icon color is orange Underfloor Zone 1 when Zone 1 is in heating heating appli- mode. ance The icon color is blue when Zone 1 is in cooling mode. Fan coil The icon color is gray when unit Zone 1 is OFF.
- Page 13 temperature The icon color is orange when DHW heating is ON. 10** DHW tank The icon color is gray when DHW heating is OFF. Visible when fast DHW is 11** Fast DHW active. * Invisible if DOUBLE ZONE is disabled. **Invisible if DHW MODE is disabled.
- Page 14 Name Icon Note Current date (DD-MM-YYYY) Date and time (HH:MM) of the Time wired controller. Display 1 or 2 depending on Zone indicator Zone1 the zone you have selected. Temperature When temperature controlled by room temperature, Current room is displayed. temperature When temperature...
- Page 15 Visible if any electric heater is Electric heater active. Daily timer Visible if the daily timer is active. Visible when silent mode is Silent mode active. Visible when holiday mode is Holiday mode active. Visible when the compressor is Compressor running.
- Page 16 Visible when disinfection function Disinfection is active. Visible when the weekly timer is Weekly timer active. Outdoor ambient Current outdoor ambient temperature. temperature Error Visible when any error exists. Visible during WLAN WLAN connection connecting and after successful WLAN connection Visible when smart grid function Smart grid is active.
- Page 17 Page C – Menu page Mode ② ③ ① ④ ⑧ ⑤ ⑦ ⑥ Name Icon Definition Set the unit operation mode. Mode The system operates according to a Schedule schedule. Allow regulate water Weather temperature depending on the outdoor temperature ambient temperature.
- Page 18 Page D – Setting and information page The page layout varies with your selection. It is either the setting page in which the parameters can be adjusted, or the information page which only provides additional information.
-
Page 19: Basic Operations
4 BASIC OPERATIONS 4.1 Screen Lock/Unlock The screen dims 30 seconds after no operation, and then turns dark in 10 seconds. To lock or unlock the screen, hold simultaneously for 1.5 seconds. 4.2 Unit ON/OFF Select an appliance (icon 3, 6, or 10) in Page A, and press to turn ON/OFF the selected appliance. -
Page 20: Mode Change
4.4 Mode Change Mode Access icon 1 in Page C to change the operation mode. Heating Press to change the operation mode. Three modes are optional: Heating, Cooling, and Auto. - Page 21 NOTE About AUTO mode: • The unit selects the operation mode automatically based on the outdoor ambient temperature and some advanced settings of the installer. You can see the interfaces as below when the unit is running in different modes. Heating: Mode Cooling:...
- Page 22 Mode Auto: Mode...
-
Page 23: Other Functions And Settings
5 OTHER FUNCTIONS AND SETTINGS The settings and operation guide of icons 2, 3, 4, 5, 6, 7, and 8 in Page C are shown below. NOTE The icon below is the status indicator. means inactive, and means active. 5.1 Schedule Schedule You can make schedules for the unit operation. - Page 24 Schedule Zone1 daily timer Zone2 daily timer DHW daily timer Zone1 weekly schedule Schedule Zone 2 weekly schedule DHW weekly schedule Holiday away Holiday home The status indicator on the right of the interface shows “ON” when the schedule is active, and “OFF” when the schedule is inactive.
- Page 25 NOTE You might see less items than what is illustrated above. The number of visible items depends on your actual application. This function is based on the current time displayed on the wired controller. Make sure the time is correct. Zone 1 daily timer For daily schedule for Zone 1, 4 parameters can be set.
- Page 26 The time when the unit starts to execute the following Time command. The mode in which the unit starts to run from the set Mode time. OFF means Zone 1 turns off at the set time. Temp The target temperature of the unit in the set mode. The status of the schedule setting.
- Page 27 NOTE Weekly schedule: The commands repeats every week. Zone 1 weekly schedule 1 Weekly schedule Press and you can see the interface below. Zone 1 weekly schedule 1 Weekly schedule Every day Command...
- Page 28 Day: Zone 1 weekly schedule Sunday Monday Tuesday Wednesday Command: Zone 1 weekly schedule 1 Time Temp. Mode 01:00 26,5°C 20:00 26,5°C 00:30 26,5°C 00:30 26,5°C Weekly Indicates the status of the weekly schedule. schedule The day on which the following command is active within a week.
- Page 29 Zone 2 weekly schedule Weekly schedule for Zone 2. Refer to Zone 1 weekly schedule. This item is invisible if DOUBLE ZONE is disabled. DHW weekly schedule Weekly schedule for DHW heating. Refer to Zone 1 weekly Schedule and DHW daily timer. This item is invisible if DHW MODE is disabled.
- Page 30 Holiday away Current state From 15-08-2022 Until 17-09-2022 Heating mode Holiday away DHW Mode Disinfect Current Indicates the status of Holiday away mode. Status The day on which Holiday away mode starts From (00:00 on that day). The day on which Holiday away mode ends Until (24:00 on that day).
- Page 31 Heating Indicates the status of heating mode. Mode* Heating The target temperature of the unit in heating Temp.* mode. Indicates the status of DHW heating mode. Mode** The target temperature of the unit in DHW heating mode. Temp.** Disinfect*** Indicates the status of disinfect function. * Invisible if Heating mode is inactive.
- Page 32 Holiday home In case that user stays at home for holiday, user can make customized schedule. Holiday home Current state Press and you can see the interface below. Holiday home Current state 15-08-2022 From 17-09-2022 Until Zone 1 holiday timer...
- Page 33 Holiday home Zone 2 holiday timer DHW holiday timer Current Status Indicates the status of Holiday home mode. The day on which Holiday home mode starts From* (00:00 on that day) The day on which Holiday home mode ends Until* (24:00 on that day) Zone 1 holiday Zone 1 holiday timer.
-
Page 34: Weather Temperature
NOTE You might see less items than what is illustrated above. The number of visible items depends on your actual application. Quit Holiday home mode in advance: When Holiday home mode is active, press any key on the wired controller. Then, a confirmation page appears. For more information, see FAQ. - Page 35 Weather temp. settings Weather temp. settings introduction Zone 1 heating mode Zone 1 cooling mode Zone 2 heating mode Weather temp. settings Zone 2 cooling mode The status indicator on the right of the interface shows “ON” when the setting is active, and “OFF” when the setting is inactive.
- Page 36 • If the temperature is controlled by room temperature, the set temperature (in home page) can be adjust as usual. • This function is invalid if the unit is in holiday away or holiday home mode, and the function turns to valid automatically (if this function is set to be active) when the unit quits holiday away or holiday home mode.
- Page 37 Zone 1 heating mode Temperature curve Temperature curve type Standard Temperature level Temperature offset Temperature Indicates the status of temperature curve function. curve Select which curve type you want to apply. Three types in all: Standard, ECO, Custom Standard: Curves preset by manufacturer, Temperature mainly for common conditions curve type*...
- Page 38 ECO** Temperature Up to 8 curves preset by manufacturer, from level* which you can choose one. ECO timer: Indicates the status of ECO timer. -If the ECO timer is inactive, the unit will operate in ECO mode all the way. -If the ECO timer is active, the unit will operate in timer* ECO mode only during the set time period.
- Page 39 ** Available only for Zone 1 heating mode and single zone application. Zone 1 cooling mode Cooling temperature curve setting for Zone 1. Refer to Zone 1 heating mode. Zone 2 heating mode Heating temperature curve setting for Zone 2. Refer to Zone 1 heating mode.
-
Page 40: Dhw
5.3 DHW DHW settings NOTE Invisible if DHW MODE is disabled. The status indicator on the right of the interface shows “ON” when the setting is active, and “OFF” when the setting is inactive. DHW settings Disinfect Fast DHW Tank heater DHW pump... - Page 41 Kill Legionella at high temperature. Disinfect Current State Indicates the status of Disinfect function. The day on which Disinfect function is Operate Day active within a week. At least one day should be selected. Start The hour when Disinfect function starts. Indicates the status of Fast DHW function.
- Page 42 Disinfect Disinfect Current state Press and you can see the interface below Disinfect Current state Operatation day Every day Start...
-
Page 43: Settings
DHW pump DHW pump Time 5.4 Settings Settings The status indicator on the right of the interface shows “ON” when the setting is active, and “OFF” when the setting is inactive. - Page 44 Settings Silent Mode Backup Heater Display Setting WLAN Setting Settings Force defrost Silent mode In Silent mode, the unit operates without producing much noise.
- Page 45 Silent mode Silent mode Press and you can see the interface below. Silent mode Silent mode Slient mode level Super silent Silent mode timer 1 From...
- Page 46 Silent mode Until Silent mode timer 2 From Until Silent Mode Indicates the status of Silent Mode. The level you want to use: (1)Silent; (2) Super Silent mode silent. level Silent mode Indicates the status of Silent mode timer 1. timer 1 The time when Silent mode timer 1 starts.
- Page 47 • When silent mode is active while the silent mode timer is inactive, the unit runs in silent mode all the time. When silent mode is active and the silent mode timer is also active, the unit runs in silent mode only in the set time period. •...
- Page 48 Display Setting Display Setting Time 12:30 Date 15-08-2022 Language English Backlight Display Setting Buzzer Screen Lock 120 S Screen lock time...
- Page 49 Time Set the current time of HMI. Set the current date of HMI. Date Set the language of HMI. Language Backlight Set the backlight brightness. Indicates the status of Buzzer. Buzzer Reminds user how to lock and unlock the Screen Lock screen.
- Page 50 Jump to a new page, which contains the SN code of the wired controller. -Every time you enter the Smart Link screen, the WLAN connection is activated for 5 minutes. Smart Link -With the WLAN connection activated, connect to the unit through the app. Refer to the instructions of the app for more information.
-
Page 51: Unit Status
5.5 Unit Status Unit status Unit status Operation parameter Energy metering SN check Service call A list of parameters related to the units (both master units and slave units). You can check the current status of each Operation parameter. parameter Press to switch the unit. - Page 52 You can check the produced energy, consumed power and efficiency of the unit for every type. Three types in all: -Heating energy data* -Cooling energy data* -DHW energy data* Two functions: E n e r g y -Energy data: you can check the hourly, daily, metering weekly, monthly, or yearly data or total data.
- Page 53 Operating parameter Operation parameter Unit Online unit number ODU model Heating Operation mode Operation status Energy metering Energy metering Heating energy data Cooling energy data DHW energy data...
- Page 54 Heating energy data Energy data Historical data Energy data: Heat energy: Hour 8,5 kW Production 6,5 kw RE production Consumption 2,5 kW 3,40...
-
Page 55: Error Info
Historical data: Heating energy Total 2021 Production 6000 kwh 3455 kWh RE production Consumption 1456 kWh 4,12 5.6 Error Info Error info Access icon 7 in page C. Then, unit errors (if any) are displayed. - Page 56 Error info. Unit Time Code Date You can press at each record to check the definition of the error code. Error info. Unit Code Time Date 11:27 19-12-2022 Water flow fault...
-
Page 57: Faq
5.7 FAQ Access icon 8 in page C. Then, a QR code is displayed. Scan the code to obtain FAQ file. Scan the QR code for more details about the wired controller. -
Page 58: Installation Configuration
6 INSTALLATION CONFIGURATION To be filled in by the installer. Setting Code Unit Date DHW setting DHW mode Disinfect DHW priority Pump_D DHW priority time set °C dT5_ON dT1S5 °C T4DHWMAX °C T4DHWMIN °C Minutes t_INTERVAL_DHW T5S_DISINFECT °C t_DI_HIGHTEMP. Minutes t_DI_MAX Minutes Minutes... - Page 59 Cooling setting Cooling mode Hour t_T4_FRESH_C °C T4CMAX °C T4CMIN °C dT1SC °C dTSC Minutes t_INTERVAL_C Zone 1 C-emission Zone 2 C-emission Heating setting Heating mode t_T4_FRESH_H Hours T4HMAX °C T4HMIN °C dT1SH °C dTSH °C t_INTERVAL_H Minutes Zone 1 H-emission Zone 2 H-emission Force defrost AUTO mode setting...
- Page 60 Temp. type setting WATER FLOW TEMP. ROOM TEMP. DOUBLE ZONE Room thermostat setting ROOM THERMOSTAT MODE SET PRIORITY Other heat source IBH function IBH locate dT1_IBH_ON °C t_IBH_DELAY Minutes T4_IBH_ON °C P_IBH1 P_IBH2 AHS function AHS_PUMPI CONTROL dT1_AHS_ON °C t_AHS_DELAY Minutes T4_AHS_ON °C...
- Page 61 MIN-SETHEATER °C MAX-SIGHEATER MIN-SIGHEATER TBH FUNCTION dT5_TBH_ OFF °C t_TBH_DELAY Minutes T4_TBH_ON °C P_TBH Solar function Solar control Deltatsol °C Holiday away setting °C T1S_H.A_H °C T5S_H.A_DHW Special function Preheating for floor T1S °C t_ARSTH Hours t_Dryup Days t_Highpeak Days t_Drydown Days t_Drypeak...
- Page 62 Preheating for floor Floor drying up AUTO RESTART AUTO RESTART COOLING/HEATING MODE AUTO RESTART DHW MODE POWER INPUT LIMITATION POWER INPUT LIMITATION INPUT DEFINE M1 M2 SMART GRID T1T2 P_X PORT CASCADE SETTING PER_START Minutes TIME_ADJUST ADDRESS RESET HMI ADDRESS SETTING HMI SETTING HMI ADDRESS FOR BMS...
- Page 63 Stop BIT Common setting t_DELAY PUMP Minutes t1_ANTILOCK PUMP Hours t2_ANTILOCK PUMP RUN Seconds t1-ANTILOCK SV Hours t2-ANTILOCK SV RUN Seconds Ta-adj. °C F-PIPE LENGTH PUMP_I SILENT OUTPUT Energy metering Pump_O...
-
Page 64: Operating Parameters
7 OPERATING PARAMETERS Code Value Date ODU model Operation mode Comp. frequency Fan speed Expansion valve Tp comp. discharge temp. Th comp. suction temp. T3 outdoor exchanger temp. T4 outdoor air temp. TF module temp. P1 comp. pressure P2 comp. pressure T2b plate F-in temp. - Page 65 21 Tbt buffer tank temp. T1S_C1 CLI. curve temp. T1S2_C2 CLI. curve temp. Water pressure Water flow ODU current ODU voltage DC voltage DC current Pump_I PWM...
- Page 66 NOTE...
Need help?
Do you have a question about the KCTAQ-03 and is the answer not in the manual?
Questions and answers