
Related Manuals for Schaller humimeter FS4.1


Summary of Contents for Schaller humimeter FS4.1
- Page 1 User Manual Sludge granulate moisture meter humimeter FS4.1 Version 2.2_en © Schaller GmbH 2011...
- Page 2 It is important that no material is left in the measuring chamber when you turn on the device. 3. Switch on the humimeter FS4.1 by pressing the power button ( ) for 3 sec. 4. As the next step, please do the self calibration.
- Page 3 6. Fill up the cup with the sample material (+/- 1.0g). The fill quantity is shown on the upper left corner on the display of the humimeter. 7. Fill up the measuring device with the sample material. The filling needs to be done slowly and constantly to ensure reproducible results 8.
- Page 4 11. To name the saved results press the button. 12. Empty the humimeter and ensure that no grain rests are accumulated in the measuring chamber. Changing batteries Your new device is provided with batteries. Please find enclosed the manual for fitting and changing of batteries: 1.) Press with your finger onto the arrow of the battery cap und pull it back.
-
Page 5: Calibration Curves
Empty calibration curves: There are another 10 empty calibration curves stored in the measurement device. These can be used for special fruits or variety calibration. “Schaller GmbH” can request customized calibration curves of your product. Version 2.2_en page 5... -
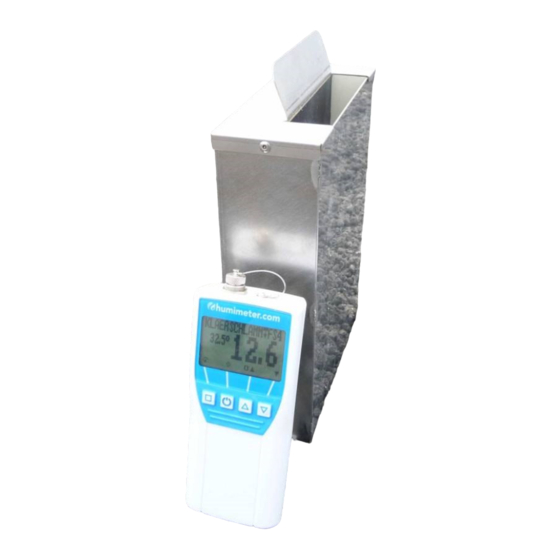
Page 6: Design Of The Device
Design of the device Filler assistance Measuring chamber Name of calibration curve Water content POWER button Batteries slot (flipside) Determination of the material reference moisture The principle is a comparison measurement with the dehydration method according to EN ISO712. Take the measured sample and weigh it. -
Page 7: Menu Level Overview
Keypad symbols Menu level overview Measuring window: Rolling Menu Type selection Power ON / OFF menu Switch upper Switch lower Next calibration curve Save Previouse calibration curve Hold Power off (3 sec.) Watch the saved data Store menu Suppliers data can be added Watch the saved data (logs) Save new value (log) - Page 8 Transfer saved data to the PC To send your saved logs to the PC, connect the humimeter device to your PC using the USB cable that was delivered with your device. Carefully loose the protection cap on your humimeter and plug in the USB mini B connector.
- Page 9 Print saved data To print your saved data, connect the device to the printer using the printer cable that was delivered with your device. Carefully loose the protection cap on the humimeter. At first plug in the side of the connector with the close plastic casing at the humimeter.
- Page 10 Each device includes a serial number and the guarantee stamp. If those are broken, no claims for guarantee can be made. In case of a faulty device, please contact Schaller GmbH (www.humimeter.com) or our dealer. Activation of the “super user” function 2 times - Options –...
- Page 11 Technical data Resolution of the display 0.1% water content 0.5°C temperature Measuring range 10 up to 55% moisture content Operation temperature 0 up to +40°C (32 up to 104°F) Storage temperature -20°C to +60°C Temperature compensation Automatically Power supply 4 pcs. 1.5 Volt AA Alkaline batteries (900 measurements) Auto Switch OFF After app.
-
Page 12: Important ! Please Read
! IMPORTANT ! please read Most common reasons for miss readings • Product temperature out of application range Material below 0°C resp. above +40°C (32 to 104 °F) may cause faulty measurements. The storage of cold material in a warm storage area usually creates condensed water which may lead to major measuring errors.
Need help?
Do you have a question about the humimeter FS4.1 and is the answer not in the manual?
Questions and answers