Table of Contents
Advertisement
Quick Links
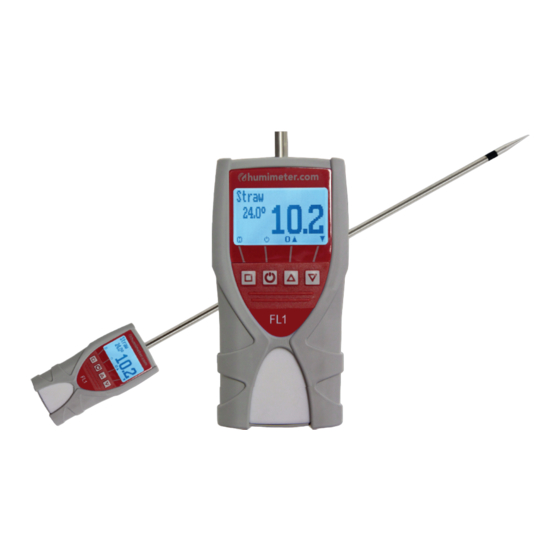
Moisture meter
Operating Manual
humimeter FL1
Moisture meter with insertion probe
for measuring the moisture content of hay and straw
78,0 °F | 6,16 % | 456 kg/m
| -27,3 td | 0,64 aw | 51,9 %r.H. | 14,8 % abs | 100,4 g/m
| 09 m/s | 4,90 Ugl | 1
3
2
Always read this operating manual before using the humimeter FL2
Version 2.1
Advertisement
Table of Contents

Related Manuals for Schaller FL1


Summary of Contents for Schaller FL1
- Page 1 Moisture meter Operating Manual humimeter FL1 Moisture meter with insertion probe for measuring the moisture content of hay and straw 78,0 °F | 6,16 % | 456 kg/m | -27,3 td | 0,64 aw | 51,9 %r.H. | 14,8 % abs | 100,4 g/m...
-
Page 2: Your Humimeter Fl1 At A Glance
FL1 Operating Manual Your humimeter FL1 at a glance The main unit Name Measuring head Insertion probe Electronics in plastic housing Page 2... -
Page 3: The Main Unit In Detail
The main unit in detail Name USB port (optional) Display Keypad Rubber protection cover Rear of the main unit Name Battery compartment Page 3... -
Page 4: The Display
FL1 Operating Manual The display Name Product type Moisture content % ("6.1 How moisture is defined") Display symbols Temperature display The display symbols Symbol Name Symbol Name Enter Change input level Down Back Change menu Enter numbers Enter data... -
Page 5: The Menus
The menus Simplified user The device has two different menus: product selection and main menu. Product selection menu Name Hold measuring value (see "5.3 Hold function - Freezing the displayed values") Display illumination / device on/off For changing the product type Advanced user The device has three different menus: product selection, Data Log and main menu: Product selection menu... - Page 6 FL1 Operating Manual Data Log menu Name Change menu Display illumination / device on/off Save measured value Show the last recorded values Main menu The main menu comprises the following menu items: • Clear Logs: • Options: Language, Unlock, °C/°F, Userlevel, Materialcalib., Password, Reset •...
-
Page 7: Table Of Contents
Table of contents Your humimeter FL1 at a glance �������������������������������������������������� 2 The main unit ......................2 The main unit in detail ..................... 3 Rear of the main unit ....................3 The display ....................... 4 The menus ....................... 5 1� Introduction ������������������������������������������������������������������ 10 Information about this operating manual .......... - Page 8 FL1 Operating Manual Selecting the product type ..............16 Taking a measurement ................16 Switching the device off ................ 16 5� The measuring process ������������������������������������������������� 17 Preparing a measurement ..............17 Taking a measurement ................17 Hold function - Freezing the displayed values ........19 5.3.1...
- Page 9 Configuring the material calibration function ........32 Changing the password ................ 33 Resetting the device to its factory settings ..........34 9� Cleaning and maintenance ������������������������������������������ 35 Changing batteries ................35 Care instructions ................... 35 Cleaning the device ................35 10�...
-
Page 10: Introduction
Introduction Information about this operating manual This operating manual is designed to enable you to use the humimeter FL1 safely and effectively. It is part of the device, has to be stored nearby and must be easily accessi- ble to users at all times. -
Page 11: Symbols Used In This Manual
For technical advice, please contact our customer service department at: Schaller GmbH Max-Schaller-Straße 99 A - 8181 St.Ruprecht an der Raab Telefon: +43 (0)3178 28899 Fax: +43 (0)3178 28899 - 901 E-Mail: info@humimeter.com Internet: www.humimeter.com © Schaller Messtechnik GmbH 2022 Page 11... -
Page 12: For Your Safety
FL1 Operating Manual For your safety The device complies with the following European directives: • Restriction of Hazardous Substances in Electrical and Electronic Equipment (RoHS) • Electromagnetic compatibility (EMC) The device corresponds to state-of-the-art technology. However, it is still associated with a number of residual hazards. -
Page 13: General Safety Information
• Keep the measuring head away from other people throughout all activities. • In case of damages or loose parts on the device, remove the batteries and con- tact Schaller GmbH or your dealer. All of the device’s technical features have been inspected and tested before delivery. -
Page 14: Making Sure That All Of The Components Have Been Included
FL1 Operating Manual Making sure that all of the components have been included Make sure that all of the components have been included by checking the package contents against the following list: • humimeter FL1 • 4 pieces of AA Alkaline batteries •... -
Page 15: Using The Device - Basics
Using the device - Basics Switching the device on • Press the button for 3 seconds. » The display will then show the status indicator (figure 6). » After inserting the batteries, the device switches on automatically. Simplified user At delivery, the simplified user is activated. The simplified user restricts the user´s access to the product selection menu with Hold function. -
Page 16: Selecting The Product Type
FL1 Operating Manual Selecting the product type To do so: The device has to be in the product selection menu (figure 8). For an overview of the different product types and the criteria for selecting them, please refer to "6. -
Page 17: The Measuring Process
The measuring process Preparing a measurement To do so: The device has to have nearly the same tempe- rature than the product to measure. It is recommended to let your humimeter device adjust to the surrounding temperature before the measurement. Switch on the device (see "4.1 Switching the device on"). - Page 18 FL1 Operating Manual CAUTION Risk of injury Risk of injury due to the measuring head ► Keep the measuring head away from your body throughout all activities. ► Keep the measuring head away from other people throughout all activities.
-
Page 19: Hold Function - Freezing The Displayed Values
Hold function - Freezing the displayed values With the simplified user active, the device is configured in such a way that the informa- tion being shown on the display will freeze at the touch of a button until a new button is pressed. -
Page 20: Saving Several Readings (A Measurement Series) At The Same Time
FL1 Operating Manual The data you have inputted can be overwritten at any time. Inputting letters: Press and hold to quickly scroll to the required letter and either press it for 3 seconds or press to confirm the selected letter (figure 19). - Page 21 Inputting letters: Press and hold to quickly scroll to the required letter and either press it for 3 seconds or press to confirm the selected letter (figure 22). Inputting numbers: Press and hold to quickly scroll to the required number and either press it for 3 seconds or press to confirm the selected number.
-
Page 22: Viewing Individual Readings
FL1 Operating Manual Viewing individual readings To do so: You must have saved a reading (e.g. 1 Log) and the advanced user has to be active (see "8.5 Changing Userlevel"). The display will now appear as shown in figure 23. -
Page 23: Deleting All Measured Values (Data Log)
Deleting all measured values (data log) To do so: You must have taken and saved one or several readings. Open the main menu. » Simplified user: see section "4.2.3 Opening the main menu in the simplified user level". » Advanced user: Press twice or hold for 2 seconds. -
Page 24: Deleting Single Values From A Series Of Measurements
FL1 Operating Manual » The display will then show the message clear? (figure 34). Confirm by pressing » The value has been deleted. 5.10 Deleting single values from a series of measurements To do so: You must have saved a series of measurements... -
Page 25: Product Types
If you are not sure which calibration curve is the best suited for your material, it is recommended to carry out a reference measurement by kiln-drying (EN ISO 18134-2). Schaller GmbH will be happy to advise you on the selection of the right calibration curve for special hay and straw types. - Page 26 FL1 Operating Manual Straw Incorrect measurement Page 26...
-
Page 27: Notes For Comparative Measurement With Oven-Drying Method
Notes for comparative measurement with oven-drying method The device uses a much higher sample quantity than the drying oven (12-fold to 20-fold quantity of kiln-drying method). Furthermore, to determine a more accurate average moisture value in case of inhomogeneous material, there can be effected sev- eral measurements within a short time. -
Page 28: Checking On The Device's Status
FL1 Operating Manual Checking on the device's status Press twice or hold for 2 seconds. Select Status. To do so, press and confirm by pressing » The display will then show the status indicator humimeter. » The display will show the following information:... -
Page 29: Configuring The Device
Configuring the device Selecting a language Open the main menu. » Simplified user: see section "4.2.3 Opening the main menu in the simplified user level" » Advanced user: Press twice or hold for two seconds. Select Options. To do so, press and confirm by pressing Select Language. -
Page 30: Activating Options
FL1 Operating Manual Activating options To do so: Some of the options must be deactivated. Open the main menu. » Simplified user: see section "4.2.3 Opening the main menu in the simplified user level". » Advanced user: Press twice or hold for two seconds. -
Page 31: Deactivating Options
Deactivating options Once the device has been restarted, the °C/°F, Userlevel, Materialcalib., Password, Reset options will be deactivated again. Selecting °C/°F To do so: All of the options must be activated (see "8.2 Activating options"). Open the main menu. » Simplified user: see section "4.2.3 Opening the main menu in the simplified user level". -
Page 32: Changing The Userlevel
FL1 Operating Manual Changing the Userlevel 8.5.1 Changing from simplified to advanced user To do so: The device has to be turned off. Open the main menu (see section "4.2.3 Opening the main menu in the simpli- fied user level"). -
Page 33: Changing The Password
Changing the password To do so: All of the options must be activated (see "8.2 Activating options"). Open the main menu. » Simplified user: see section "4.2.3 Opening the main menu in the simplified user level". Advanced user: Press twice or hold for two seconds. Select Options. -
Page 34: Resetting The Device To Its Factory Settings
FL1 Operating Manual Resetting the device to its factory settings To do so: All of the options must be activated (see "8.2 Activating options"). Open the main menu. » Simplified user: see section "4.2.3 Opening the main menu in the simplified user level". -
Page 35: Cleaning And Maintenance
Cleaning and maintenance Regularly cleaning and maintaining the device will ensure that it will have a long service life and stay in good condition. Changing batteries The device constantly monitors the charge level of the batteries. The current battery status is shown on the status screen. -
Page 36: Faults
FL1 Operating Manual 10. Faults If the measures listed below fail to remedy any faults or if the device has faults not listed here, please contact Schaller GmbH. Fault Cause Remedy Measuring error The temperature of the mate- The temperature of the... -
Page 37: Storage And Disposal
Fault Cause Remedy Heating of the measuring head Let the device cool down. because of friction in bales with high compressed density 11. Storage and disposal 11.1 Storing the device The device must be stored as follows: • Do not store outdoors. •... -
Page 38: Device Information
A – 8181 St. Ruprecht Produktbezeichnung: humimeter Product designation: Typenbezeichnung: BL2 ; BLL ; BLH ; BLW ; FL1 ; FL2 ; FLH ; FLM ; FLS ; RM1; SLW ; WLW Type designation: Produktbeschreibung: Messgerät zur Bestimmung des Wassergehalts in Biomasse und diversen Schüttgütern... - Page 39 Für das angeführte Produkt ist eine vollständige Dokumentation mit Betriebsanleitung in Originalfassung vorhanden. For the mentioned product a complete documentation with manual of instruction in original version is available. Bei Änderungen, die nicht vom Hersteller spezifiziert sind, verliert diese Konformitätserklärung die Gültigkeit.
- Page 40 Max-Schaller-Straße 99 A – 8181 St. Ruprecht Product designation: humimeter BL2 ; BLL ; BLH ; BLW ; FL1 ; FL2 ; FLH ; FLM ; FLS ; RM1; Type designation: SLW ; WLW Product description: Measuring device for determining the water content in bio...
- Page 41 For the mentioned product, a complete documentation with manual of instruction in original version is available. In case of any changes not agreed upon with the manufacturer, this declaration of conformity loses its validity. St. Ruprecht a.d. Raab, 31.07.2022 …............Bernhard Maunz Legal binding signature of the issuer Page 41...
-
Page 42: Technical Data
FL1 Operating Manual 12.2 Technical data Display resolution 0.1 % moisture content, 0.5 °C/°F temperature Measuring range 8 % to 30 % water content Operating temperature 0 °C to +40 °C Temperature measuring -20 °C to +120 °C (only measuring head) -
Page 43: Notes
13. Notes Page 43... - Page 44 Schaller Messtechnik develops, produces and sells professional moisture meters and turnkey solutions. Schaller Messtechnik GmbH Max-Schaller-Straße 99, A - 8181 St. Ruprecht an der Raab Tel +43 (0)3178 - 28899 , Fax +43 (0)3178 - 28899 - 901 info@humimeter.com, www.humimeter.com...
Need help?
Do you have a question about the FL1 and is the answer not in the manual?
Questions and answers