Table of Contents
Advertisement
Quick Links
3 BURNER GAS BBQ
GFGBBQ3B
WARNING: PLEASE ENSURE YOU HAVE READ
THROUGH THE SAFETY AND OPERATING
INSTRUCTIONS BEFORE USE.
PLEASE RETAIN INSTRUCTIONS FOR FUTURE REFERENCE
For Customer Services & Spare Parts please call 0345 209 7461
Opening times: Monday - Friday 9am – 5pm
Or visit us at www.productcare.co.uk
Advertisement
Table of Contents

Related Manuals for George Foreman GFGBBQ3B


Summary of Contents for George Foreman GFGBBQ3B
- Page 1 3 BURNER GAS BBQ GFGBBQ3B WARNING: PLEASE ENSURE YOU HAVE READ THROUGH THE SAFETY AND OPERATING INSTRUCTIONS BEFORE USE. PLEASE RETAIN INSTRUCTIONS FOR FUTURE REFERENCE For Customer Services & Spare Parts please call 0345 209 7461 Opening times: Monday - Friday 9am – 5pm...
-
Page 2: Table Of Contents
CONTENTS Page(s) Safety instructions BBQ Feature Diagram & Parts List BBQ Assembly 8-15 Attaching Gas Cylinder Disconnecting Gas cylinder Lighting your BBQ Food Safety Tips for use Storage Cleaning and care Troubleshooting 23-24 Guarantee and customer services Notes 26-27... -
Page 3: Safety Instructions
SAFETY INSTRUCTIONS IMPORTANT SAFETY INSTRUCTIONS READ CAREFULLY AND KEEP FOR FUTURE REFERENCE WARNING: • The Barbeque must be installed on a secure level base prior to use. • Read the instructions before using the appliance. • Always light the barbecue with the lid open. •... - Page 4 • The appliance must be installed with 1m clearance in all directions around the appliance and should not be used underneath any overhead obstruction or in an enclosed space. • In the event of a gas leak, turn off the gas supply at the gas cylinder, extinguish any open flames and keep the lid open.
- Page 5 SAFETY CHECKS BEFORE USE • If you smell gas shut off gas to the appliance and at the cylinder, extinguish any open flames, open lid and if the odour continues, keep away from the appliance and immediately call your gas supplier or the fire brigade.
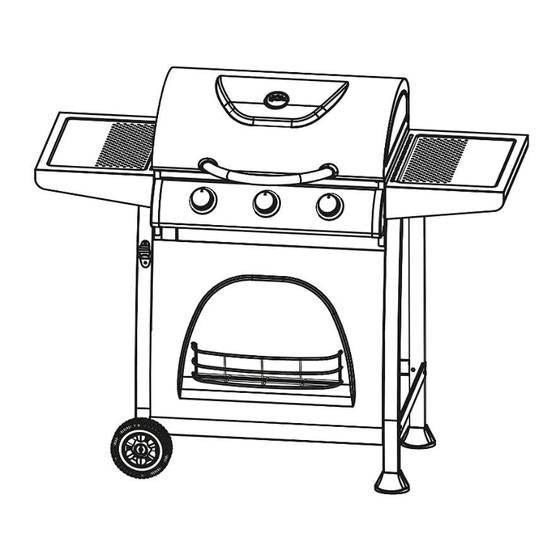
- Page 6 BBQ FEATURE DIAGRAM...
-
Page 7: Bbq Feature Diagram & Parts List
BBQ PARTS LIST PART DESCRIPTION Barbeque Shelves Right Bracket Left Bracket Right Back Leg Right Front Let Left Back Leg Left Front Leg Front Fascia Side Support Back Support Wheel Axle Wheel Rubber Anti-Slip Feet Grease Drip Tray Flame Tamers Left Grill Rack Right Grill Rack Warming Rack... -
Page 8: Bbq Assembly
BBQ ASSEMBLY Assembling the Right Shelf 1. Place right shelf aligned with the two screw holes. 2. Using the screws (B) from the inside, screw onto the shelf. You will need: Assebling the Left Shelf 1. Place left shelf aligned with the two screw holes. - Page 9 BBQ ASSEMBLY Attaching the Right Legs 1. Line up the rear right leg (5) with the screw holes underneath the barbeque. 2. Using bolt (A) screw into the second hole from the top. 3. Repeat the process with the front right leg (6).
- Page 10 BBQ ASSEMBLY Attaching the Front Plate 1. Line the front plate (9) with the front legs screw holes with the flat fascia facing down. 2. Using the screws (B) attach the plate (9) on the inner legs. You will need: Attaching the Crossbars 1.
- Page 11 BBQ ASSEMBLY Attaching the Wheels 1. Push the bar (12) through the holes on the base of the left legs. 2. Attach a washer (E) on the outside of both sides of the bar (12). 3. Attach a wheel on both sides of the bar (12).
- Page 12 BBQ ASSEMBLY Attaching the Rear Bracket 1. Place the left bracket (3) aligning the screw holes at the top of the rear right leg (5). 2. Push 2 bolts (A) through the leg and into the bracket. 3. Secure the bolts with the screw nuts (C).
- Page 13 BBQ ASSEMBLY Attaching the Brackets 1. On the sides of the rear legs, secure the mounting bracket to the body using the bolts (B) on each side. You will need: Attaching the Grease Tray 1. Hang the grease collection tray (15) over the tray on the rear of the barbeque.
- Page 14 BBQ ASSEMBLY Installing the Flame Tamers 1. Place the flame tamers (16) across the three bars of the barbeque onto the hooks. 2. Ensure all the covers are flat and flush. Fitting the Grill Racks 1. Place the left grill rack (17) onto the barbeque so it is resting on the lip.
- Page 15 BBQ ASSEMBLY Attaching the Thermostat 1. Slot the warming rack (19) on to the frame of the gas BBQ so that the rear of the warming rack is over the back plate of the frame. 2. Push the thermostat (20) through the hole on the lid.
- Page 16 BBQ ASSEMBLY Checking for Gas Leaks 1. When fully attached, turn on the gas cylinder. 2. Using soapy water, rub along the length of the gas hose and the valve. 3. If there are any leaks, bubbles will form. Immediately turn off the gas and replace the hose.
-
Page 17: Attaching Gas Cylinder
ATTACHING YOUR GAS CYLINDER After purchasing your gas cylinder you will then be ready to set it up with your gas grill. When changing the gas cylinder it must not be near any source of ignition such as matches, cigarettes, direct sunlight or any open flame. -
Page 18: Disconnecting Gas Cylinder
DISCONNECTING YOUR GAS CYLINDER When you have finished using the appliance you must remove the gas cylinder. In order to do this you turn the small lever on the regulator from its open position (horizontal) to its closed position (vertical). Once the gas supply has been turned off you then need to remove the regulator from the gas cylinder. -
Page 19: Lighting Your Bbq
LIGHTING YOUR BBQ USING THE AUTOMATIC IGNITION Caution: The lid must be always open when lighting the barbeque. Do not stand with your face directly over the gas grill when lighting it. 1. Ensure the dial is in the “OFF” position. 2. -
Page 20: Food Safety
FOOD SAFETY Thoroughly defrost frozen meat and poultry in the refrigerator before cooking. Keep raw meat and poultry separate from cooked foods. Always wash hands before and after handling raw meat and poultry, and before handling any ready to eat foods. Wipe and disinfect all surfaces that have been in contact with raw meat and poultry. -
Page 21: Tips For Use
TIPS FOR USE It is important to preheat the grill before starting to barbeque. Follow the Lighting your BBQ instructions on Page 18, then turn control dial to the “HIGH” position and close the lid to preheat the grill. This will take 10 to 15 minutes depending on conditions such as air temperature and wind. -
Page 22: Storage
STORAGE Your gas bottle must be stored outdoors in a well ventilated area and must be disconnected from your gas grill when not being used. Ensure that you are outdoors and away from any sources of ignition before attempting to disconnect your gas bottle from your barbeque. -
Page 23: Cleaning And Care
CLEANING INSTRUCTIONS Ensure the appliance is completely cool before cleaning. Empty the grease tray after each use and wash with warm soapy water. Grill trays should be cleaned by soaking and washing with warm soapy water. The interior surfaces of the grill housing cover should also be washed with warm, soapy water. -
Page 24: Troubleshooting
TROUBLE SHOOTING PROBLEM POSSIBLE CAUSE PREVENTION/ SOLUTION Gas leaking from Turn off gas at LP tank, if hose is cut or Damaged hose cracked/cut/burned hose cracked, replace hose. Gas leaking from LP tank Mechanical failure due to resting or Turn off LP tank valve and replace. mishandling Gas leaking from LP tank Failure of tank valve from mishandling or... - Page 25 TROUBLE SHOOTING PROBLEM POSSIBLE CAUSE PREVENTION/ SOLUTION Burner will not light using Electrical issues: 1.Replace electrode. ignitor 1. Electrode cracked or broken;” sparks at 2.Tip of electrode should be pointing crack.” toward port hole in burner. The distance 2. Electrode tip not in proper position should be 1/8”...
-
Page 26: Guarantee And Customer Services
GUARANTEE AND CUSTOMER SERVICES This product is guaranteed for 12 months from the date of the original purchase. If any defect arises due to faulty materials or workmanship, the faulty product must be returned to the place of purchase. Refund or replacement is at the discretion of the retailer. The following conditions apply: •... -
Page 27: Notes
NOTES... - Page 28 NOTES...
- Page 29 3 BURNER GAS BBQ GFGBBQ3B Made by G2S under license. G2S Ltd, Wigan, WN2 4AY George Foreman is the registered trademark of Spectrum Brands (U.K.) Ltd. Revision 2.1...
Need help?
Do you have a question about the GFGBBQ3B and is the answer not in the manual?
Questions and answers