Advertisement
- 1 Technical specifications
- 2 Intended use
- 3 Grounding installation
- 4 Main parts of the product
- 5 Control panel
- 6 Preparation before use
- 7 Operating instructions
- 8 Operating tips
- 9 Cleaning & maintenance
- 10 Troubleshooting
- 11 Safety instructions
- 12 Special safety instructions
- 13 Documents / Resources
Read user manual and keep this with the appliance.
For indoor use only.
Technical specifications
| A | 229026 | 229033 |
| B | 220 - 240V~ 50 - 60Hz | |
| C | 900 - 1100W | 550 - 650W |
| D | 35°C ~ 75°C | |
| E | 30 minutes to 24 hrs | |
| F | I | |
| G | 10 | 6 |
| H | 0,5 kg | 0,25 kg |
| I | 417 x 535 x (h)430 mm | 340 x 450 x (h)311 mm |
| J | 17,2 kg | 8,3 kg |
- Item no
- Rated voltage and frequency
- Rated input power
- Temperature settings
- Time settings: 30 Minutes to 24 Hours
- Protection class (Class)
- Number of shelf
- Maximum shelf load
- Dimensions
- Net weight
Remark: Technical specification is subjected to change without prior notification.
Read this user manual carefully, paying particular attention to the safety regulations before installing and using this appliance for the first time.
Intended use
- This appliance is intended to be used in household and similar applications such as:
- staff kitchen areas in shops, offices and others working environment;
- farm houses;
- by clients in hotels, motels and other residential type environment;
- bed and breakfast type environment.
- The appliance is designed for drying appropriate food such as vegetables, fruits, etc. Any other use may lead to damage of the appliance or personal injury.
- Operating the appliance for any other purpose shall be deemed a misuse of the device. The user shall be solely liable for improper use of the device.
Grounding installation
This appliance is classified as protection class I and must be connected to a protective ground. Grounding reduces the risk of electric shock by providing an escape wire for the electric current.
This appliance is fitted with a power cord with grounding plug or electrical connections with grounding wire. The connections must be properly installed and grounded.
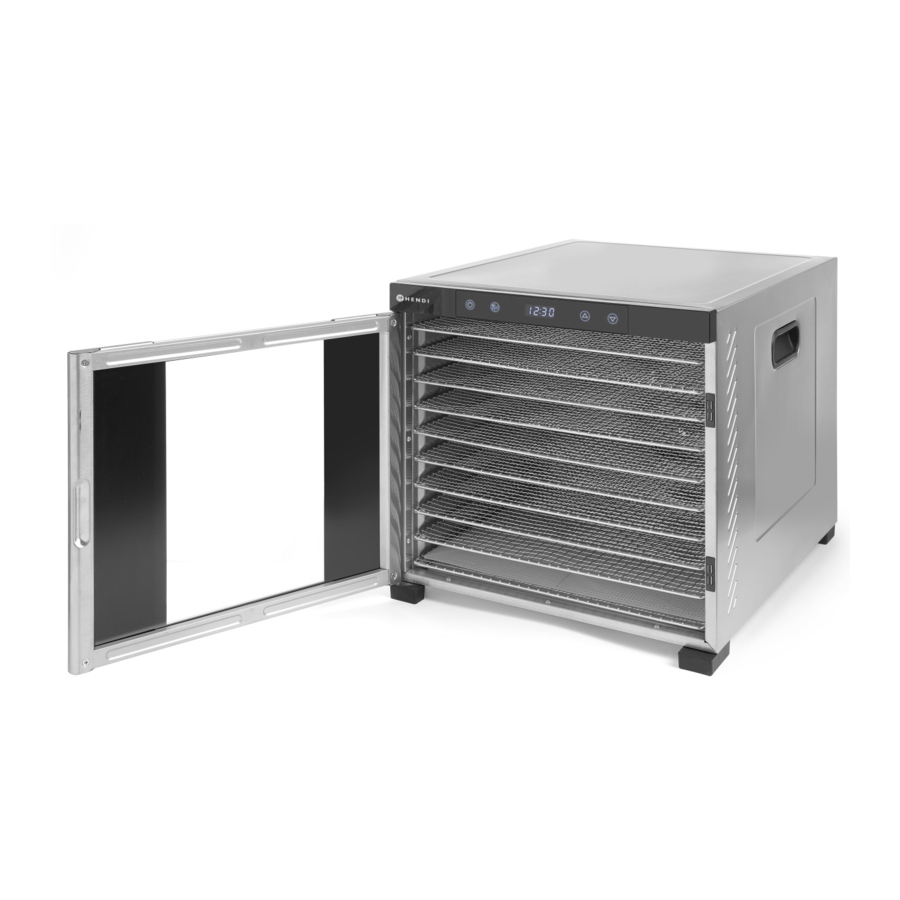
Main parts of the product
(Fig.1)

- Metal housing
- Stainless steel grid (x 10 for item 229026; x 6 for item 229033)
- Door
- Handle (x2)
- Control panel
- Ventilation holes
- Magnetic bar (x2)
- Foot (x4)
- Mesh (x1)
- Bottom pad (x1)
Remark: The content of this manual applies for all listed items unless specified otherwise. The appearance may vary from the shown illustrations.
Control panel
(Fig.2)

- ON / OFF button
- TEMP / TIME button
- LED display
- Increase setting (TEMP / TIME)
- Decrease setting (TEMP / TIME)
Preparation before use
- Remove all protective packaging and wrapping.
- Check that the device is in good condition and with all accessories. In case of incomplete or damaged delivery, please contact the supplier immediately. In this case, do not use the device.
- Clean the accessories and the appliance before use (See ==> Cleaning & Maintenance).
- Make sure the appliance is completely dry.
- Place the appliance on a horizontal, stable and heat resistant surface that is safe against water splashes.
- Keep the packaging if you intend to store your appliance in the future.
- Keep the user manual for future reference.
NOTE! Due to manufacturing residues, the appliance may emit a light odor during the first few uses. This is normal and does not indicate any defect or hazard. Make sure the appliance is well ventilated.
Note: After cleaning the appliance, it must be switched ON (See ==> Operation instructions) for about 30 minutes with temperature set at 70°C. There is some odour or smoke evolved during the first few cycles. This is normal and does not indicate any defect or hazard. Make sure the appliance is well ventilated.
Operating instructions
- Place the appliance on a horizontal, stable, non-slip, and heat-resistant surface.
- Position the food evenly on the trays, ensuring they do not overlap. In order to have good ventilation inside the appliance, 10% of the tray's surface should be free from food.
- Remove any trays that are not being used. A total of ten trays can be used at the same time.
- When inserting the trays, ensure they are aligned with the same side board correctly. Then, close the door firmly.
- Next, connect the power plug to a suitable electrical power supply socket and the appliance is now in the STANDBY mode. There is a beep sound and ON / OFF button will be lighted up in blue and the LED display will be shown as " 0000 " in white.
- Press the ON / OFF button to start the operation, the LED display will show the default time "10:00" (10 hours). All buttons on the control panel will be lighted up in blue.
Time setting
- Now, you can press button + or - to increase or decrease operation time. (Range: 00:30 ~ 24:00, interval is 30 minutes).
- The setting time will be stored automatically within few seconds.
- Then, the appliance will start operation and remaining time will be shown on the LED display. The fan at the rear side of the appliance will start rotation.
Temperature setting
- Press TEMP / TIME button once to check the temperature setting, you can also press button + or - to increase or decrease operation temperature setting. (Default temperature: 70°C, range: 35°C ~ 75°C, interval is 5°C).
- The setting temperature will be stored automatically within few seconds and return to display remaining time on the LED display.
- If you want to check the temperature that was set, press TEMP / TIME button once and the set temperature will be shown on the LED display.
- During the operation process, you can check or change the time and temperature setting by pressing the TEMP / TIME button. And then press button + or - to increase or decrease the temperature and time setting.
Switch to STANDBY mode
- Press ON / OFF button to turn to STANDBY mode. All the buttons will go out except the ON / OFF button. And the LED display will be shown as " 0000 " in white.
Time setting end up
- When the setting time counts down to 00:00, the heating elements stop working first. The cooling fan will still continue running for about 10 seconds and 20 times of "beep" sound from the buzzer will be heard to remind the user the operation is finished.
- 'End' will be shown on the LED display and the appliance is in STANDBY mode.
- Unplug the appliance and wear gloves (not included) if necessary to take out the food.
Operating tips
Guidelines for food preparation
- For the reason of safe and hygienic preservation, wash all the food well before drying.
- Only process non-perished food, any blemishes are to be removed generously.
- Dehydration results are more even if the food is cut into pieces of roughly the same size.
- To reduce the desiccating time, cut the food in thinner slices or pieces.
- The prepared food is to be desiccated in a continuous process. Do not interrupt the dehydrating process.
Approximate dehydration time and particular food preparation guidelines
- The time required for dehydrating is greatly dependent on the kind of food to be dried, their moisture content, ripeness, thickness, temperature setting and humidity of the inside chamber.
Storing of dried food
- Allow the dried food to cool well before storing. Also make sure that they are absolutely dry. This is essential for proper storage.
- To prevent deterioration, dried food must be prevented from absorbing humidity during storage. Therefore, any storage tins, glasses or plastic bags should be sealed airtight. Vacuum packaging would be the appropriate storage method.
- Desiccated food should be stored in a dry, cool and clean area to ensure a long storage time.
Cleaning & maintenance
- ATTENTION! Always disconnect the appliance from the power supply and cool down before storage, cleaning & maintenance.
- Do not use water jet or steam cleaner for cleaning and do not push the appliance under the water as the parts will get wet and electric shock might be resulted.
- If the appliance is not kept in a good state of cleanliness, this can adversely affect the life of the appliance and result in a dangerous situation.
- Food residues should be regularly cleaned and removed from the appliance. If the appliance is not cleaned properly, it will reduce its lifespan and may result in a dangerous condition during use.
Cleaning
- Clean the cooled exterior surface with a cloth or sponge slightly dampened with a mild soap solution.
- For reasons of hygiene, the appliance should be cleaned before and after use.
- Avoid water contacting the electrical components.
- Clean the inside of container with a non-abrasive detergent and rinse with clean water.
- Never immerse the appliance in water or other liquids.
- Never use aggressive cleaning agents, abrasive sponges, or cleaning agents containing chlorine. Do not use steel wool, metallic utensils, or any sharp or pointed objects for cleaning. Do not use petrol or solvents!
- No parts are dishwasher safe.
| Parts | How to clean | Remark |
| All accessories such as racks, rack holders, etc. |
| Dry all parts well at last. |
| External glass surfaces |
| |
| Interior glass surfaces |
| |
| Glass door |
Maintenance
- Check the operation of the appliance regularly to prevent serious accidents.
- If you see that the appliance is not working properly or that there is a problem, stop using it, switch it off and contact the supplier.
- All maintenance, installation and repair work must be carried out by specialised and authorised technicians, or recommended by the manufacturer.
Transportation and Storage
- Before storage, always make sure that the appliance has been disconnected from the power supply and completely cooled down.
- Store the appliance in a cool, clean and dry place.
- Never place heavy objects on the appliance as this could damage it.
- Do not move the appliance while it is under operation. Disconnect the appliance from power supply when moving and hold it at the bottom.
Troubleshooting
If the appliance does not function properly, please check the below table for the solution. If you are still unable to solve the problem, please contact the supplier/service provider.
| Problem | Possible cause | Possible solution |
| On/off switch doesn't light red | No power | Check if the plug is connected to the power socket |
| Switch defect | Contact the supplier | |
| Chamber doesn't get warm | Heating element, thermostat or fan might be defect | Contact the supplier |
| Chamber is too warm | Heating element or thermostat might be defect | Contact the supplier |
| Drying takes too long | Humid conditions | Place the appliance in a less humid environment |
| Heating element, fan or thermostat is defect | Contact the supplier |
Safety instructions
- Only use the appliance for the intended purpose it was de-signed for, as described in this manual.
- The manufacturer is not liable for any damage caused by incorrect operation and improper use.
![]()
RISK OF ELECTRIC SHOCK! Do not attempt to repair the appliance by yourself. Do not immerse the electrical parts of the appliance in water or other liquids. Never hold the appliance under running water.- NEVER USE A DAMAGED APPLIANCE! Check the electrical connections and cord regularly for any damage. When damaged, disconnect the appliance from the power supply. Any repairs should only be carried out by a supplier or qualified person to avoid danger or injury.
![]()
When positioning the appliance, route the power cable safely if necessary to avoid unintentional pulling, being damaged, coming into contact with the heating surface, or causing a tripping hazard.![]()
As long as the plug is in the socket the appliance is connected to the power supply.![]()
ALWAYS switch off the appliance before disconnecting from the power supply, cleaning, maintenance or storage.- Only connect the appliance to an electrical outlet with the voltage and frequency mentioned on the appliance label.
- Do not touch the plug/electrical connections with wet or damp hands.
- Keep the appliance and electrical plug/connections away from water and other liquids. If the appliance falls into water, remove the power supply connections immediately. Do not use the appliance until it has been checked by a certified technician. Failure to follow these instructions will cause life threatening risks.
- Connect the power supply into an easily accessible electrical outlet so you can disconnect the appliance immediately in case of emergency.
- Make sure the cord does not come in contact with sharp or hot objects and keep it away from open fire. Never pull the power cord to unplug it from the socket, always pull the plug instead.
- Never carry the appliance by its cord.
- Never try to open the housing of the appliance yourself.
- Do not insert objects into the housing of the appliance.
- Never leave the appliance unattended during use.
- This appliance should be operated by trained personnel in kitchen of the restaurant, canteens or bar staff, etc.
- This appliance should not be operated by persons with reduced physical, sensory or mental capabilities, or persons that have a lack of experience and knowledge.
- This appliance should, under any circumstances, not be used by children.
- Keep the appliance and its electrical connections out of reach of children.
- Never use accessories or any extra devices other than those supplied with the appliance or recommended by the manufacturer. Failure to do so could pose a safety risk to the user and could damage the appliance. Only use original parts and accessories.
- Do not operate this appliance by means of an external timer or remote-control system.
- Do not place the appliance on a heating object (gasoline, electric, charcoal cooker, etc.).
- Do not cover the appliance in operation.
- Do not place any objects on top of the appliance.
- Do not use the appliance near any open flames, explosive or flammable materials. Always operate the appliance on a horizontal, stable, clean, heat-resistant and dry surface.
- The appliance is not suitable for installation in an area where a water jet could be used.
- Leave a space of at least 20 cm around the appliance for ventilation during use.
![]()
Keep all ventilation openings on the appliance free from obstruction.


Special safety instructions
- This appliance is intended for commercial use.
![]()
![burn hazard]() RISK OF BURNS! HOT SURFACES! The temperature of the accessible surfaces are very high during use. Touch only the control panel, handles, switches, timer control knobs or temperature control knobs.
RISK OF BURNS! HOT SURFACES! The temperature of the accessible surfaces are very high during use. Touch only the control panel, handles, switches, timer control knobs or temperature control knobs.- If the supply cord is damaged, it must be replaced by the manufacturer, its service agent or similarly qualified persons in order to avoid a hazard.
- Do not install the appliance near objects and appliances that may be affected by a magnetic field, like, e.g., TVs, radios, bank cards and credit cards.
- Do not place any dangerous products, such as fuel, alcohol, paint, aerosol cans with a flammable propellant, flammable or explosive substances, etc. inside or near the appliance.
- Do not overload the interior shelves. The maximum load refers to "Technical specifications".

 RISK OF BURNS! HOT SURFACES! The temperature of the accessible surfaces are very high during use. Touch only the control panel, handles, switches, timer control knobs or temperature control knobs.
Documents / ResourcesDownload manual
Here you can download full pdf version of manual, it may contain additional safety instructions, warranty information, FCC rules, etc.
Download HENDI Profi Line, 229026, 229033 - FOOD DEHYDRATOR Manual
Advertisement


Need help?
Do you have a question about the Profi Line and is the answer not in the manual?
Questions and answers