Advertisement
Available languages
Available languages
Quick Links
Item #
Model #FTS80635
USE AND CARE GUIDE
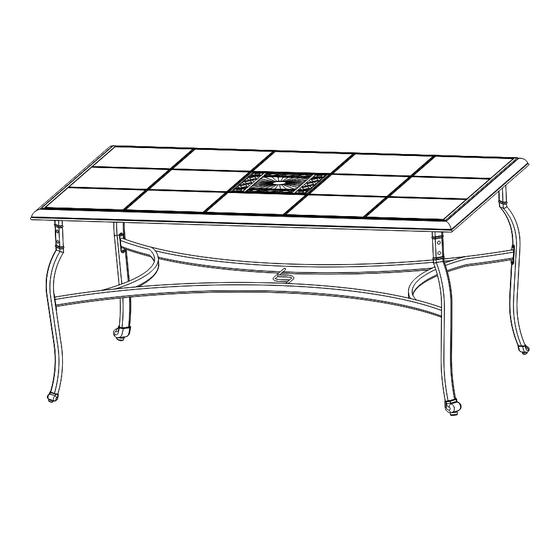
BELLEVILLE DINING TABLE
Questions, problems, missing parts? Before returning to the store call
Hampton Bay Customer Service.
8 a.m. - 6 p.m., EST, Monday-Friday
1-855-HD-HAMPTON
HAMPTONBAY.COM
THANK YOU
We appreciate the trust and confidence you have placed in Hampton Bay through the purchase of these dining table. We strive to continually create
quality products designed to enhance your home. Visit us online to see our full line of products available for your home improvement needs.
Thank you for choosing Hampton Bay!
Advertisement

Subscribe to Our Youtube Channel
Related Manuals for HAMPTON BAY BELLEVILLE FTS80635


Summary of Contents for HAMPTON BAY BELLEVILLE FTS80635
- Page 1 THANK YOU We appreciate the trust and confidence you have placed in Hampton Bay through the purchase of these dining table. We strive to continually create quality products designed to enhance your home. Visit us online to see our full line of products available for your home improvement needs.
- Page 2 Table of Contents Table of Contents ............2 Package Contents ..............3 Warranty ................ 2 Assembly ............... 4 What is Covered ..............2 Care and Cleaning ............6 What is Not Covered ..............2 Pre-Assembly ..............2 Planning Assembly ..............2 Hardware Included ..............
- Page 3 Pre-Assembly (continued) PACKAGE CONTENTS Part Description Quantity Tile Stamped metal Table rim Leg connector Table leg HAMPTONBAY.COM Please contact 1-855-HD-HAMPTON for further assistance.
- Page 4 Assembly Connecting the table leg Place the table rim (C) upside down on a soft surface. Connect each of the table legs (E) with M6X20 bolts (BB) and M6 washers (CC) to the table rim (C). NOTE: Loosely tighten the bolts using the hex wrench (DD).
- Page 5 Assembly (continued) Connecting the leg connector to the table legs Align the holes of the leg connector (D) with the holes on the inside of each the table leg (E). Connect the leg connector (D) to the table legs (E) with M6X15 bolts (AA) and washers (CC). Tighten all the bolts.
- Page 6 Assembly (continued) Adding the tiles and stamped metal Turn the table over so it is right side up. Ensure that all connections are secure. Carefully place the tiles (A) and stamped metal (B) on the table. Care and Cleaning For best results, clean the frame with damp cloth and dry thoroughly. This will help prevent mildew by removing dirt particles that may accumulate.
- Page 7 Questions, problems, missing parts? Before returning to the store call Hampton Bay Customer Service. 8 a.m. - 6 p.m., EST, Monday-Friday 1- 855-HD-HAMPTON HAMPTONBAY.COM Retain this manual for future use.
- Page 8 GRACIAS Apreciamos la con anza que has depositado en Hampton Bay al comprar esta mesa de comedor. Nos esforzamos para continuamente crear productos de calidad diseñados para mejorar tu hogar. Visítanos por Internet para ver nuestra línea completa de productos disponibles para las...
- Page 9 Tabla de contenido ..............3 Tabla de contenido ............2 Contenido del paquete Garantía ................. 2 Ensamblaje ..............4 Qué cubre la garantía ............. 2 Mantenimiento y limpieza ........... 6 Qué no cubre la garantía ............2 Preensamblaje ............... 2 Plani cación del ensamblaje ...........
- Page 10 Preensamblaje (continuación) CONTENIDO DEL PAQUETE Pieza Descripción Cantidad Losa Metal estampado Borde de la mesa Conector de las patas Pata de la mesa HAMPTONBAY.COM Para obtener asistencia, llama a 1-855-HD-HAMPTON.
- Page 11 Ensamblaje Cómo conectar las patas de la mesa Coloca el borde de la mesa (C) boca abajo sobre una super cie suave. Conecta todas las patas de la mesa (E) al borde de la mesa (C) con los pernos M6x20 (BB) y las arandelas M6 (CC). NOTA: Aprieta ligeramente todos los pernos con la llave hexagonal (DD).
- Page 12 Ensamblaje (continuación) Cómo ensamblar el conector de las patas a las patas de la mesa Alinea los ori cios del conector de las patas (D) con los ori cios en el interior de cada pata de la mesa (E). Fija el conector de las patas (D) a las patas de la mesa (E) con los pernos M6x15 (AA) y las arandelas (CC). Ajusta todos los pernos.
- Page 13 Ensamblaje (continuación) Cómo colocar las losas y el metal estampado Voltea la mesa y apóyala sobre sus patas. Con cuidado, coloca las losas (A) y el metal estampado (B) en la mesa. Mantenimiento y limpieza Para obtener mejores resultados, limpia el armazón con un paño húmedo y sécalo completamente. Esto ayudará a prevenir la aparición de moho al quitar las partículas de polvo que puedan acumularse.
Need help?
Do you have a question about the BELLEVILLE FTS80635 and is the answer not in the manual?
Questions and answers