Advertisement
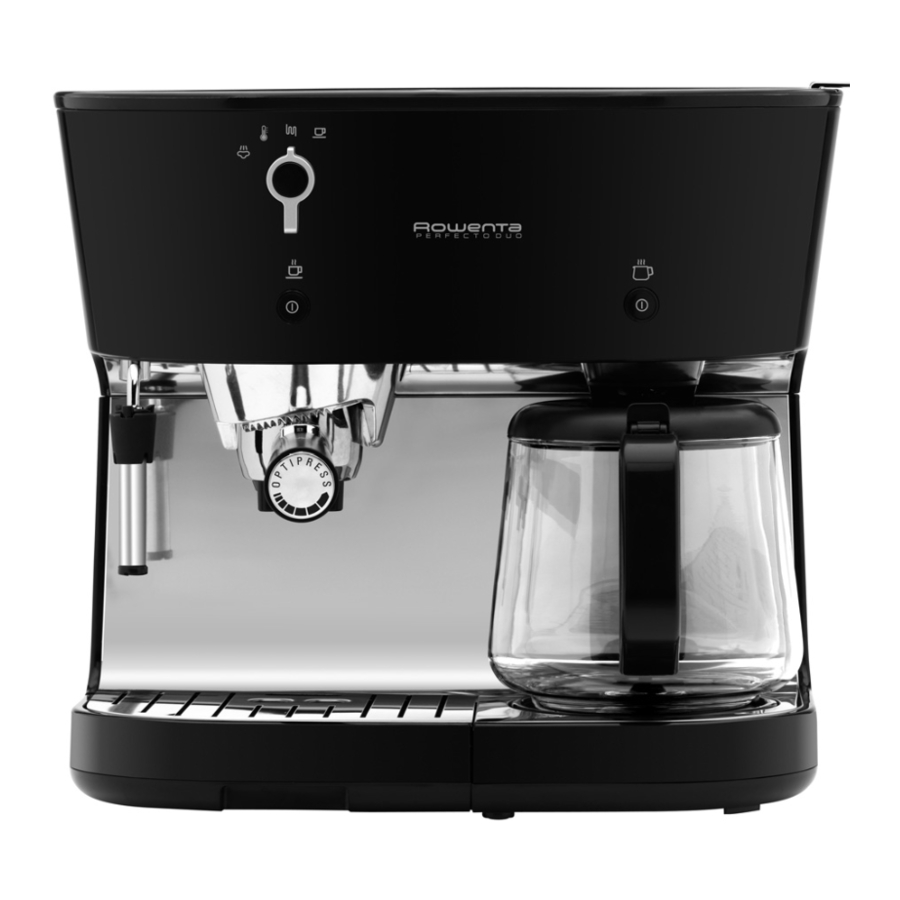
DESCRIPTION

ESPRESSO
- Espresso and coffee maker water tank lid
- Removable water tank
- Cup tray
- Control panel:
- Selection button (coffee or steam)
![]() = preheating coffee
= preheating coffee![]() = preparing an espresso
= preparing an espresso![]() = preheating steam
= preheating steam![]() = preparing steam
= preparing steam
- On/off button with light indicator
- Selection button (coffee or steam)
- Location of filter holder
- Filter holder with a system to eject the used coffee grounds or pod and gradual tamping ground espresso coffee or pod: OPTIPRESS system.
- Steam nozzle
- Drip tray grid
- Drip tray, fitted with its level indicator
- Measuring spoon
- Power cord
 = preparing an espresso
 = preheating steam
 = preparing steam
FILTER COFFEE
- Filter holder lid
- Coffee maker tank
- Filter holder with locking handle
- Graduated water level in coffee maker tank
- Graduated jug
- Coffee warming plate
- Filter coffee maker on/off button
You have purchased the cutting-edge innovation in espresso. Your machine is equipped with a filter holder that boasts of three exclusive systems:
- One for the gradual tamping the ground espresso coffee as the filter holder is being positioned (OPTIPRESS system).
- Another is for ejecting the used grounds.
- The last is for using E.S.E. (Easy Serving Espresso) or soft pods.
![]()

It is also removable, and so can be frequently cleaned to be maintained in perfect working order. For your safety, your filter holder is equipped with a locking system to keep it in place when the pressure rises.
TECHNICAL CHARACTERISTICS

Operating voltage: This appliance is designed to work only at alternating current 220 - 240 V. Type of use: This appliance has been designed for DOMESTIC USE ONLY
- Electromagnetic pump: 15 bar
- Filter holder with used grounds ejection system
- 1 or 2 cups
- Compatible with all types of E.S.E or soft pods
- Steam function
- Automatic shutoff after 9 minutes (protection of the environment)
- Removable tank (capacity: 0.86 litres)
- Power: 2550 W
- Voltage: 220-240 V - 50 Hz
- Anti-overheating safety mechanisms
- Dimensions: H. 336 mm, L. 385 mm, W. 274 mm
MAKING AN ESPRESSO
TIPS
Before using for the first time, after a prolonged period of inactivity or after descaling, the appliance must be cleaned as described in paragraph USING FOR THE FIRST TIME
Release the filter holder by pressing the  button lightly before removing it from the appliance (Fig. 1a).

- For an espresso with intense flavour, we recommend using freshly ground special espresso coffee which is ideal for the delicacy of this type of drink, along with cups with a capacity not exceeding 50 ml.
- Keep the ground espresso coffee in the refrigerator; it retains its flavour longer.
- Do not fill your filter holder to the brim, but use the measuring spoon (1 spoon for one cup, 2 spoons for 2 cups). Remove any excess ground espresso coffee from the edge of the filter holder (Fig. 9b).

- If you do not use the appliance for more than 5 days, rinse and drain the water tank.
- Before removing the water tank to fill or empty it, always turn the appliance off.
- Always place the appliance on a flat, stable, heat-resistant work surface.

USING FOR THE FIRST TIME
Rinsing before first use
Before using your coffee machine, clean all of the accessories in mild detergent and water. Rinse thoroughly and dry them.
- Fill the tank with cold water and place it on the appliance making sure it is secure (Fig. 1c).

- Switch on the appliance by pressing the on/off button d2
![]() .
. - The temperature light flashes and then remains lit. The appliance is ready for use (Fig. 2).

- Insert the filter holder (without ground espresso coffee) into the appliance: turn it towards the right as far as possible (Fig. 3).

- Place a container with a volume of more than 1/2 litre underneath the filter holder. Turn the selector dial d1 to the
![]() position (coffee) (Fig. 4 and 5). If the water doesn't run off (pump priming), repeat the process from the beginning.
position (coffee) (Fig. 4 and 5). If the water doesn't run off (pump priming), repeat the process from the beginning.


- Let the water run from the tank. To stop the flow of water, turn the selector dial d1 to the
![]() position (Fig. 6) and unplug the appliance.
position (Fig. 6) and unplug the appliance.

- Remove the tank, empty it and rinse it carefully. Then securely place it back into the appliance (Fig. 1b and 7)


PREPARING AN ESPRESSO
If the espresso machine is being used for the first time, the appliance must be cleaned as described in Paragraph USING FOR THE FIRST TIME
In order to release all the aromas of the coffee and ensure your complete satisfaction, this machine pre-brews each coffee. The pump works 3 seconds, stops the following 3 seconds and then the cycle continues until the end of the preparation.
PREHEATING THE ACCESSORIES
- For the best results, we recommend that you preheat the accessories (filter holder and cups) without ground coffee. To do so:
- Fill the water tank and turn the machine on (Fig. 1, 2, and 3).
- Put the filter holder in place, place the cups below.
- As soon as the appliance reaches the required temperature, the light stops flashing.
- Then turn the selector dial to the
![]() position "coffee" (Fig. 8).
position "coffee" (Fig. 8).

- When the cups are filled with hot water, turn the selector dial to the "off" position (Fig. 9).

- Remove the cups.
- Unlock the filter holder: press the
![]() button while turning the filter holder to the left and remove it from the appliance (Fig. 10).
button while turning the filter holder to the left and remove it from the appliance (Fig. 10).


Note: When the appliance is hot, the espresso cups can be preheated on the cup warming plate.
With ground coffee
The type of coffee you choose will determine the strength and taste of your espresso: the finer your coffee is ground, the stronger the espresso.
- Before removing the removable tank, place the selector dial d1 in the
![]() position (Fig. 6).
position (Fig. 6). - Fill the tank with cold water and fit it back into the appliance (Fig. 7).
- Switch on the appliance by pressing the on/off button
![]() d2.
d2. - The light flashes during the preheating phase and then remains lit. The appliance is then ready for use.
- Release the filter holder by pressing the
![]() button lightly and turning it towards the left (Fig. 8). Using the measuring spoon, place the ground coffee into the filter holder: one measuring spoon (filled to the top) per cup for a good espresso (Fig. 9a).
button lightly and turning it towards the left (Fig. 8). Using the measuring spoon, place the ground coffee into the filter holder: one measuring spoon (filled to the top) per cup for a good espresso (Fig. 9a).

- Remove any excess ground coffee from the edge of the filter holder (Fig. 9b).
- Insert the filter holder in the appliance by turning it to the right up to the stop (Fig. 11).

- Put one or two cups on the drip tray grid under the filter holder (Fig. 12).

- Turn the selector dial d1 to the position
![]() (coffee) (Fig. 4).
(coffee) (Fig. 4). - After a few moments, the coffee will start to flow.
- When your cups are full, move the selector d1 to the
![]() position (Fig. 6).
position (Fig. 6). - Remove the cups.
- Unlock the filter holder: press the
![]() button lightly while turning the filter holder to the left and remove it from the appliance. Throw away the used grounds using the ejection system by pressing the "Push" button under the filter holder (Fig. 15). Wash the filter holder under running water, pressing the "Push" button to eliminate the remaining grounds (see also Paragraph CLEANING AND MAINTENANCE - Filter holder for a more thorough cleaning).
button lightly while turning the filter holder to the left and remove it from the appliance. Throw away the used grounds using the ejection system by pressing the "Push" button under the filter holder (Fig. 15). Wash the filter holder under running water, pressing the "Push" button to eliminate the remaining grounds (see also Paragraph CLEANING AND MAINTENANCE - Filter holder for a more thorough cleaning).


It is normal that every time the selector dial d1 returns to the  position there is a slight noise of running water or steam. This is due to a specific device which eliminates the pressure built up within the system.
With an E.S.E espresso pod
"ESE" for "Easy Serving Espresso" is a packaged pod (44 mm diameter) of 7g of selected coffee, ground and compacted between two paper filters, specially designed to make Italian style ristretto (small and strong) espressos. This system allows an immediate, simple, clean and comfortable use of your machine.
- Before removing the water tank, remember to place the selector dial d1 in the
![]() position (Fig. 6).
position (Fig. 6). - Fill the tank with cold water and fit it back into the appliance (Fig. 7).
- Switch on the appliance by pressing the on/off button
![]() d2.
d2. - The light flashes during the preheating phase and then remains lit. The appliance is then ready for use.
- Unlock the filter holder by pressing the
![]() button lightly and turning it towards the left (Fig. 14). If required, remove the excess paper around the pod following the dotted lines (Fig. 13).
button lightly and turning it towards the left (Fig. 14). If required, remove the excess paper around the pod following the dotted lines (Fig. 13).

Place the E.S.E pod with the red writing facing downwards (fold the corners of the filter paper back). Ensure that the paper is placed inside the filter; otherwise this could cause it to leak.
For a richer and thicker cream, the E.S.E pod must be positioned correctly. The pod is designed to make one cup of coffee. The use of 2 E.S.E pods on top of one another is not recommended. - Insert the filter holder into the appliance tightening it by turning it towards the right as far as possible (Fig. 11).
- To prepare your espresso, follow the same procedure as for preparing an espresso with ground coffee.

With a soft pod
Your machine is also compatible with soft pods (generally 60 mm in diameter). As this type of pod is not specifically designed for espresso machines, you will obtain a weaker espresso than with an E.S.E pod.
- Before removing the water tank, remember to place the selector dial d1 in the
![]() position (Fig. 6).
position (Fig. 6). - Fill the tank with cold water and fit it back into the appliance (Fig. 7).
- Switch on the appliance by pressing the on/off button
![]() d2.
d2. - The light flashes during the preheating phase and then remains lit. The appliance is then ready for use.
- Unlock the filter holder by pressing the
![]() button lightly and turning it towards the left (Fig. 14). Place a soft pod into the filter holder. The pod is designed to make one cup of coffee. The use of 2 pods on top of one another is not recommended.
button lightly and turning it towards the left (Fig. 14). Place a soft pod into the filter holder. The pod is designed to make one cup of coffee. The use of 2 pods on top of one another is not recommended. - Insert the filter holder into the appliance tightening it by turning it towards the right as far as possible (Fig. 11).
- To prepare your espresso, follow the same procedure as for preparing an espresso with ground coffee.
STEAM FUNCTION
Steam is used to froth the milk (for example when preparing cappuccinos).
- To produce steam, turn the selector dial d1 to the
![]() position (Fig. 16) (to obtain more steam, the temperature needs to be higher than when making coffee).
position (Fig. 16) (to obtain more steam, the temperature needs to be higher than when making coffee).

- The ON/OFF button LED flashes again then remains lit. The appliance is then ready for use.
- Put the milk in a container. For best results, we recommend using a container with a narrow neck (a small jug for example).
- Immerse the steam nozzle into the milk.
- Turn the selector dial d1 to the
![]() position (steam) (Fig. 17): the steam pours into the milk.
position (steam) (Fig. 17): the steam pours into the milk.

- In order to obtain good frothy milk, use circular movements and move from top to bottom, making sure that the steam nozzle remains straight in the middle of the container (Fig. 25c). The pump operates intermittently; this is normal.

- For best results, we recommend that you use pasteurised or UHT milk and that you avoid untreated or skimmed milk.
- During the operation, it is normal for the temperature light of the ON/OFF button to light up and then turn off.
- Once the froth has been formed, switch off the appliance (selector dial d1 in
![]() position).
position). - When the selector dial d1 is in
![]() position, the appliance will automatically cool down. During the cooling down phase, the LED of the ON/OFF button will flash, and hot water and/or steam will run into the drip tray. When the optimal temperature for preparing an espresso is reached, the LED remains lit.
position, the appliance will automatically cool down. During the cooling down phase, the LED of the ON/OFF button will flash, and hot water and/or steam will run into the drip tray. When the optimal temperature for preparing an espresso is reached, the LED remains lit.


Once the steam has been stopped, clean the steam nozzle immediately as described in Paragraph CLEANING AND MAINTENANCE - Steam nozzle.

The steam nozzle is still hot! Be careful not to burn yourself.
CLEANING AND MAINTENANCE
The appliance
- Unplug the power supply before cleaning and let the appliance cool down.
- Clean the outside of the appliance from time to time with a damp sponge. Wash the tank, the drip tray and its grid regularly and dry them.
- Rinse the inside of the tank regularly.
- When a fine white film obscures the tank, carry out a descaling operation (see Paragraph DESCALING).
- Do not use alcohol or solvent based cleaning products.
- To clean the hot water drip-through grid, regularly carry out an espresso preparation without coffee.
- Use only a damp cloth without detergent or abrasive products.
Filter holder
Your appliance is equipped with a removable filter ejecting holder, which we recommend that you maintain in perfect working condition. We recommend that you clean it after each use. These removal/fitting operations must be carried out when the machine has cooled down.
- Removing the filter holder:
- Remove the filter holder from your machine.
- Dispose of the used grounds or pod by pressing the "Push" button (Fig. 15).
- Rinse under running water.
- Remove the bottom of the filter holder by rotating clockwise while turning the 2 fixed coffee outlets.
- Cleaning and rinsing the filter holder:
The filter holder may then be cleaned using a household washing-up liquid and a scourer; it should be rinsed afterwards with running water. For best results, you may press the eject button several times while rinsing. We recommend shaking the filter holder vigorously in order to release any water that may have collected inside. - Fitting the filter holder:
Replace the bottom of the filter holder by turning it anticlockwise to lock it in place.
The drip tray
When the level gauge indicates that the drip tray is full, it must be emptied after first removing the grid (Fig. 18). The presence of water is normal and is not the sign of a leak. If required, clean the drip tray and its grid with water and a little non abrasive detergent. Rinse and dry.

Steam nozzle (Figs 25a, 25b)

This accessory consists of 2 parts: one part which is the plastic support and the other which is the metal protection cylinder.
Before cleaning, unlock the nozzle from the articulated arm by turning it to the left.
Then slide the metal cylinder along the plastic support.
Clean these two parts with tap water and some mild washing-up liquid.
Rinse and dry.
Once the parts have been properly cleaned, put the metal cylinder back on the support.
Make sure that you don't damage the silicone seal which makes the nozzle watertight.
Insert the nozzle on the articulated arm then twist to the right.
DESCALING
- Regular descaling of your appliance, as described in paragraphs for coffee and steam functions, will guarantee its long service life. The frequency of descaling should be adapted to the hardness of your water. Ask your local water authority company for advice.
- During the operation, do not stand your appliance on a marble surface. The descaler agent may damage it.
- To make this clearer, please find below a summary table of the frequencies of the descaling operations according to the hardness of water and use:
DESCALING FREQUENCY Av. number of coffees per week Soft water (<19°th) Hard water (19-30°th) Very hard water (>30°th) Less than 7 Once a year Every 8 months Every 6 months From 7 to 20 Every 4 months Every 3 months Every 2 months More than 20 Every 3 months Every 2 months Every month
If in doubt, we recommend carrying out a descaling operation every month. Any repair of the coffee maker due to:
- lack of descaling
- scale build-up
will not be covered by the guarantee.
Descaling the coffee function
- Unplug the appliance.
- Insert the filter holder (without ground coffee) into the appliance and lock it by turning it towards the right as far as possible (Fig. 3).
- Place a container with a volume of more than 1/2 litre underneath the filter holder (Fig. 5).
- Make sure that the selector dial d1 is in
![]() position.
position. - Empty the tank and place it back securely in position (Fig. 1b - 1c).
- Fill the tank with a mixture of three parts water to one part white vinegar or a mixture of 1/2 litre water and a sachet of citric / sulphamic acid.
- Plug in the appliance.
- When the temperature light of the ON/OFF button remains lit, you can switch to the
![]() position (coffee) (Fig. 4).
position (coffee) (Fig. 4). - Let the mixture flow through (1/3).
- Turn the selector dial to the
![]() position.
position. - Wait for 2 minutes and then repeat the operation twice.
- Now follow the instructions for descaling the steam function.
Descaling the steam function
- Place a container under the steam nozzle.
- Turn the selector dial d1 to the
![]() position (steam heating) (Fig. 16) (to obtain more steam, the temperature needs to be higher than when making coffee).
position (steam heating) (Fig. 16) (to obtain more steam, the temperature needs to be higher than when making coffee). - The LED of the ON/OFF button flashes and then remains lit.
- Turn the selector dial d1 to the
![]() position (steam extraction) (Fig. 17): the steam pours into the liquid. Let the rest of the mixture flow for 2 minutes.
position (steam extraction) (Fig. 17): the steam pours into the liquid. Let the rest of the mixture flow for 2 minutes. - During the operation, it is normal for the water temperature light to light up and then turn off.
- After a few moments, move the selector dial to
![]() position (d1).
position (d1). - When the selector dial d1 is in
![]() position, the appliance will automatically cool down. During the cooling down phase, the LED of the ON/OFF button will flash, and hot water and/or steam will run into the drip tray.
position, the appliance will automatically cool down. During the cooling down phase, the LED of the ON/OFF button will flash, and hot water and/or steam will run into the drip tray.
Rinsing
- After descaling, perform 2-3 rinsing operations with clear water (without ground coffee), as described in Paragraph "Using for the first time".
- Remember to rinse the steam nozzle (figs. 25.a, b). The appliance is descaled and ready to be used again.
TROUBLESHOOTING
| Problems | Possible causes | Solutions |
| The espresso is not hot enough | The cups and the filter holder are cold | Preheat the accessories: cups and filter holder (see Paragraph PREHEATING THE ACCESSORIES) |
| The filter holder is blocked | You have forgotten to lock the filter holder | Press the button while turning the filter holder towards the left (Fig. 1a) |
| The used grounds are not dry after the water has passed through | You have not tightened the filter holder correctly | Tighten the filter holder more by turning it as far as possible towards the right, up to the stop |
| The espresso flows too slowly | You have over-tightened the filter holder | Loosen it slightly |
| The coffee is too finely ground, too oily or powdery | Choose a more coarsely ground coffee | |
| The filter holder is dirty | Clean your filter holder (see Paragraph CLEANING AND MAINTENANCE - Filter holder) | |
| The water drip-through grid is clogged | When the appliance has cooled down, clean the brew head with a damp sponge | |
| The speed of the flow depends on the fineness of the coffee used and can vary when preparing espresso | ||
| The water does not run through | No water in the tank. Tank incorrectly fitted | Fill the tank Press firmly on the tank |
| The filter is clogged. The ground coffee is too fine | Clean the filter holder (see Paragraph CLEANING AND MAINTENANCE - Filter holder) and try a less finely ground coffee | |
| Your appliance is scaled up | Descale your appliance according to the instructions (see Paragraph DESCALING) | |
| Water flows from the filter holder after an espresso has been made | The selector dial has not been set to the "off" position | Switch off your appliance by turning the selector dial to the "off" position (Fig. 9) |
| Formation of scale because of especially hard water | Descale your appliance according to the instructions (see Paragraph DESCALING) | |
| Used grounds in the cup | The filter holder is clogged | Clean the filter holder with hot water. Press the "PUSH" button to eliminate the remaining grounds. Shake to drain the water |
| The grind is too fine | Choose a slightly coarser grind | |
| The water tank leaks when it is moved | The valve at the bottom of the tank is dirty or faulty | Wash the water tank and actuate the valve at the bottom of the tank with your finger |
| The valve is blocked by scale | Descale your appliance according to the instructions (see Paragraph DESCALING) | |
| Water leak underneath the appliance | Internal leak | Check that the tank is fitted correctly. If the problem continues, do not use the appliance, contact an approved service centre |
| Water leak under the drip tray | Water can be present or can flow when the drip tray is removed. This is not a sign of leak | |
| Cracking noises are heard from the filter holder | This is normal: safety lock on the filter holder | |
| The pump is abnormally noisy | No water in the tank | Switch off the appliance, fill the water tank and switch back on |
| Tank incorrectly fitted | Press firmly on the tank | |
| The cups are not filled equally | The filter holder is clogged | Clean the filter holder (see Paragraph CLEANING AND MAINTENANCE - Filter holder) |
| The espresso leaks from the sides of the filter holder | The filter holder is not fitted correctly | Fit the filter holder in place and lock it (turn it towards the right as far as possible up to the stop) |
| The edge of the filter holder has ground coffee on it | Remove the excess ground coffee | |
| Pod not correctly positioned in the filter | Place all the paper inside the filter holder | |
| Your espresso tastes bad | After descaling, the rinsing was not performed properly | Rinse the appliance according to the instructions (see Paragraph DESCALING) |
| The appliance does not work | The pump was unprimed due to lack of water | Fill the water tank and reprime the pump (see Paragraph USING FOR THE FIRST TIME). Avoid completely emptying the tank |
| The water tank is not properly clicked in place | Click the tank into place by pressing firmly | |
| The steam nozzle does not froth the milk | The steam nozzle is blocked or scaled up | Descale the steam nozzle (see Paragraph DESCALING) or unblock it with a needle |
| The milk is too hot | Use cold milk | |
| The container is not the right shape | Use a small pitcher | |
| You are using skim milk | Preferably use whole or semi-skimmed milk | |
| The espresso is not frothy | The grind is too old | Use freshly ground coffee |
| The grind is not suitable for espresso | Use a finer grind | |
| There is too little grind in the filter holder | Add some more grind |
FILTER COFFEE MAKER
USING FOR THE FIRST TIME
Operate the coffee maker for the first time, without ground coffee, by filling the water tank with 1 litre of water and pressing the on/off button on the coffee maker (G) to rinse the circuit.
MAKING COFFEE
(Follow the illustrations 19 to 24)
- Use only cold water and filter paper no. 4.
- Do not exceed the maximum amount of water indicated on the tank water level.
- Lift the lid (a) and fill the water tank using the jug according to the desired number of cups (Fig. 19).

- Observe the maximum amount of water in the tank, using the water level gauge.
- Lift the filter holder lid (A) and place a paper filter in the filter holder (Fig. 20).

- Fill it with ground coffee using the measuring spoon, with one spoon per cup of coffee (Fig. 21).

- Press the "on/off" button on the filter coffee maker; the light comes on, the cycle starts (Fig. 22).

- The filter coffee maker is fitted with an anti-drip appliance which enables you to serve the coffee before it has completely finished running through. If you serve yourself a coffee while the cycle is still running, place the jug back in position quickly to prevent any spillage.
- This coffee maker is also equipped with a keep warm system with automatic shutoff after 2 hours.
- The jug and lid can be reheated in microwave ovens.
- Never leave your empty jug in the microwave oven.


CLEANING
- To throw away the used grounds, remove the filter holder from the coffee maker(Fig. 23 and 24).

- Unplug the appliance.
- Do not clean when hot.
- Clean with a damp cloth or sponge.
- Never place the appliance in water or under running water.
- The filter holder is dishwasher safe.

DESCALING
- Descale your coffee maker approximately every 40 cycles. You can use:
- either a sachet of descaler from the stores diluted in 500 ml of cold water
- or 2 large cups of white vinegar.
- Pour the descaler or vinegar into the tank (B) and turn on the coffee maker (without ground coffee).
- Let half of this mixture run through into the jug (E) and then turn the appliance off by pressing the "On/Off" button (Fig. 22).
- Leave for one hour.
- Turn the coffee maker back on and let the rest of the mixture run through.
- Rinse the coffee maker by running it 2 or 3 times with 1 litre of water without ground coffee.
The warranty does not cover coffee makers that do not work properly or do not work at all because they have not been descaled.
IN CASE OF PROBLEM
- Check:
- the electrical connection
- that the On/Off button is in On position (LED lit).
- that the filter holder is locked properly.
- The water takes too long to run through or the appliance makes excessive noise:
- descale your coffee maker.
Your appliance still does not work? Contact an approved service centre.
HELPLINE:
If you have any product problems or queries, please contact our Customer Relations Team first for expert help and advice:
0845 602 1454 - UK
(01) 677 4003 - ROI
 |  |  |  |
| TAIWAN | SEB ASIA Ltd. Taipei International Building, Suite B2, 6F-1, No. 216, Tun Hwa South Road, Sec. 2 Da-an District Taipei 106, R.O.C. | 1 year | 886-2-27333716 |
| THAILAND | GROUPE SEB THAILAND 2034/66 Italthai Tower, 14th Floor, n° 14-02, New Phetchburi Road, Bangkapi, Huaykwang, Bangkok, 10320 | 2 years | 02723 4488 |
| TÜRKIYE | GROUPE SEB ISTANBUL AS Beybi Giz Plaza Dereboyu Cad. Meydan Sok. No: 28 K.12 Maslak | 2 YIL | 216 444 40 50 |
| U.S.A. | GROUPE SEB USA 2121 Eden Road Millville, NJ 08332 | 1 year | 800-769-3682 |
| UKRAINE/ Україна | ТОВ «Груп СЕБ Україна» Вул. Драгоманова 31 Б, офіс 1 02068 Київ, Україна | 2 роки/ 2 years | 044 492 06 59 |
| UNITED KINGDOM | GROUPE SEB UK Ltd. 11-49 Station Road Langley, Slough Berkshire SL3 8 DR | 1 year | 0845 602 1454 |
| VENEZUELA | GROUPE SEB VENEZUELA Av Eugenio Mendoza, Centro Letonia, Torre ING Bank, Piso 15, Ofc 155 Urb. La Castellana, Caracas | 2 anno | 0800-7268724 |
| VIETNAM | GROUPE SEB VIETNAM (Representative office) 127-129 Nguyen Hue Street District 1, Ho Chi Minh City, Vietnam | 1 year | +84-8 3821 6395 |
SAFETY INSTRUCTIONS
- Read the instructions for use carefully before using your appliance for the first time: the manufacturer shall accept no liability in the event of any improper use.
- For your safety, this appliance complies with applicable standards and laws:
- Low Voltage Directive
- Electromagnetic Compatibility
- Environment
- Materials in contact with food
- Always plug the appliance into an earthed socket. Please check that the voltage indicated on the name plate of the appliance corresponds to your electrical installation.
- Do not remove the filter holder containing the ground espresso coffee while the water is going through because the appliance is under pressure at that time.
- Do not use the appliance if the drip tray and the grid are not in place.
- Remove the plug if a problem occurs as the coffee is passing through, or before you clean the appliance.
- Do not unplug the appliance by pulling on the cord, and do not run the cord over a sharp edge or the corner of a piece of furniture.
- Do not use the jug on a flame or on electric cooker hotplates.
- Do not put the jug into the dishwasher.
- Ensure that the cord and your hands do not touch the hot parts of the appliance (filter holder, steam nozzle, warming plate, etc.).
- Do not put water in the appliance while it is still hot.
- Always close the lid (A) when the coffee maker is in operation.
- After starting your coffee maker, never put your hand on the warming plate when you remove the jug from the coffee-maker. During operation, this plate is very hot and can cause burns.
- Do not use the jug without its lid.
- Never immerse your appliance in water.
- Keep the appliance out of the reach of children and do not leave the power cord hanging.
- Refer to the instructions for descaling your appliance.
- Always place on a flat, stable, heat-resistant work surface away from water splashes and sources of heat.
- Do not turn the appliance on if it is damaged or if the cord is in poor condition.
- If the power supply cord is damaged, it must be replaced by the manufacturer or its service agent or a similarly qualified person in order to avoid a hazard.
- Make sure the filter holder is tightly fitted before running the coffee through.
- This appliance is not designed to be used by persons (including children) with reduced physical, sensorial or mental capacities, or by people with no prior knowledge or experience, unless they have been given supervision or instruction concerning use of the appliance, from a person responsible for their safety.
- Children should not be allowed to play with the appliance.
- The accessories and the removable parts of the appliance are not dishwasher safe.
- This appliance has been designed for domestic use only. It is not designed to be used in the following cases, which are not covered by the guarantee:
- In staff kitchen areas in stores, offices and other working environments
- In farms houses
- By customers in hotels, motels and other residential environments
- Bed and breakfast type environments.
Documents / Resources
References
Download manual
Here you can download full pdf version of manual, it may contain additional safety instructions, warranty information, FCC rules, etc.
Download Rowenta PERFECTO COMBI, ES421010 - Espresso Machine Manual
Advertisement


Need help?
Do you have a question about the PERFECTO COMBI and is the answer not in the manual?
Questions and answers