Table of Contents
Advertisement
Advertisement
Table of Contents

Related Manuals for dji FPV Remote Controller 3


Summary of Contents for dji FPV Remote Controller 3
- Page 1 DJI FPV Remote Controller 3 User Manual v1.0 2024.04...
- Page 2 This document is copyrighted by DJI with all rights reserved. Unless otherwise authorized by DJI, you are not eligible to use or allow others to use the document or any part of the document by reproducing, transferring, or selling the document. Users should only refer to this document and the content thereof as instructions to operate DJI products.
-
Page 3: Using This Manual
Download DJI Fly app Scan the QR code to download the latest version. • The Android version of DJI Fly is compatible with Android v7.0 and later. The iOS version of DJI Fly is compatible with iOS v11.0 and later. -
Page 4: Table Of Contents
Using Manual Mode Controlling the Gimbal and Camera Customizable Buttons Optimal Transmission Zone Remote Controller Alert Calibrating the Remote Controller Updating Firmware Using DJI Fly Using DJI Assistant 2 (Consumer Drones Series) Appendix Specifications Aftersales Information © 2024 DJI All Rights Reserved... -
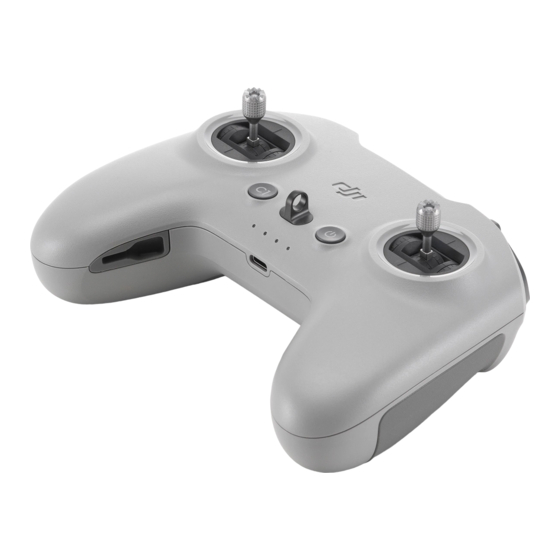
Page 5: Overview
Stick Storage Slots 14. F1 Right Stick Resistance Adjustment Screw (Vertical) 15. F2 Right Stick Spring Adjustment Screw (Vertical) 16. F1 Left Stick Resistance Adjustment Screw (Vertical) 17. F2 Left Stick Spring Adjustment Screw (Vertical) © 2024 DJI All Rights Reserved... -
Page 6: Preparing The Remote Controller
Press the power button once to check the current battery level. If the battery level is too low, charge before use. Press once, then press and hold for two seconds to power the remote controller on or off. © 2024 DJI All Rights Reserved... -
Page 7: Installation
Remove the control sticks from the storage slots and mount them on the remote controller. Linking Make sure that all the DJI devices are updated to the latest firmware using DJI Assistant 2 (Consumer Drones Series) before linking. 1. Linking Goggles and Remote Controller (Figure A) a. - Page 8 • The aircraft can be controlled with only one remote control device during flight. If the aircraft has been linked with multiple remote control devices, turn off the other remote control devices before linking. • Make sure the devices are within 0.5 m of each other during linking. © 2024 DJI All Rights Reserved...
-
Page 9: Using The Remote Controller
Emergency Propeller Stop When using Normal or Sport mode, the setting for Emergency Propeller Stop can be changed in the goggles. Press the 5D button on the goggles, and select Settings > Safety > Advanced Safety Settings. © 2024 DJI All Rights Reserved... - Page 10 CSC. When using Manual mode, press the start/stop button twice on the remote controller to stop the motors at any time. • Stopping motors mid-flight will cause the aircraft to crash. Operate with caution. © 2024 DJI All Rights Reserved...
- Page 11 Right Turn Left Turn Right Mode 2 Left Stick Right Stick Forward Down Backward Left Right Turn Left Turn Right Mode 3 Left Stick Right Stick Forward Down Backward Left Right Turn Left Turn Right © 2024 DJI All Rights Reserved...
- Page 12 • The control stick mode can be modified in the goggles. • In Manual mode, the throttle stick has no center position. Before flying, adjust the throttle stick to prevent it from returning to the center. © 2024 DJI All Rights Reserved...
- Page 13 Sport mode Normal mode • The flight operations may vary in different flight modes. Carefully read the DJI Avata 2 User Manual and learn about each flight mode. DO NOT switch from Normal mode to either Sport mode or Manual mode unless you are sufficiently familiar with the aircraft behavior under each flight mode.
-
Page 14: Using Manual Mode
Adjusting the Throttle Stick Before enabling Manual mode, adjust the F1 and F2 screws behind the throttle stick to keep the stick from auto recentering, and set the stick resistance according to user preference. Throttle Stick Adjustment Screws © 2024 DJI All Rights Reserved... - Page 15 ) clockwise to increase the stick resistance. It is recommended to set the stick resistance according to user preference. 3. Reattach the rubber grip once the adjustment is complete. • Only adjust the throttle stick before the aircraft takes off. DO NOT adjust during flight. © 2024 DJI All Rights Reserved...
- Page 16 Training in Flight Simulators In Manual mode, the control sticks are used to directly control the throttle and attitude of the aircraft. The aircraft has no flight assistance functions such as automatic stabilization and can reach any attitude. © 2024 DJI All Rights Reserved...
-
Page 17: Controlling The Gimbal And Camera
Make sure to learn and practice the flying skills in Manual mode using flight simulators before flying the aircraft in Manual mode. • DJI FPV Remote Controller 3 supports flight simulators such as Liftoff, Uncrashed, the Drone Racing League (DRL), and the Drone Champions League (DCL). -
Page 18: Optimal Transmission Zone
• DO NOT calibrate the device in locations with strong magnetic interference, such as near magnets, parking lots, or construction sites with underground reinforced concrete structures. • DO NOT carry ferromagnetic materials such as mobile phones during calibration. © 2024 DJI All Rights Reserved... -
Page 19: Updating Firmware
Updating Firmware Use one of the following methods to update the firmware: 1. Use the DJI Fly App to update the firmware for the entire set of devices including the aircraft, goggles, and remote controller. 2. Use DJI Assistant 2 (Consumer Drones Series) to update the firmware for a single device. -
Page 20: Appendix
Approx. 240 g Dimensions 165×119×62 mm (L×W×H) Operating Frequency 2.4000-2.4835 GHz Transmitter Power (EIRP) 2.4000 GHz: <26 dBm (FCC), <20 dBm (CE/SRRC/MIC) Aftersales Information Visit https://www.dji.com/support to learn more about after-sales service policies, repair services, and support. © 2024 DJI All Rights Reserved... - Page 21 DJI SUPPORT This content is subject to change. https://www.dji.com/avata-2/downloads If you have any questions about this document, please contact DJI by sending a message to DocSupport@dji.com. DJI and DJI AVATA are trademarks of DJI. Copyright © 2024 DJI All Rights Reserved.
Need help?
Do you have a question about the FPV Remote Controller 3 and is the answer not in the manual?
Questions and answers
Hello, good time. I connected the remote to DJI neo I came back to Ovata 2 and didn't have a link I came and updated it a few times. Now I hold down the power button, D-DDD doesn't hit
If the DJI FPV Remote Controller 3 does not connect to the DJI Neo after updating, ensure that all devices (including the goggles and controller) have the latest firmware. If the firmware update does not appear immediately, wait 2–3 minutes after connecting your smartphone to the Goggles N3. Then, power off all devices, turn on the DJI Neo first with one short press and one long press, and follow the connection process again.
This answer is automatically generated