Table of Contents
Advertisement
Advertisement
Table of Contents

Related Manuals for dji Cendence


Summary of Contents for dji Cendence
- Page 1 Cendence User Manual V1.0 2017.08...
-
Page 2: Using This Manual
Legends Warning Important Hints and Tips Reference Watch the video tutorials Please watch the tutorial video below to learn how to use Cendence correctly and safely: http://www.dji.com/cendence/info#video Download the DJI GO 4 app Be sure to use the DJI GO 4 app or other apps compatible with DJI aircraft during flight. -
Page 3: Table Of Contents
Contents Using this manual Legends Watch the video tutorials Download the DJI GO 4 app Download the DJI Assistant 2 Product Profile Introduction In the Box Remote Controller Diagram Preparing the Remote Controller Mounting/Removing the Intelligent Battery Charging the Battery... -
Page 4: Product Profile
Cendence can be equipped with a DJI CrystalSky monitor (the 7.85-inch model is used as example in this user guide), which offers an HD live camera view with its built-in DJI Pilot app or DJI 4 app for a precise and responsive flying experience. With various customizable buttons, you can adjust a number of flight controller, camera, and gimbal parameters with just your hands. The Cendence Patch Antenna also allows for high-gain signal transmission and improved reception. The remote controller can reach its maximum transmission distance (FCC) in a wide open area with no electro-magnetic interference at an altitude of about 400 feet (120 meters). To comply with local regulations, the 5.8 GHz frequency is not available in some countries and regions. -
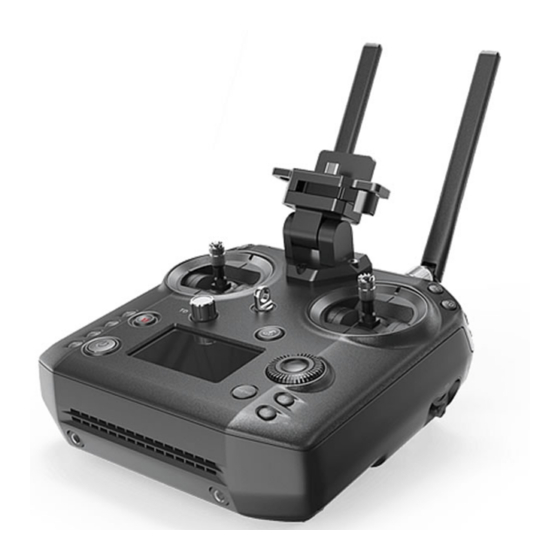
Page 5: Remote Controller Diagram
Cendence User Guide Remote Controller Diagram 1. Antennas Relay aircraft control and video signal. 2. Monitor Mounting Bracket Used to mount the DJI CrystalSky monitor. 3. Control Sticks 17 17 Control the orientation and movement of the aircraft. 4. Strap Hood 5. - Page 6 Press to show the battery level. 25. Remote Controller Support Rig 26. Handle Bar 27. Patch Antenna Mounting Holes Used to mount the Cendence Patch Antenna. 28. Left Dial Controls gimbal tilt. 29. Flight Mode Switch 34. SDI Port (for Video Output) Switch between P-mode, S-mode, and Used for video output.
-
Page 7: Preparing The Remote Controller
(100-240V, 50/60Hz). The Charging Hub will intelligently charge batteries in sequence according to battery power levels from high to low. The buzzer will begin beeping when charging is complete. Remove the battery or turn off the Buzzer Switch to stop it. © 2017 DJI All Rights Reserved. -
Page 8: Mounting The Monitor To The Remote Controller
Part A. pitch axis. Mounting the Third Party Mobile Devices For other mobile devices (e.g. iPhones, iPads), the Cendence Mobile Device Holder and an appropriate USB cable are required. Unlock the Mounting Bracket and Lock the Mounting mount the Mobile Device Holder. -
Page 9: Linking The Remote Controller
1. Power on the remote controller, connect to your mobile device, and launch DJI GO 4. 2. Power on the aircraft. 3. Enter the Camera View and tap the Linking Remote Controller button shown below. 4. The DJI GO 4 app will display a countdown box, the remote controller will be ready to link, with its display showing Connecting and a beeping sound being emitted. ©... - Page 10 The master remote controller shows the aircraft status, and the slave remote controller shows the camera settings. If No Connection is shown after linking, repeat the above steps to try linking again. © 2017 DJI All Rights Reserved.
-
Page 11: Operating The Aircraft
Right Stick Forward Down Backward Left Right Turn Left Turn Right The Stick Mode is set to Mode 2 by default. Stick Neutral/Mid-Point: Control sticks are centered. Moving the Control Stick: Control sticks are pushed away from the center. © 2017 DJI All Rights Reserved. - Page 12 Toggle the switch to select the desired flight mode. Choose between: P-mode, S-mode, and A- mode. Position Figure Flight Mode Position P Position P P-mode Position S Position S S-mode Position A Position A A-mode © 2017 DJI All Rights Reserved.
-
Page 13: Controlling The Gimbal
Turn the dial to the left, and the gimbal will shift to 0° point downwards. The camera will remain in its current position -130° when the dial is static. horizon © 2017 DJI All Rights Reserved. -
Page 14: Operating The Camera
4. ISO Setting Press ISO Setting Button and rotate the Camera Setting Dial at the same time to set the ISO value. 5. Focus Adjustment Rotate Focus Adjustment Knob to set the focal length. © 2017 DJI All Rights Reserved. -
Page 15: Customizable Buttons
Cendence User Guide Customizable Buttons Go to the Customizable Button Settings Menu in DJI GO 4. Here you can set functions for the left lever, right lever, C1-C4 buttons, and BA-BH buttons. Dual Remote Controller Mode More than one remote controller can connect to the same aircraft in Dual Remote Controller mode. - Page 16 When in Slave mode, the remote controller cannot link to the aircraft nor control aircraft orientation. Select Master in DJI GO 4 if you wish to connect and control the aircraft with the remote controller. 2. Search the “Master” remote controller in the surrounding area.
-
Page 17: Using Accessories
Make sure to power off the remote controller before removing and attaching the antennas. Usage The signal transmission between aircraft and remote controller perform best within the range that displayed in the picture shown below: Ensure the aircraft is flying within the optimal transmission range. Adjust the distance and position between the operator and the aircraft to achieve optimal transmission performance. © 2017 DJI All Rights Reserved. -
Page 18: Mounting The Control Stick Covers
1. Remove the rings around sticks with the Control Stick Cover Mounting Key, and the screws on the top of the sticks. 2. Mount the Control Stick Covers to the remote controller and secure them with the Control Stick Cover Mounting Key. 3. Reattach the screws to the sticks. © 2017 DJI All Rights Reserved. -
Page 19: Appendix
Appendix Upgrading the Remote Controller Firmware Using the DJI GO 4 App Power on the remote controller and connect it with the DJI GO 4 app. A prompt will appear if a new firmware upgrade is available. To start upgrading, connect a mobile device to the Internet and follow the on-screen instructions. Ensure the DJI GO 4 app has access to the Internet. -
Page 20: 2017 Dji All Rights Reserved
HDMI Logo are trademarks or registered trademarks of HDMI Licensing LLC in the United States and other countries . This content is subject to change. Download the latest version from http://www.dji.com/cendence If you have any questions about this document, please contact DJI by sending a message to DocSupport@dji.com. © 2017 DJI All Rights Reserved.
Need help?
Do you have a question about the Cendence and is the answer not in the manual?
Questions and answers