Table of Contents
Advertisement
Quick Links
MOUNTING BRACKETS
Installation to a ceiling
(V-Series Bracket use)
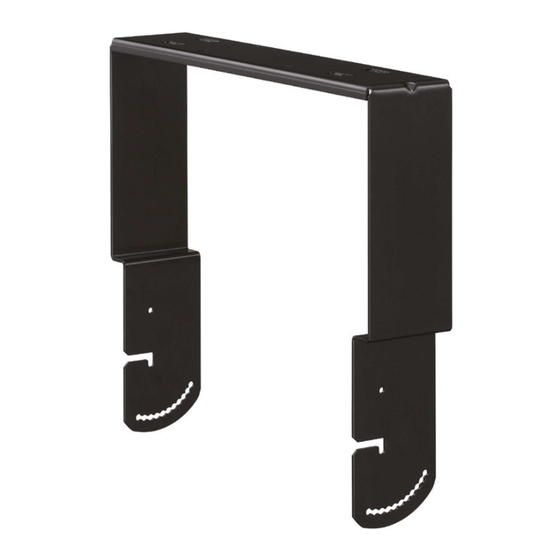
Installation to a ceiling
(H-Series Bracket use)
TABLE OF CONTENTS
1. SAFETY PRECAUTIONS ............................. 2
2. GENERAL DESCRIPTION ........................... 3
(For speaker fall prevention) ...................... 4
4. INSTALLING TO A CEILING ........................ 4
Thank you for purchasing TOA's Mounting Bracket.
Please carefully follow the instructions in this manual to ensure long, trouble-free use of your equipment.
OPERATING INSTRUCTIONS
V-Series Mounting Brackets
HY-1200VB
HY-1200VW
HY-1500VB
HY-1500VW
H-Series Mounting Brackets
HY-1200HB
HY-1200HW
HY-1500HB
HY-1500HW
5. INSTALLING ON A WALL .......................... 10
6. DIMENSIONAL DIAGRAMS ....................... 14
7. SPECIFICATIONS ...................................... 16
Accessories ................................................. 16
Optional products ........................................ 16
Advertisement
Table of Contents

Related Manuals for Toa V Series


Summary of Contents for Toa V Series
-
Page 1: Table Of Contents
(For speaker fall prevention) ...... 4 Accessories ..........16 Optional products ........16 4. INSTALLING TO A CEILING ......4 Thank you for purchasing TOA's Mounting Bracket. Please carefully follow the instructions in this manual to ensure long, trouble-free use of your equipment. -
Page 2: Safety Precautions
1. SAFETY PRECAUTIONS • Before installation or use, be sure to carefully read all the instructions in this section for correct and safe operation. • Be sure to follow all the precautionary instructions in this section, which contain important warnings and/or cautions regarding safety. -
Page 3: General Description
2. GENERAL DESCRIPTION These H- and V-Series Mounting Brackets are designed exclusively to mount the HS series speaker system to a ceiling or wall. The HY-1200VB, HY-1200VW, HY-1500VB and HY-1500VW (V-Series Mounting Brackets) are for vertical speaker installation, while the HY-1200HB, HY-1200HW, HY-1500HB and HY-1500HW (H-Series Mounting Brackets) are for horizontal speaker installation. -
Page 4: Safety Wire Installation (For Speaker Fall Prevention)
3. SAFETY WIRE INSTALLATION (For speaker fall prevention) When mounting the speaker system to the ceiling or wall, install a safety wire as needed. When installing the safety wire, be sure to follow the instructions below. WARNING Failure to do so may cause the speaker to fall off, resulting in personal injury. - Page 5 1-2. For horizontal speaker installation (H-Series Mounting Bracket) Speaker direction angle can be adjusted from 0° to 90° downward. Adjustable speaker direction angle • 0° to 60° downward • 75° to 90° downward Bracket holder (accessory) Machine screw M6 x 20 (accessory) About 4 mm (0.16") Step 2.
- Page 6 Step 3. Install the mounting bracket to the ceiling. For the dimensions of the mounting bracket, refer to p. 14, "Dimensional Diagrams." Bolts and nuts used to fix a bracket to a ceiling are not included. Prepare those that are appropriate for the ceiling's WARNING structure and composition.
- Page 7 6-2. When adjusting the speaker direction within the range of 75° to 90° downward using the V-Series Mounting Bracket. Ceiling The speaker angle is adjustable in 7.5° steps with Hex bolt M6 x 30 the angle adjustment holes in the mounting bracket. (accessory) Angle adjustment hole 0°...
- Page 8 4.2. When Using in conjunction with the Optional Mount Bracket The H- or V-Series Mounting Bracket allows speaker's horizontal angle to be adjusted in conjunction with the optional HY-C0801 or HY-C0801W Ceiling Mount Bracket. The following figure shows an example of vertical speaker installation. To the ceiling surface Bracket A Nut for M8...
- Page 9 Step 1. Attach the supplied bracket holders and hex bolts to the speaker. For the procedures, refer to Steps 1 and 2 in the "Using the H- or V-Series Mounting Bracket Only" on page 4. Step 2. Remove the safety bolt from the Bracket A of the HY-C0801 or HY-C0801W to detach the Bracket B. Step 3.
-
Page 10: Installing On A Wall
5. INSTALLING ON A WALL The brackets to be used are as follows. For vertical speaker installation: V-Series Mounting Brackets (HY-1200VB, HY-1200VW, HY-1500VB and HY-1500VW) For horizontal speaker installation: H-Series Mounting Brackets (HY-1200HB, HY-1200HW, HY-1500HB and HY-1500HW) The example here shows the installation procedure of the mounting bracket using the HS-1200 series speaker system. - Page 11 Step 3. Install the mounting bracket on the wall. For the dimensions of the mounting bracket, refer to p.14, "Dimensional Diagrams." Bolts and nuts used to fix a bracket on a wall are not included. Prepare those that are appropriate for the wall's WARNING structure and composition.
- Page 12 6-2. For the H-Series Mounting Bracket Hex bolt (M6 x 30) The speaker angle is adjustable in 7.5° steps with (accessory) the angle adjustment hole in the mounting bracket. Angle adjustment hole 15° 0° (Horizontal) Wall 60° Step 7. Tighten the loosely fitted bolts in Step 2. Note: Check that all bolts are securely tightened.
- Page 13 Step 1. Attach the supplied bracket holders and hex bolts to the speaker. For the procedures, refer to Steps 1 and 2 in the "Using the H- or V-Series Mounting Bracket Only" on page 4. Step 2. Attach the Bracket B of the HY-W0801 or HY-W0801W to the H- or V-Series Mounting Bracket. Be sure to use the hex bolts supplied with the HY-W0801 or HY-W0801W, and the nuts for M8 and plain washers for M8 supplied with the H- or V-Series Mounting Bracket.
-
Page 14: Dimensional Diagrams
6. DIMENSIONAL DIAGRAMS 6.1. HY-1200VB and HY-1200VW [Top] 366.4 (14.43) Unit: mm (inches) 224 (8.82) 150 (5.91) 4 - ø8.5 (0.33) 4 - 11 × 36 (0.43 x 1.42) [Front] [Side] 31 (1.22) 3.2 (0.13) 337.9 (13.3) 6.2. HY-1200HB and HY-1200HW [Top] 395.4 (15.57) Unit: mm (inches) - Page 15 6.3. HY-1500VB and HY-1500VW [Top] 460.4 (18.13) Unit: mm (inches) 294 (11.57) 150 (5.91) 4 - ø8.5 (0.33) 4 - 11 × 36 (0.43 x 1.42) [Front] [Side] 31 (1.22) 3.2 (0.13) 410.9 (16.18) 6.4. HY-1500HB and HY-1500HW [Top] Unit: mm (inches) 485.4 (19.11) 294 (11.57) 150 (5.91)
-
Page 16: Specifications
Plain washer for M8 (used when installing in conjunction with the optional bracket) ..4 Nut for M8 (used when installing in conjunction with the optional bracket) ...... 4 • Optional products Ceiling Mount Bracket: HY-C0801, HY-C0801W Wall Mount Bracket: HY-W0801, HY-W0801W URL: http://www.toa.jp/ 133-01-00117-00...
Need help?
Do you have a question about the V Series and is the answer not in the manual?
Questions and answers