
Related Manuals for Clarke Start N Charge WIBC200


Summary of Contents for Clarke Start N Charge WIBC200
- Page 1 INTELLIGENT BATTERY CHARGER-STARTER MODEL NO: WIBC200 PART NO: 6261520 OPERATION & MAINTENANCE INSTRUCTIONS ORIGINAL INSTRUCTIONS DL0921...
-
Page 2: Environmental Recycling Policy
Battery Charger will give you long and satisfactory service. GUARANTEE This CLARKE product is guaranteed against faulty manufacture for a period of 12 months from the date of purchase. Please keep your receipt as proof of purchase. -
Page 3: Safety Symbols
SAFETY SYMBOLS Wear Eye Protection Wear Protective Clothing Wear Protective Gloves WEEE Directive Indoor Use Only Class 1 Appliance Warning: Battery Warning: Risk of Charging Electrical Shock Explosive Gases: Not suitable for use with Prevent flames & sparks Li-Ion or Li-Poly batteries and provide ventilation during charging Parts &... -
Page 4: Electrical Connections
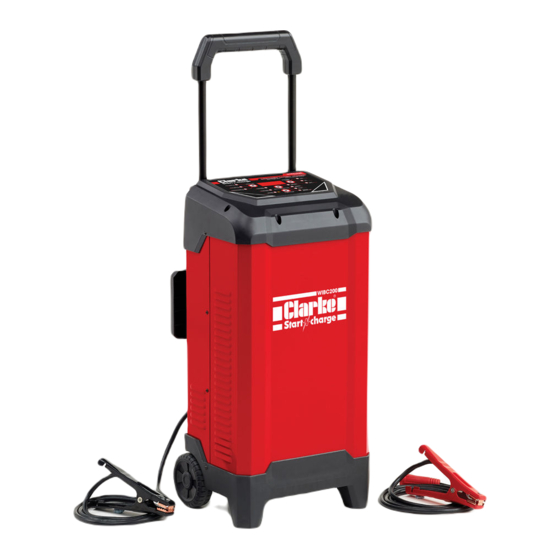
ELECTRICAL CONNECTIONS WARNING! READ THESE ELECTRICAL SAFETY INSTRUCTIONS THOROUGHLY BEFORE CONNECTING THE PRODUCT TO THE MAINS SUPPLY. Before switching the product on, make sure that the voltage of your electricity supply is the same as that indicated on the rating plate. This product is designed to operate on 230VAC 50Hz. - Page 5 WIBC200 OVERVIEW 1 Handle Positive (Red) Lead 2 Display & Control Panel Positive Lead Terminal +24V 3 Cable Rack Positive Lead Terminal +12V 4 Negative (BLACK) Lead Fuse Cover Parts & Service: 020 8988 7400 / E-mail: Parts@clarkeinternational.com or Service@clarkeinternational.com...
-
Page 6: Specifications
SPECIFICATIONS Model Number WIBC200 Dimensions (D x W x H) 300 x 300 x 850 Weight 16.5 kg IP Rating IP20 Suitable Battery Type 12V & 24V WET, MF, EFB, STD, GEL & AGM Min. Charging Battery Size 4 Ah Max. -
Page 7: Safety Precautions
SAFETY PRECAUTIONS WARNING: ALWAYS SWITCH OFF THE CHARGER WHEN CONNECTING OR DISCONNECTING LEADS TO AVOID SPARKING AS HIGHLY INFLAMMABLE HYDROGEN GAS CAN BE RELEASED IN THE PROCESS OF BATTERY CHARGING PLEASE READ BEFORE USING THIS UNIT 1. Batteries can generate explosive gases during normal operation. ALWAYS use in well ventilated area. - Page 8 Have it checked and repaired if damaged. 22. NEVER attempt any repairs yourself. If you have a problem with your charger contact your local CLARKE dealer or contact service@clarkeinternational.com 23. When charging is complete, ensure that the vehicle battery leads are secured to the proper terminals which should be clean, and lightly smeared with petroleum jelly to prevent corrosion.
-
Page 9: Display And Control Panel
DISPLAY & CONTROL PANEL DISPLAY BUTTON Press the DISPLAY button until the following LED is lit: 1. VOLTAGE (V) - When the charger is NOT charging a battery, the digital display will show the battery voltage. 2. BATTERY (%) - When in charging mode, the digital display shows an estimated charge percentage of the battery connected to the charger’s battery clamps. -
Page 10: General Preparation
GENERAL PREPARATION CHARGER LOCATION 1. Place the charger as far away from the car battery as possible. 2. DO NOT let battery acid drip on anything when reading specific gravity or when topping up the battery. 3. DO NOT operate the charger in an enclosed space, such as inside the vehicle. - Page 11 • For positive earth vehicles, connect the NEGATIVE (BLACK) lead and clamp from the battery charger to the NEGATIVE terminal on the battery. Connect the POSITIVE (RED) lead and clamp to the vehicle frame or engine block away from the battery. •...
-
Page 12: Charging Steps
CHARGING STEPS 1. ANALYSING 1: Checks if battery is connected with the charger. 2. DESULPHATION: Pulsing charging to remove sulphate. 3. SOFT START: Charges with gradually increasing charging current. 4. CONTROLLED CURRENT CHARGE: Adjusts the charging current intelligently. 5. ANALYSING 2: Tests if the battery can absorb charge. 6. - Page 13 STARTING A CAR - BOOST The battery charger can be used to start a car if the battery is low. Follow all safety instructions and precautions for charging your battery. Wear eye protection and protective clothing. The procedures are as follows: WARNING: USING THE ENGINE START FEATURE WITHOUT A BATTERY INSTALLED IN THE VEHICLE WILL DAMAGE THE VEHICLES ELECTRICAL SYSTEM.
-
Page 14: Repair Function
REPAIR FUNCTION Press the FUNCTION button until the REPAIR LED is lit to enter this mode (digital display shows REPAIR-ON). It is an advanced battery recovery mode for repairing old, idle, stratified or sulfated batteries. Not all batteries can be recovered. -
Page 15: Charging Time Duration
CHARGING TIME DURATION Different battery capacity, residual voltage and charging current will all affect charging time. The following table is for guidance in the case of a fully discharged battery. Battery Approx. Time to Charge Size - Ah 33mins 33mins Parts &... -
Page 16: Replacing The Fuse
FUSES 1. The starter/charger is equipped with a safety fuse which will protect the unit under the following circumstances: • Overload - too high a current to the battery. • Short Circuit - clamps touch or cross connection to battery. •... - Page 17 MAINTANENCE This charger requires minimal maintenance. As with any appliance or tool, a few common sense rules will prolong the life of the battery charger. WARNING: ALWAYS BE SURE THE CHARGER IS UNPLUGGED FROM THE MAINS AND ANY BATTERY BEFORE PERFORMING ANY MAINTENANCE OR CLEANING.
- Page 18 WIBC200 PARTS DIAGRAM Parts & Service: 020 8988 7400 / E-mail: Parts@clarkeinternational.com or Service@clarkeinternational.com...
- Page 19 WIBC200 PARTS LIST NO DESCRIPTION NO DESCRIPTION Front Cover Rectifier Bridge Upper Cover Fuse Posts Bottom Cover 12V Positive Cable Joint (Showing Positive Cable Attached) Base Plate 24V Positive Cable Joint Main PCB Radiator Power Cable Control PCB Negative (Black) Cable & Clamp Wheels Fuse...
-
Page 20: Error Messages
ERROR MESSAGES 1. E01 Display + ERROR LED lit: Reverse connection 2. E02 Display + ERROR LED lit: Temperature in charger is too high 3. E03 Display + ERROR LED lit: The battery cannot store electric charge (dead battery) 4. E04 Display + ERROR LED lit: No battery connected/battery voltage is lower than 1 volt (dead battery) 5. - Page 21 DECLARATION OF CONFORMITY - UKCA Parts & Service: 020 8988 7400 / E-mail: Parts@clarkeinternational.com or Service@clarkeinternational.com...
-
Page 22: Declaration Of Conformity (Ce)
DECLARATION OF CONFORMITY - CE Parts & Service: 020 8988 7400 / E-mail: Parts@clarkeinternational.com or Service@clarkeinternational.com... -
Page 23: Associated Products
ASSOCIATED PRODUCTS 10 Tonne Body Repair Car Creeper - CMC40 1 Tonne Folding Kit - CS10BRK Workshop Crane - CFC100 •10 tonne hydraulic •Integral parts and tool •Lifting capacity of pump, ram & hose. storage 250kg to 1000kg in 4 stages •Housed in a tough •Padded oil resistant...
Need help?
Do you have a question about the Start N Charge WIBC200 and is the answer not in the manual?
Questions and answers