
Related Manuals for Webasto Ti22 ProX


Summary of Contents for Webasto Ti22 ProX
- Page 1 Installation Instructions Ti22 ProX Chilled Water Marine Air-Conditioning Systems English...
-
Page 2: Table Of Contents
Chiller unit Home screen without cabin control .. 16 System settings ............ 16 Setting level 1 ............ 17 Setting level 2 ............ 17 Setting level 3 (parameter menu)........ 18 Dehumidification........ 19 Commissioning ........ 19 Checking connections .......... 19 Checking operation of condensed-water-drain ... 19 2112898A II Ti22 ProX... -
Page 3: About This Document
Intended use l Always make sure that the drive motor of the compressor The purpose of Ti22 ProX is to provide heating and cooling on has come to a complete standstill. Motors that are still ships. -
Page 4: Scope Of Delivery
Even when the drive motor of the compressor is not run- Conformity ning, the motor terminals U, V and W are live when the Webasto herewith declares that this product conforms with the frequency converter is connected to the power supply. basic directives for marketing in the EU:... -
Page 5: Type Label
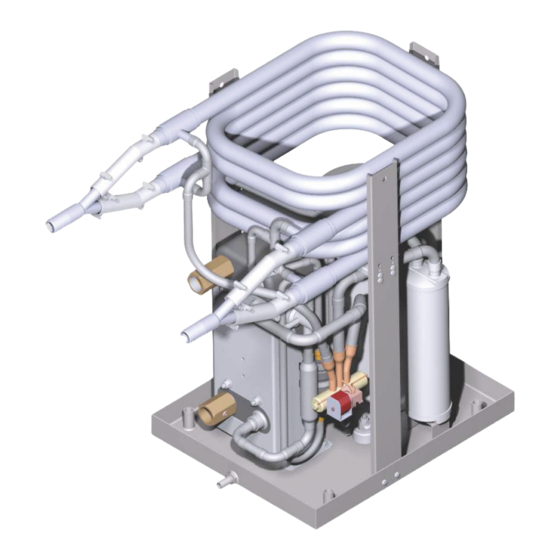
Fig. 5 Seawater line Refrigerating circuit Cooling water circuit The Ti22 ProX is an air-conditioning system with four basic com- ponents: l Evaporator (liquid heat exchanger): Refrigerant vaporises at low pressure and a temperature below the cooling water temperature. The refrigerant absorbs heat from the cold water circuit in the process. -
Page 6: Installation
The compressor compresses the refrigerant vapour, ance purposes. which condenses to a liquid when flowing through the con- l Make sure to mount the Ti22 ProX on an even, horizontal denser cooled with seawater. The seawater absorbs the re- surface. -
Page 7: Installation Example
Installation example The illustration below shows an example of a typical installation of a Ti22 ProX air-conditioning system. In addition to the Ti22 ProX, a further 3 air handlers are shown in this installation example for heating and cooling the respective cabines. -
Page 8: Transporting The Unit
The unit is heavy and must not be carried incorrectly. Installing the condensed-water drain For correct carrying of the Ti22 ProX, make sure to: line l Lift the unit only at the lifting eyes on the stainless steel frame or the condensed-water tray. - Page 9 Webasto recommends that each Ti22 ProX chiller unit is sup- Each Ti22 ProX chiller unit requires a separate seawater outlet plied by its own individual seawater pump. This to achieve the to be able to check and secure the minimum required seawater minimum required seawater flow rate.
-
Page 10: Installing The Cooling Water Circuit
5.7.6 Equipotential bonding on the condenser NOTE The Ti22 ProX chillers come with a bonding clamp fixed on the The water/glycol mix ratio should be 25% to 40% titanium condenser. You must attach the titanium condenser to the galvanic cathodic protection system with an 8 AWG (10 glycol and 75% to 60% fresh water. - Page 11 Primary lines should at least have the same diameter as the con- smooth operation. nections of the Ti22 ProX unit. Secondary lines used as branches Fit pressure gauges or pressure gauge connections on the to air handlers must have the same diameter as the connections intake and the pressure side of the pump.
-
Page 12: Installation With Module Configuration
Cold water temperature sensors ample, a total of 7 power supply lines, which must be individu- NOTE ally protected by circuit breakers, is required for a Ti22 ProX sys- To make sure that the system operates satisfactorily, tem with 4 compressors. -
Page 13: Installing The Electrical Box
This requirement complies with protection class IP21. If no specific requirements relating to the IP class need to be met, the electrical box of the Control Kit Ti22 ProX can be in- stalled in any position. Fig. 15 For protection class IP21, the electrical box must be installed Use the supplied connection cable to connect the control ele- vertically upright with the connections facing downward. -
Page 14: Installation Cabin Temperature Sensor
For 2 to 4 stages: See Fig. 14. Accessories The BlueCool MyTouch is the standard control element for the Ti22 ProX and enables easy operation and setting of the con- 6.7.1 BlueCool Expert Tool nected system. The screen is a touch screen. System operation is The BlueCool Expert tool enables you to configure, actuate and described below. -
Page 15: Home Screen And Icons
Operation | 7 The icons on the Home screen provide information about the NOTE system status. Webasto recommends operating the screen using your fingers only. The touch sensitivity of the screen is op- Icon Function timized to fingertip contact. The screen may not re- On / Off spond if gloves are worn. -
Page 16: Chiller Unit Home Screen Without Cabin Control
15 °C and above 40 °C in heating mode. The current cold The explanation of the Timer function is an example for the op- water temperature at the outlet of the Ti22 ProX can be reques- erating logic. The explanation also applies to other setting levels ted in setting level 2 (crew menu). -
Page 17: Setting Level 1
Tap the Settings icon for authorised person only (crew). This displays setting level 1 with the following functions de- To access setting level 2, tap and hold the Webasto logo. scribed below: This provides access to the following functions: 7.5.1... -
Page 18: Setting Level 3 (Parameter Menu)
As a result, the com- To access Setting level 3 (Parameter menu): pressors cut in and out depending on the cooling load. For Tap and hold the Webasto logo. You are now at setting systems with multiple compressors, significant fluctuation level 2. -
Page 19: Dehumidification
All parameters are reset to the factory settings. leaking. Dehumidification Checking operation of condensed- In the dehumidification mode F7, the Ti22 ProX automatically water-drain controls heating,cooling and removes humidity from the cabin l Pour water into the condensed-water tray and ensure cor- in the absence of the crew. -
Page 20: Filling Cold Water Circuit
9 | Commissioning NOTE Filling cold water circuit The easiest way to do this is by using the Webasto BlueCool Expert Tool. You can download this tool from 9.4.1 Filling and flushing an open cold water circuit the Webasto dealer portal. The tool enables you to ac-... -
Page 21: Test Run
Inspection and maintenance Add glycol into the tank. Webasto recommends a series of routine checks at regular in- NOTE tervals to make sure that the system functions well over the Add a sufficient amount of glycol to get a water/glycol long-term and retains its capacity. -
Page 22: Cold Water Circuit
If the condenser is soiled, the cooling or heating capacity of the system decreases. The seawater circuit must be cleaned by an expert (such as the installer or your Webasto Service Centre). Cold water circuit 10.2 The operation of the cold water circuit must always be checked, especially after a longer absence. -
Page 23: Checklist For Inspection And Maintenance
Check the electrical connections for corrosion to the contacts and firm seating. (See chapter 10.3, "Electrical wiring" on page 22) Check shaft seal of the pumps (seawater, cold water) and replace it if neces- sary (does not apply to pumps with magnetic coupling). 2112898A II Ti22 ProX 23 / 43... -
Page 24: Decommissioning
30 minutes, the system is completely shut down and the fault code is displayed continuously. No further restarts are at- tempted. The Ti22 ProX can be reset when the cause of the error has been eliminated. To reset the Ti22 ProXunit: l Switch the air handler off and on via BlueCool MyTouch. - Page 25 A09 - Cabin temperat- 10x flashing, Cabin temperature sensor defective, break / Connect or replace the cabin temper- ure sensor pause... short-circuit in electrical circuit, cabin tem- ature sensor. perature sensor not connected. 2112898A II Ti22 ProX 25 / 43...
- Page 26 Call out a refrigerant specialist if ne- cessary. Technical datasheet available. Refrigerant circuit blocked (drier, capillary Have checked by refrigerant specialist. lines or expansion valve). Technical datasheet available. Compressor fault. Have checked by refrigerant specialist. 26 / 43 2112898A II Ti22 ProX...
- Page 27 Select screen settings “Chiller unit despite with cabin control (Yes)”. cabin temperatures Now select automatic mode (F3/F4, needing heating see chapter , "Screen settings" on mode (or cooling page 18) mode). 2112898A II Ti22 ProX 27 / 43...
-
Page 28: Faults Not Shown On The Control Element
(and not, for example, in the chiller unit installa- tion space). l Check whether the cabin temperature sensor is subject to direct fault sources, like direct sunlight or devices radiating heat. l Calibrate the sensor, or replace the defective sensor. 28 / 43 2112898A II Ti22 ProX... -
Page 29: Technical Data
1 chiller and control box 31.5 x 24 x 27.6 31.5 x 24 x 27.6 31.5 x 24 x 27.6 31.5 x 24 x 27.6 ( L x W x H) [mm / inches] 2112898A II Ti22 ProX 29 / 43... -
Page 30: Dimensions And Minimum Clearance
Where yy is the recommended clearance in mm The Ti22 ProX 60 is shown as an example, the same values apply to all Ti22 ProX systems. For L x W x H of the chiller units, see the tables in chapter 13, "Technical data" on page 29. -
Page 31: Annex
Deactivation com- Compressor 1 ponents Compressor 2 Compressor 3 Compressor 4 Compressor 5 Compressor 6 Flow monitor Further settings Access code Undervoltage switch-off Correction cabin temperature sensor CAN-bus address Valve Air handle Factory settings 2112898A II Ti22 ProX 31 / 43... -
Page 32: Parameter Settings
Firmware Firmware version Example: 3.2 Screen settings Chiller unit cabin control Yes / No Save Reset System settings Access to setting level 3 with code entry. Code entry is not required if code=00 32 / 43 2112898A II Ti22 ProX... - Page 33 3. 01 to 99 = tings" on page access code activated. Undervoltage switch-off - 195 Correction cabin temperature -5.5 to 5.5 / -9.9 to 9.9 sensor K or °F CAN-bus address 1 to 239 2112898A II Ti22 ProX 33 / 43...
-
Page 34: Wiring Diagrams
Compressors that are present, are ON. Compressors that are not present, are OFF. Webasto shall not accept liability for faults caused by operating the compressors below the recommended voltage level. Do not se- lect any settings that are lower than the factory settings. - Page 35 Annex | 14 14.3.3 PC-board layout diagram Fig. 29 2112898A II Ti22 ProX 35 / 43...
- Page 36 14 | Annex 14.3.4 Ti22 ProX, 1-stage, 1-phase Fig. 30 36 / 43 2112898A II Ti22 ProX...
- Page 37 Annex | 14 14.3.5 Ti22 ProX, 1-stage, 1-phase with Soft-Start Fig. 31 2112898A II Ti22 ProX 37 / 43...
- Page 38 14 | Annex 14.3.6 Ti22 ProX, 1-stage, 3-phase Fig. 32 38 / 43 2112898A II Ti22 ProX...
- Page 39 Annex | 14 14.3.7 Ti22 ProX, 1-stage, 3-phase with VFD Fig. 33 2112898A II Ti22 ProX 39 / 43...
- Page 40 14 | Annex 14.3.8 Ti22 ProX, 2 to 4 stages, 1-phase Fig. 34 40 / 43 2112898A II Ti22 ProX...
- Page 41 Annex | 14 14.3.9 Ti22 ProX, 2 to 4 stages, 3-phase Fig. 35 2112898A II Ti22 ProX 41 / 43...
-
Page 42: Used Abbreviations
Acrylonitrile butadiene styrene American wire gauge CAN (bus) Controller Area Network (bus) EPDM Ethylene propylene diene monomer Gallons per minute Magnetic circuit breaker Meters of liquid column Polyethylene Rated Load Amperage Variable frequency drive 42 / 43 2112898A II Ti22 ProX... - Page 43 To request this Installation Documentation in another language, please locate and contact your local Webasto dealer. You can find your nearest dealer at: https://dealerlocator.webasto.com/en-int. To provide feedback (in English or German) on this document, please email the Tech Doc and Translation team:feed- back2tdt@webasto.com...
Need help?
Do you have a question about the Ti22 ProX and is the answer not in the manual?
Questions and answers