
Subscribe to Our Youtube Channel
Related Manuals for Exquisit KGC265-70-010D white


Summary of Contents for Exquisit KGC265-70-010D white
- Page 1 Kühl-Gefrierkombination KGC265-70-010D weiss KGC265-70-010D inoxlook Refrigerator-freezer KGC265-70-010D white KGC265-70-010D inoxlook DE Gebrauchsanweisung EN Instruction Manual...
- Page 2 Einleitung Vor Inbetriebnahme des Gerätes unbedingt die Gebrauchsanweisung aufmerksam durchlesen. Die Gebrauchsanweisung enthält wichtige Sicherheitshinweise für den Betrieb und den Unterhalt des Gerätes. Korrektes Bedienen trägt wesentlich zur effizienten Energienutzung bei und minimiert den Energieverbrauch im Betrieb. Eine unsachgemäße Verwendung des Gerätes kann gefährlich sein, insbesondere für Kinder.
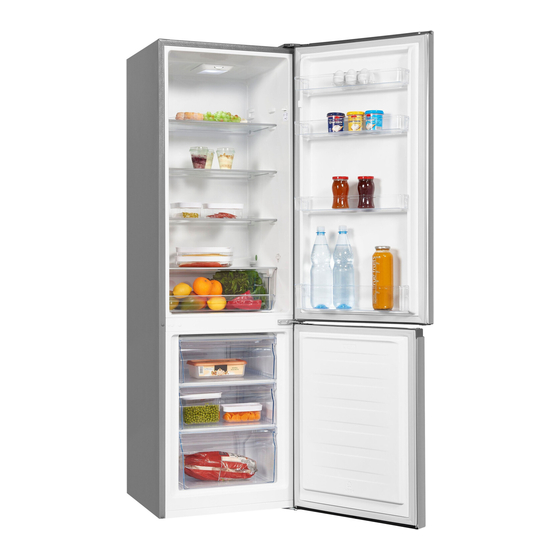
- Page 3 Gerät kennenlernen / Getting to know your appliance DEUTSCH ENGLISH Lieferumfang Scope of supply Gerät appliance Gebrauchsanweisung Instruction manual Servicekarte Service card Kühlraum Refrigerating compartment Glasablage Glass shelves Gemüseschale Vegetable drawer Eierablage Egg tray Türfach Door compartments Gefrierraum Freezer compartment Gefrierschublade Freezer drawers Bezeichnung...
- Page 4 Seite 4 von 52...
-
Page 5: Table Of Contents
Inhaltsverzeichnis Zu Ihrer Sicherheit ..................7 Bestimmungsgemäße Verwendung .............. 7 Fehlgebrauch .................... 8 Sicherheit zu bestimmten Personengruppen ..........8 Restgefahren .................... 9 Gefahren durch Kältemittel ................. 9 Aufstellen und Anschließen ................10 Türanschlag wechseln / Türgriff montieren ..........10 Gerät aufstellen ..................12 Nivellieren .................... - Page 6 12.3 Defrosting ....................43 12.4 Lamp (LED) .................... 43 12.5 Decommissioning the appliance ..............44 13 Operating noises / troubleshooting ..............44 14 Spare parts/After Sales Service ............... 46 15 Warranty terms .................... 47 16 Disposal ....................... 48 Seite 6 von 52...
-
Page 7: Zu Ihrer Sicherheit
Zu Ihrer Sicherheit Zu Ihrer Sicherheit Für eine sichere und sachgerechte Anwendung die Gebrauchsanweisung und weitere produktbegleitende Unterlagen sorgfältig lesen und für spätere Verwendung aufbewahren. Alle Sicherheitshinweise in dieser Gebrauchsanweisung sind mit einem Warnsymbol versehen. Sie weisen frühzeitig auf mögliche Gefahren hin. Diese Informationen unbedingt lesen und befolgen. -
Page 8: Fehlgebrauch
Zu Ihrer Sicherheit 1.2 Fehlgebrauch Folgende Tätigkeiten gelten als Fehlgebrauch und sind somit untersagt: • Keine Medikamente, Blutplasma, Laborpräparate oder ähnlichen der Medizinprodukterichtlinie 2007/47/EG zu Grunde liegenden Stoffe und Produkte im Kühlschrank lagern und kühlen. • Keine explosiven Stoffe oder Sprühdosen mit brennbaren Treibmitteln, wie z.B. Butan, Propan, Pentan usw. -
Page 9: Restgefahren
Zu Ihrer Sicherheit 1.4 Restgefahren GEFAHR STROMSCHLAGGEFAHR! • Den Netzstecker am Netzkabel beim Einstecken und Herausziehen nie mit feuchten oder nassen Händen anfassen. • Das Gerät nur nach Angaben der Gebrauchsanweisung montieren und anschließen. • Im Notfall sofort den Netzstecker aus der Steckdose ziehen. •... -
Page 10: Aufstellen Und Anschließen
Aufstellen und Anschließen Vorgehen bei beschädigtem Kältekreislauf: • Offenes Feuer und Zündquellen unbedingt vermeiden. • Den Raum, in dem das Gerät steht, gut durchlüften. • Den Kundendienst kontaktieren. Aufstellen und Anschließen Vor dem Aufstellen und Anschließen des Geräts sicherstellen, dass •... - Page 11 Aufstellen und Anschließen Türanschlagwechsel SCHRITTFOLGE BILD 1. Die Scharnierabdeckung (1) entfernen. 2. Die Schrauben (2) lösen und das Scharnier (3) entfernen. 3. Die Scharnierabdeckung in die separate Plastiktüte mit dem Zubehör zurücklegen. Die Schrauben und das Scharnier für die spätere Montage zur Seite legen. 4.
-
Page 12: Gerät Aufstellen
Aufstellen und Anschließen 16. Links das Scharnier (1) mit den Schrauben (4) fixieren und den Fuß (3) einschrauben. 17. Den Fuß (2) rechts mit der Schraube (5) befestigen. 18. Die untere Gerätetür auf das untere Scharnier aufsetzen und schließen. 19. Den Stift des mittleren Scharniers herausschrauben. 20. -
Page 13: Nivellieren
Aufstellen und Anschließen KLIMAKLASSE TEMPERATURBEREICH (SN) erweiterte gemäßigte Zone +10 °C bis +32 °C (N) gemäßigte Zone +16 °C bis +32 °C (ST) subtropische Zone +16 °C bis +38 °C (T) tropische Zone +16 °C bis +43 °C Mindestabstände für Be- und Entlüftung Die Luftzirkulation an der Geräterückwand, -seite und -oberkante beeinflusst den Energieverbrauch und die Kühl-/ Gefrierleistung (je nach Modell). -
Page 14: Inbetriebnahme
Inbetriebnahme Inbetriebnahme Das Gerät sowie die Teile der Innenausstattung vor Inbetriebnahme gründlich reinigen (s. Kapitel Wartung und Pflege). 3.1 Gerät ein-/ ausschalten • Gerät am Strom anschließen. • Netzstecker auf festen Sitz prüfen. Elektrischer Anschluss, siehe Typenschild. Das Gerät ist betriebsbereit. ACHTUNG SACHSCHADEN! Gerät nicht unmittelbar nach einem Stromunterbruch einschalten. - Page 15 Inbetriebnahme Temperatur einstellen EMPFOHLENE TEMPERATUREINSTELLUNG UMGEBUNGSTEMPERATUR GEFRIERRAUM KÜHLRAUM Warm ⁄ 29° C – 38° C Einstellung 2~4 Normal ⁄ 21° C – 28° C Einstellung 4 Kalt ⁄ 16° C – 20° C Einstellung 4~6 Ø Gemäß den empfohlenen Temperatureinstellungen, Lebensmittel nicht länger als 3 Tage im Kühlraum aufbewahren.
-
Page 16: Lebensmittel Richtig Lagern
Inbetriebnahme Ø Der Sticker OK ist nur für die Verwendung in diesem Gerät vorgesehen. Ø Bleibt die Gerätetür länger geöffnet, steigt die Temperatur im Gerät. Die Anzeige OK kann verblassen oder nicht mehr ersichtlich sein. Ø Der Sticker OK ist nur für die Verwendung in diesem Gerät vorgesehen. - Page 17 Inbetriebnahme Zum Verpacken eignen sich: • Für Lebensmittel geeignete Frischhaltebeutel und -folien • Spezielle Hauben aus Kunststoff mit Gummizug • Aluminiumfolie • Frisches Fleisch oder Fisch Vakuumieren. Um größere Mengen im Kühl-/Gefrierraum zu lagern, sind die Glasablagen abnehmbar. 1. Glasablagen hinten anheben und nach vorne ziehen. Oder 2.
- Page 18 Inbetriebnahme Beschreibung Gefrierfächer nach *-Fach ZIEL- FÄCHER-TYP GEEIGNET ZUM… LAGERTEMPERATUR Aufbewahren von frischem Fleisch und frischem Fisch über einen Zeitraum von einem bis maximal drei Tagen Null-Sterne-Fach - 6 °C ~ + 0 °C sowie zum Lagern oder Herstellen von Eiswürfeln.
- Page 19 Inbetriebnahme Übersicht Lagerempfehlungen KÜHLRAUM GEFRIERRAUM ❶ ❽ ❷ ❾ ❸ ❹ ❺ ❻ ❼ Ø Die empfohlene Temperatur im Kühlfach beträgt 4 °C. Aufkleber OK, Seite 12 Ø Durch die Kühllagerung ist es möglich auch leicht verderbliche Lebensmittel 1-3 Tage zu lagern. Ø...
-
Page 20: Wartung Und Pflege
Wartung und Pflege Energie sparen • Gerät nicht in der Nähe von Herden, Heizkörpern oder anderen Wärmequellen aufstellen. Bei hoher Umgebungstemperatur läuft der Kompressor häufiger und länger und führt zu erhöhtem Energieverbrauch. • Auf ausreichende Be- und Entlüftung am Gerätesockel, an den Geräteseiten und an der Geräterückseite achten. -
Page 21: Gerät Reinigen
Wartung und Pflege 4.1 Gerät reinigen 1. Kühlgut herausnehmen. Alles abgedeckt an einem kühlen Ort lagern. 2. Glasablagen zum Reinigen etwas nach oben anheben und herausziehen, bis sie sich nach oben oder unten abschwenken und herausnehmen lassen. 3. Türfächer nach oben schieben und herausnehmen. 4. -
Page 22: Abtauen
Wartung und Pflege Ø Gerätetürdichtungen regelmäßig auf Verschmutzungen und Beschädigungen kontrollieren. Ø Fett und Öl macht die Gerätetürdichtungen porös und spröde. Wenn Fett oder Öl an Türdichtungen gelangt, ist: Gerätetürdichtungen sofort mit einem Lappen und lauwarmem Wasser unter Zugabe von etwas handelsüblichem Geschirrspülmittel reinigen. -
Page 23: Gerät Außer Betrieb Nehmen
Betriebsgeräusche / Fehler beheben 4.5 Gerät außer Betrieb nehmen ü Zum Abschalten des Gerätes den Netzstecker ziehen oder Sicherung abschalten und herausdrehen. ü Lebensmittel entnehmen. ü Netzstecker ziehen oder Sicherung abschalten und herausdrehen. ü Gerät abtauen und gründlich reinigen (s. Kapitel „Wartung und Pflege“). ü... - Page 24 Betriebsgeräusche / Fehler beheben Umgebungstemperatur ist zu (s. Kapitel 2.2) niedrig. Seitenwand ist sehr Der Verflüssiger gibt warme Luft an Keine Maßnahmen warm (nur für die Umgebung ab. Bei zu hoher notwendig. Modelle mit Umgebungstemperatur kann ein eingeschäumtem Wärmestau entstehen. Sobald die Verflüssiger).
-
Page 25: Ersatzteile / Kundenservice
Ersatzteile / Kundenservice Ersatzteile / Kundenservice Folgende Ersatzeile sind beim Kundendienst erhältlich (Abhängig vom Gerät): (1) Thermostate, Temperatursensoren, Leiterplatten und Lichtquellen; (2) Türgriffe, Türscharniere, Einlegeböden und Einschübe Die Ersatzteile sind 7 Jahre nach dem Inverkehrbringen des letzten Exemplars eines Modells erhältlich. Türdichtungen sind 10 Jahre nach dem Inverkehrbringen des letzten Exemplars eines Modells erhältlich. -
Page 26: Garantiebedingungen
Garantiebedingungen Garantiebedingungen Als Käufer eines Exquisit Gerätes stehen Ihnen die gesetzlichen Gewährleistungen aus dem Kaufvertrag mit Ihrem Händler zu. Zusätzlich räumen wir Ihnen eine Garantie zu den folgenden Bedingungen ein: Leistungsdauer Die Garantie läuft 24 Monate ab Kaufdatum (Kaufbeleg ist vorzulegen). Während der ersten 6 Monate beseitigt der Kundendienst Mängel am Gerät unentgeltlich. -
Page 27: Entsorgung
Entsorgung Entsorgung Verpackung entsorgen Die Verpackung sortenrein entsorgen. Pappe und Karton zum Altpapier und Folien in die Wertstoffsammlung geben. Altgerät entsorgen (DE) Altgeräte dürfen nicht in den Hausmüll Das Symbol der durchgestrichenen Abfalltonne auf Rädern auf dem Produkt oder seiner Verpackung bedeutet, dass das Gerät nicht im Hausmüll entsorgt werden darf, sondern eine separate Entsorgung erfordert. -
Page 28: For Your Safety
For your safety For your safety For safe and proper use of the appliance, read the instruction manual and other documentation accompanying the product and keep in a safe place for future reference. All safety instructions in this instruction manual are marked with a warning symbol. They draw your attention to potential hazards. -
Page 29: Improper Use
For your safety 9.2 Improper use The following activities are considered improper use and are therefore prohibited: • Do not store or refrigerate medicines, blood plasma, laboratory preparations or similar substances and products based on the Medical Devices Directive 2007/47/EC in the refrigerator. •... -
Page 30: Residual Risks
For your safety 9.4 Residual risks DANGER ELECTRIC SHOCK HAZARD! • Never touch the mains plug on the mains power cable with wet or damp hands when plugging it in or unplugging it. • Install and connect the appliance only in accordance with the description in the instruction manual. -
Page 31: Setting Up And Connecting
Setting up and connecting What to do if the refrigeration circuit is damaged: • Avoid naked flames and ignition sources. • Ventilate the room in which the appliance is installed thoroughly. • Contact After Sales Service. Setting up and connecting Before setting up and connecting the appliance, ensure that •... - Page 32 Setting up and connecting Swapping door hinges SCHRITTFOLGE BILD 1. Remove the hinge cover (1). 2. Loosen the screws (2) and remove the hinge (3). 3. Put the hinge cover back in the separate plastic bag with the accessories. Put the screws and the hinge aside for later assembly.
- Page 33 Setting up and connecting 16. Fix the hinge (1) on the left with the screws (4) and screw in the foot (3). 17. Fix the foot (2) on the right with the screw (5). 18. Place the lower appliance door on the lower hinge and close it.
-
Page 34: Setting Up The Appliance
Setting up and connecting 10.2 Setting up the appliance Place the appliance in accordance with the prescribed minimum clearances. Set up the appliance in a dry, well-ventilated room whose ambient temperature corresponds to the climate class for which the appliance is designed. ATTENTION APPLIANCE DAMAGE! Leave the appliance to stand for 12 hours after transport to allow the refrigerant to... -
Page 35: Levelling
Putting into operation Ø Failure to observe the minimum distances increases power consumption. Ø If the accumulated heat cannot dissipate around the appliance, the function of the appliance will be impaired. Ø To achieve the specified energy class, comply with the above mentioned clearances. - Page 36 Putting into operation Set temperature RECOMMENDED TEMPERATURE SETTING FREEZER REFRIGERATING AMBIENT TEMPERATURE COMPARTMENT COMPARTMENT Warm ⁄ 29° C - 38° C Setting 2~ 4 Normal ⁄ 21° C - 28° C Setting 4 cold ⁄ 16° C - 20° C Setting 4~ 6 Ø...
-
Page 37: Proper Storage Of Food
Putting into operation To determine whether it is too cold (below +4°C) in the area where the symbol OK is visible: 1. Only change the temperature regulator gradually and wait for approximately 12 hours before checking again). 2. If "OK" is still visible, set one or half step warmer (wait approx. 12 hours before checking again). - Page 38 Putting into operation The following are suitable for packing: • For food: suitable plastic bags and films • Special plastic hoods with rubber draw tape • Aluminium foil • Vacuum seal fresh meat or fish. To store larger quantities in the refrigerating/freezer compartment, the glass shelves are removable.
- Page 39 Putting into operation Description of freezer compartment according to number of stars (*) TARGET COMPARTMENT STORAGE SUITABLE FOR... TYPE TEMPERATURE Storage of fresh meat and fresh fish for a 0-star period of one to a maximum of three - 6 °C ~ + 0 °C compartment days and for storing or making ice cubes.
- Page 40 Putting into operation Overview of storage recommendations REFRIGERATING COMPARTMENT FREEZER COMPARTMENT ❶ ❽ ❷ ❾ ❸ ❹ ❺ ❻ ❼ Ø The recommended temperature in the refrigerator compartment is 4 °C. Sticker OK, page 12 Ø Cold storage makes it possible to store even perishable food for 1- 3 days.
-
Page 41: Service And Maintenance
Service and maintenance Saving energy • Do not install the appliance near stoves, radiators or other heat sources. At higher ambient temperatures, the compressor runs longer and more frequently and results in a higher energy consumption. • Ensure adequate ventilation space at the base, on the sides and back of the appliance. -
Page 42: Cleaning The Appliance
Service and maintenance 12.1 Cleaning the appliance 1. Remove the goods. Store everything covered and in a cool place. 2. To clean the glass shelves, lift them slightly upwards and pull them out until they can be pivoted up or down and removed. -
Page 43: Defrosting
Service and maintenance 12.3 Defrosting Automatic defrosting in the refrigerating compartment The refrigerated area is equipped with an automatic defrosting system. Frost and ice defrosts automatically. The condensation flows through the channel into the defrosting hole and out into a condensation bowl on the rear of the appliance. The heat from the motor evaporates the condensation. -
Page 44: Decommissioning The Appliance
Operating noises / troubleshooting 12.5 Decommissioning the appliance ü To switch off the appliance, remove the mains plug or switch off and unscrew the fuse. ü Remove the food. ü Remove the mains plug or switch off and unscrew the fuse. ü... - Page 45 Operating noises / troubleshooting Ambient temperature is too low. (See chapter 2.2) Side wall is very The condenser gives off warm air No actions necessary. warm (models with to the environment. If the ambient foamed-in condenser temperature is too high, heat only).
-
Page 46: Spare Parts/After Sales Service
Spare parts/After Sales Service Spare parts/After Sales Service The following spare parts are available from After Sales Service (depending on the appliance): (1) Thermostats, temperature sensors, circuit boards and light sources (2) Door handles, door hinges, shelves and drawers Spare parts are available 7 years after the last appliance of a model has been placed on the market. -
Page 47: Warranty Terms
Warranty terms Warranty terms As the buyer of an Exquisit appliance, you are entitled to the statutory warranties arising from the purchase contract with your dealer. In addition, we grant you a warranty on the following terms: Warranty period The warranty period is 24 months from the date of purchase (proof of purchase must be presented). -
Page 48: Disposal
Disposal Disposal Disposal of packaging materials Sort packaging materials before disposal. Paper and cardboard with the waste paper and plastic film in the recycled materials bin. Disposing of old appliances (EN) Old appliances must not be disposed of with household waste The symbol of the crossed-out wheeled bin on the product or its packaging means that the appliance must not be disposed of with household waste but requires separate disposal. - Page 49 Page 49 of 52...
- Page 50 Page 50 of 52...
- Page 51 Page 51 of 52...
- Page 52 GGV HANDELSGES. MBH & CO. KG AUGUST-THYSSEN-STR. 8 41564 KAARST GERMANY KGC265-70-010D_BDA_DE-EN_E1-0-2023-09.DOCX www.exquisit.de...
Need help?
Do you have a question about the KGC265-70-010D white and is the answer not in the manual?
Questions and answers