Table of Contents
Advertisement
Quick Links
Advertisement
Table of Contents

Related Manuals for ARRI TRINITY Live


Summary of Contents for ARRI TRINITY Live
- Page 1 TRINITY Live O P E R A T I N G M AN U A L 01/2024...
-
Page 2: Disclaimer
In no event shall ARRI or its subsidiaries be liable for or have a remedy for recovery of any special, direct, indirect, incidental, or consequential damages, including, but not limited to lost profits, lost savings, lost... -
Page 3: Imprint
The information and intellectual property contained herein is confidential between ARRI and the client and remains the exclusive property of ARRI. If you find any problems in the documentation, please report them to us in writing. ARRI does not warrant that this document is flawless. -
Page 4: Table Of Contents
TRINITY Live Rig Overview..................10 5.4.2 TRINITY Live Head Overview..................11 5.4.3 TRINITY Live Head Details..................13 5.4.4 TRINITY Live Top Stage / Battery Hanger Overview........... 15 5.4.5 Pinouts.......................... 17 Safety instructions......................19 Safety Conventions and Product Labels................ 19 General Safety Instructions.................... 20 Wiring the System...................... -
Page 5: About This Document
The separate TRINITY Live user manual contains more detailed information about the features and functionalities of the device. Please visit the website www.arri.com to download the TRINITY Live user manual and much more information. - Page 6 About this document Document Revision History Document ID: D45 10007861 Version Release Date Description January 2024 Initial Release...
-
Page 7: About This Product
ATTENTION TRINITY Live is a camera stabilizer system specifically designed for broadcast use. All versions of the TRINITY Live are intended exclusively for professional use and may only be used by skilled personnel. Every user must read and understand the operating instructions and the user manual. Use the product only for the purpose described in this document. -
Page 8: Technical Data
About this product Technical Data Dimensions... - Page 9 Specification Electrical Requirements Input voltage: 10.6 V - 33.6 V DC 12/24 V max. 15 A Weight 12,5 kg / 27.5 lb TRINITY Live Head Interfaces Power Supply LEMO 1B 4 pin connector 12/24 V max. 10 A (24V optional)
-
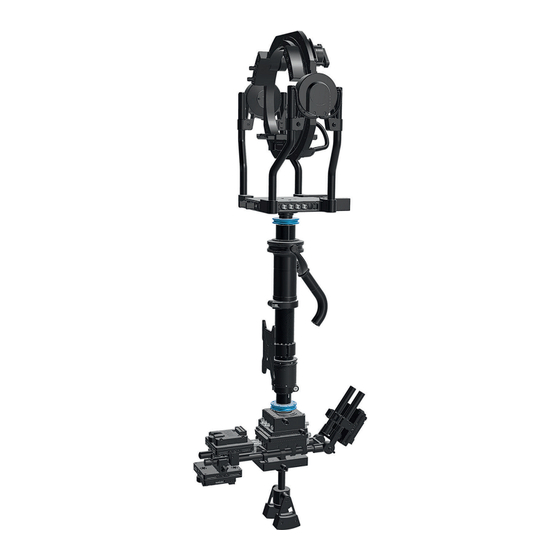
Page 10: Product Layout
About this product Product Layout 5.4.1 TRINITY Live Rig Overview... -
Page 11: Trinity Live Head Overview
About this product 5.4.2 TRINITY Live Head Overview Front / Right... - Page 12 About this product Back / Left...
-
Page 13: Trinity Live Head Details
About this product 5.4.3 TRINITY Live Head Details Left Junction Box Right Junction Box... - Page 14 About this product Front Panel Base Right Panel Base Left Panel Base...
-
Page 15: Trinity Live Top Stage / Battery Hanger Overview
About this product 5.4.4 TRINITY Live Top Stage / Battery Hanger Overview Front Side Back Side... - Page 16 Mini BNC 4 x 3G Video USB Mini For programming only Ext. Power In LEMO 1S 4pin 12V max. 10A TRINITY Live Interfaces Top Stage Interface Connector Specification Remarks 12V / 24V Camera Power LEMO 1B 4pin 12/24V max. 10A...
-
Page 17: Pinouts
Battery In LEMO 1B 2pin 12V max. 1A 12V Aux Power LEMO 0B 2pin 12V max. 3A 5.4.5 Pinouts The TRINITY Live contains the following connectors: Camera Power Out Lemo 1B 304 12V plus Ground Ground 12V plus Focus Power Out... - Page 18 About this product Ext. Power In Lemo 1S 304 12V plus Ground Ground 12V plus Ext / Control Lemo 0B 306 Can Low ARRI Can High ARRI Can Low Can High 12V plus Ground...
-
Page 19: Safety Instructions
Safety instructions Safety instructions Safety Conventions and Product Labels Structure of Safety and Warning Messages These instructions use safety instructions, warning symbols and signal words to draw your attention to different levels of risk: WARNING WARNING indicates a potentially hazardous situation which, if not avoided, may result in death or serious injury. -
Page 20: General Safety Instructions
Installation and operation may only be carried out by trained personnel who are familiar with the system. Observe accident prevention regulations. Do not place the TRINITY Live on an unstable trolley or hand truck, stand, tripod, bracket, table or any other unstable support device. - Page 21 Never operate the TRINITY Live when condensation occurs. After moving the TRINITY Live from a cool to a warm environment, wait for some time for the system to warm up.
- Page 22 ADVICE Powering TRINITY Live Head, Top and Bottom Stage at the same time This would cause more than the allowed amount of volts to flow through the TRINITY Live. Risk of damage to the accessories. Only use the Top Stage TST-2 in combination with the Battery Hanger Module BHM-2 for the internal power supply of the TRINITY Live Head.
-
Page 23: Wiring The System
Use batteries with the same chemistry only. Do not use 24V batteries. Battery Mounts The TRINITY Live can be operated with the following battery mounts: K0.0044359 BMS-1 Upgrade Set, V-Mount, incl. 3 Mounts K0.0044359 BMS-1 Upgrade Set, Gold-Mount, incl. 3 Mounts K2.0010289 TRINITY Battery Mount / V-Mount... -
Page 24: Wiring The Battery Hanger / Top Stage
Wiring the System Wiring the Battery Hanger / Top Stage 1. Connect the Battery Hanger Power Out with the Top Stage Power In first. 2. Connect the batteries with the Power In sockets before placing the batteries mounts finally. Connecting the Camera Camera Power Cables Use only the appropriate cables, like: K2.0010470... - Page 25 Use only the appropriate cables, like: K2.0044413 Ethernet Cable, Lemo 1B 10pin to 0B 7pin, TRINITY Live K2.0044414 Ethernet Adapter Cable Lemo 1B 10pin to Lemo female 7pin, TRINITY Live K2.0048526 Ethernet Adapter Cable Lemo 1B 10pin - 10 Pin Cable, TRINITY Live...
-
Page 26: Cleaning, Maintenance And Repair
Risk of injury and damage. Do only carry out maintenance work that is described in this user manual. Do not try to repair the device yourself. Repairs may only be carried out by authorized ARRI service partners. For repairs and maintenance work on the TRINITY Live System, please contact "ARRI... -
Page 27: Transportation, Storage And Disposal
Follow the specified environmental conditions. Do not store the accessories in places where they may be subject to temperature extremes, direct sunlight, high humidity, severe vibration or strong magnetic fields. If you have any questions regarding the transport or storage of ARRI products, please contact "ARRI Service". -
Page 28: Arri Service Contacts
ARRI Service Contacts Please see the current list of service partners at Service contacts Arnold & Richter Cine Technik ARRI CT Limited / London GmbH & Co. Betriebs KG 2 Highbridge, Oxford Road Herbert-Bayer-Str. 10 UB8 1LX Uxbridge 80807 Munich... - Page 29 ARRI Service Contacts ARRI Hong Kong Limited ARRI Korea Limited 41/F One Kowloon, 1 Wang Kolon Digital Tower 1(#1505-06), 25 Yuen Street Kowloon Bay Seongsuil-ro 4 gil, Seongdong-gu Hong Kong 04781 Seoul China Korea +852 2537 4266 +82 (0)70 4419 6401...
Need help?
Do you have a question about the TRINITY Live and is the answer not in the manual?
Questions and answers