Table of Contents
Advertisement
Available languages
Available languages
Advertisement
Chapters
Table of Contents

Related Manuals for La Marzocco linea mini 2023


Summary of Contents for La Marzocco linea mini 2023
- Page 1 2023...
-
Page 2: Table Of Contents
2023 Operating Manual V1.0 - 09/2023 Chapters La Marzocco S.r.l. 1. Important Safeguards page 3 Via La Torre 14/H Località La Torre 2. General Information page 5 50038 Scarperia e San Piero (Florence) - ITALY 3. Machine Description page 8 www.lamarzocco.com... -
Page 3: Important Safeguards
1. Important Safeguards WARNING SAVE THESE INSTRUCTIONS IMPORTANT SAFEGUARDS When using electrical appliance is used by 7. The use of accessory appliances, basic safety or near children. attachments not precautions should always recommended by the 5. Unplug from outlet when be followed, including the appliance manufacturer not in use and before... - Page 4 WARNING SAVE THESE INSTRUCTIONS IMPORTANT SAFEGUARDS to “off,” then remove their safety and if they equipment is prohibited; plug from wall outlet. understand dangers. the manufacturer cannot be held liable for damage 12. Do not use appliance for Children should be supervised to property, animals, and/ other than intended use.
-
Page 5: General Information
2. General Information WARNING WARNING WARNING The manufacturer declines This appliance is not intended The warranty will be void for use by persons (including any responsibility for any in case of: children) with reduced physical, event leading to liability suits •... - Page 6 Espresso coffee machine essentially made 2) Check the machine’s integrity after and safety regulations, and particularly by up of a brewing group of hot water for having carefully removed the packaging. grounding the unit. Make sure grounding espresso coffee and a steam boiler that Packaging (boxes, plastic bags, foam parts has been done properly as it represents a is able to supply steam and hot water for...
- Page 7 • wireless network 2.4 GHz; - do not allow children or untrained people not be replaced by users. In case the power • La Marzocco app available at the official to use this device supply cable becomes damaged, shut off stores Play Store and App Store.
-
Page 8: Machine Description
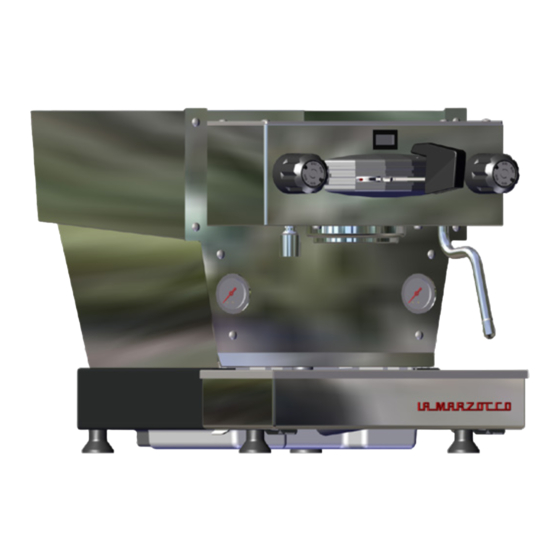
3. Machine Description Water Pump Pressure Adjustment Cup tray Group activation Paddle Group head Hot water dispensing spout Group cover Water tank indicator Pressure gauge Pressure gauge light (blue) (integrated brew group) (steam boiler) Hot water activation knob Power indicator light (red) LINEA MINI Steam activation Main power switch... -
Page 9: Installation
4. Installation Espresso machine installation, linea mini WARNING WARNING The coffee machine must be This machine is designed to be 1) Fill water reservoir with potable water. Once the espresso machine has been used with an operating cycle of placed in a horizontal position on unpackaged, placed on a hard surface. - Page 10 LA MARZOCCO WATER expansion valve in such a manner that the boilers. CALCULATOR (http://www.lamarzocco.
- Page 11 (red) is flashing. or television reception, which can be determined by turning the equipment off LINEA MINI 2023 US NOTE: As the steam boiler reaches operating and on, the user is encouraged to try to XY000000...
- Page 12 8) Adjusting water pump pressure. WARNING 2. Adjust the water pump pressure to the The water pump is factory set at 9 bar The water pump pressure should desired measurement. pressure. If it becomes necessary to be adjusted when the machine 3.
-
Page 13: Operation
For cleaning operations, brewing (see Fig.1 page 8). please follow the instructions listed Spring below very carefully. With the La Marzocco App it is possible to adjust the temperature of the coffee brewing WARNING water. This machine is designed only for Portafilter preparing coffee and hot drinks. - Page 14 NOTE: Therefore if you intend to steam small 5. Connect/disconnect the coffee machine to/ Some users believe it is important to amounts of milk it is necessary to use a from the WiFi network. allow water to pass through the integrated small pitcher.
-
Page 15: Key Features
6. Key Features 3. Coffee grind. • Being careful to avoid burns, turn on the WARNING steam wand for at least one minute. The size of the coffee granules is extremely If the above-mentioned • Turn on the hot water valve for the time important in preparing a good cup of instructions are not adhered to necessary to allow 1 liter of water to be... -
Page 16: Preventative Maintenance And Cleaning
7. Preventative Maintenance and Cleaning 2. Cleaning the brewing system. WARNING WARNING Insert the blank basket into to the Jets of water should not be used The expansion valve can portafilter and put the correct amount of to clean the machine, nor should discharge water as hot as 200°F espresso cleaning product (following the product’s... - Page 17 3. Cleaning the body. NOTE: Cleaning frequency This cleaning schedule is based Wipe the stainless steel surfaces with a upon a moderate to average use (5-20) soft, non abrasive cloth in the direction of cups per day. If machine use is less than Daily the glazing marks, if any.
-
Page 18: Installation Guide
8. Installation Guide 1. Unpack linea mini Espresso Machine page 19 page 23 7. Monitor steam boiler pressure 2. Fill with water (initial fill) page 19 page 24 8 . Brew espresso 3. Drain box alignment page 20 page 24 9. - Page 19 Unpack espresso machine and set on a level surface. Ensure all accessories are included with shipment. Check for any visable damage to espresso machine. WARNING The coffee machine must be placed in a horizontal position on a counter higher than 90 cm from the ground.
- Page 20 IMPORTANT NOTE: The drain box must be installed correctly for the machine to function properly. The drain box has two magnets that mate with two alignment grooves on the base of the linea mini. When installing the drain box, ensure that the alignment magnets are inserted into the alignment grooves.
- Page 21 WARNING The manufacturer declines any responsibility for any Turn on power by pressing the main power switch. The event leading to liability suits main power switch may be found on the right rear of the machine. whenever grounding has not been completed according to current local, national, and international regulations and electrical codes,...
- Page 22 Integrated brew group Steam boiler pressure gauge pressure gauge Next it will be necessary to check the expansion valve. As the integrated brew group heats to operating temperature the pressure in the integrated brew group will rise. There is an expansion valve behind the drain tray that allows some water to escape during this process to limit the maximum pressure in the integrated brew group to 12 bar.
- Page 23 You may also monitor the steam boiler heating progress by watching the steam boiler pressure gauge. The steam boiler is set at approximately 2.0 Bar of pressure at the factory. Once the pressure gauge reaches this point the heating will stop. Integrated brew group Steam boiler pressure gauge...
- Page 24 When the espresso machine is ready, (red indicator light ON) place ground coffee into the portafilter and activate the brewing process. Integrated brew Steam boiler group pressure gauge pressure gauge When brewing, the integrated brew group pressure should be between 8-10 bar. The steam boiler pressure should be set at 2 bar but can operate at any setting between 1.3 bar and 2 bar.
- Page 25 The temperature of the brewing water is measured at the most critical point in the Coffee group where temperature fluctuation is the greatest. This parameter is set at the factory at a preset nominal temperature. With the La Marzocco App you can adjust the pressure of the steam boiler.
-
Page 26: Indicator Light Status
Indicator light status Power indicator light (red) Water tank indicator light (blue) Status Message Status Message Red indicator light flashing 5,7 seconds off, 0,3 second Red indicator light flashing 0,5 second on, 0,5 second off: on and blue indicator light off: - Machine heating. - Page 27 hello this coffee machine is connectable.
- Page 28 2023 Mode d’emploi V1.0 - 09/2023 Chapitres La Marzocco S.r.l. 1. Clauses de Sécurité Importantes page 3 2. Informations Générales page 5 Via La Torre 14/H Località La Torre 50038 Scarperia e San Piero 3. Description de la Machine...
-
Page 29: Clauses De Sécurité Importantes
1. Clauses de Sécurité Importantes ATTENTION ENREGISTRER CES INSTRUCTIONS CLAUSES DE SÉCURITÉ IMPORTANTES Lorsque vous utilisez des de l’appareil par des enfants plus proche afin qu’il soit appareils électriques, vous devez ou près de ces derniers. examiné, réparé ou réglé. toujours observer des précautions 5. - Page 30 ATTENTION ENREGISTRER CES INSTRUCTIONS CLAUSES DE SÉCURITÉ IMPORTANTES 11. Toujours brancher l’appareil sont réduites, sauf si celles- sécurité et l’hygiène. en premier avant de le ci sont sous la surveillance 16. Toute modification de raccorder à la prise secteur. ou ont reçu les instructions l’équipement est interdite ;...
-
Page 31: Informations Générales
2. Informations Générales ATTENTION ATTENTION ATTENTION Cet appareil n'est pas prévu pour La garantie sera nulle en cas de : Le constructeur décline être utilisé par des personnes (y toute responsabilité en cas • Utilisation incorrecte, non d'événements aboutissant à des compris les enfants) avec des conforme au but de conception ;... - Page 32 Cet appareil est principalement destiné d’endommagement qui aurait pu affecter raccordement correct au réseau électrique à être utilisé pour des applications la machine à l’intérieur. aura été effectué conformément aux codes d’électroménager applications 2) Vérifier l’intégrité de la machine après et aux règlements de sécurité...
- Page 33 éteindre la machine • Application La Marzocco disponible dans d’entretien ou de nettoyage (qui ne et la débrancher du réseau électrique le play store et l’app store officiels. soient pas des opérations de lavage du en enlevant la fiche de la prise ou en groupe), régler l’interrupteur sur “0”...
-
Page 34: Description De La Machine
3. Description de la Machine Réglage de la pression de la pompe à eau Étage pour tasses Activation groupe et poignée Tête groupe Bec verseur eau chaude Couvercle groupe Led du réservoir Manomètre Manomètre d’eau (bleue) (groupe à café) (chaudière-vapeur) Poignée d’activation de l’eau chaude Led d’alimentation (rouge) -
Page 35: Installation
4. Installation Installation de la machine à café espresso, ATTENTION ATTENTION linea mini La machine à café doit être placée Cette machine est conçue pour 1) Remplir le réservoir d’eau potable. être utilisée avec un cycle de en position horizontale sur un Après avoir enlevé... - Page 36 à café rentrent dans ceux Pendant le chauffage, il se pourrait que recommandés par La Marzocco. procédé. l’aiguille du manomètre relative au groupe Une fois les tests effectués il est possible Groupe café:...
- Page 37 équipement provoque des interférences d’alimentation (rouge) clignote. nuisibles à la réception radio ou télévisée, NOTE: Lorsque la chaudière à vapeur atteint la LINEA MINI 2023 US qui peuvent être déclenchées par l’allumage température de fonctionnement, il est possible XY000000 04/23 et la mise hors tension de l’équipement,...
- Page 38 8) Réglage de la pression de la pompe à eau 2. Régler la pression de la pompe à eau ATTENTION au niveau désiré. La pompe à eau est réglée en usine à une La pression de la pompe à 3. Tourner dans le sens des aiguilles pression de 9 bar.
-
Page 39: Fonctionnement
Ressort instructions reportées ci-dessous. gauche pour commencer la distribution (voir Fig. 1 page 8). ATTENTION Avec La Marzocco App, il est possible de régler la température de l’eau de Cette machine est conçue Porte-filtre distribution du café. uniquement pour la préparation Il est recommandé... - Page 40 NOTE: NOTE: 5. Connecter/déconnecter la machine à café Certains utilisateurs pensent qu’il Il est important d’avoir un volume au réseau WiFi. est important de faire sortir de l’eau du liquide suffisant dans pichet groupe avant d’installer le porte-filtre pour d’ébouillantage. Si vous voulez réchauffer Pour la première connexion à...
-
Page 41: Caractéristiques Principales
6. Caractéristiques Principales 3. Mouture du café. • Tourner la valve de l'eau chaude pendant ATTENTION le temps qu'il faudra pour permettre de La granulométrie du café, outre la qualité Si les instructions mentionnées brasser 1 litre d'eau. du café utilisé, est extrêmement importante ci-dessus ne sont pas respectées, •... -
Page 42: Entretien Préventif Et Nettoyage
7. Entretien Préventif et Nettoyage 2. Nettoyage du circuit de distribution. ATTENTION ATTENTION Insérer le filtre aveugle dans le porte-filtre Il ne faut pas utiliser de jets La valve d'expansion peut et mettre la quantité correcte de détergent d'eau pour nettoyer la machine, décharger de l'eau chauffée à... - Page 43 5. Nettoyage des buses à eau chaude. Fréquence de nettoyage normal dans le porte-filtre, en faisant couler de l'eau chaude à travers celui-ci Les buses à eau chaude doivent être à plusieurs reprises. nettoyées périodiquement avec un chiffon Quotidiennement humide imbibé d’eau chaude et/ou de •...
-
Page 44: Guide D'installation
8. Guide d'Installation 1. Déballer la Machine Espresso page 19 page 23 7. Écran pression chaudière vapeur 2. Remplir d’eau (remplissage initial) page 19 page 24 8 . Distribution espresso 3. Alignement page 20 page 24 9. Vérifier fonctionnement pressions chaudière 4. - Page 45 Déballer la machine espresso et la place sur une surface nivelée. S'assurer que tous les accessoires sont inclus dans l'envoi. Vérifier visuellement si la machine espresso est endommagée. ATTENTION La machine à café doit être placée en position horizontale sur un comptoir dont la hauteur depuis le sol soit supérieure à...
- Page 46 REMARQUE IMPORTANTE : La cuvette de vidange doit être correctement installée pour que la machine puisse bien fonctionner. La cuvette de drainage est dotée de deux aimants qui correspondent aux deux rainures d'alignement à la base de la linea mini. Lors de l'installation de la cuvette de décharge, s'assurer que les aimants d'alignement soient insérées dans les rainures d'alignement.
- Page 47 ATTENTION Le constructeur décline toute responsabilité en cas d'événements Activer l'alimentation électrique appuyant aboutissant à des poursuites en l'interrupteur principal. L'interrupteur principal peut être responsabilité civile si la mise localisé à l'arrière droit de la machine. à la terre n'a pas été effectuée conformément aux réglementations ou aux codes de l'électricité...
- Page 48 Manomètre Manomètre groupe café chaudière vapeur Il sera ensuite nécessaire de vérifier la valve d'expansion. Le groupe café chauffant et atteignant la température de service, la pression augmentera dans le groupe café. Une soupape d'expansion est placée derrière le plateau de drainage qui permet à...
- Page 49 Il est également possible de contrôler le processus de chauffage de la chaudière en regardant le Manomètre de la Chaudière Vapeur. La chaudière vapeur est réglée en usine à une pression d’environ 2,0. Dès que le manomètre atteint ce point, la chauffe s’arrêtera. Manomètre Manomètre groupe café...
- Page 50 Quand la machine espresso est prête, (led ON rouge) mettre le café moulu dans le porte-filtre et activer la distribution. Manomètre Manomètre groupe café chaudière vapeur Pendant la distribution, la pression du groupe café devrait être située entre 8-10 bar. La pression de la chaudière vapeur devrait être réglée sur 2 bar mais peut fonctionner à...
- Page 51 Ce paramètre est réglé en usine à la température nominale préréglée. Avec La Marzocco App, il est possible de régler la pression de la chaudière vapeur.
-
Page 52: État Des Voyants Lumineux
État des voyants lumineux Led d’alimentation (rouge) Led du réservoir d’eau (bleue) Status Message Status Message Voyant rouge qui clignote 0,5 seconde allumé, 0,5 Voyant rouge qui clignote 5,7 secondes éteint, 0,3 seconde éteint: seconde allumé et voyant bleu éteint: - Machine en chauffe. - Page 53 bonjour, Cette machine à café peut être connectée.
Need help?
Do you have a question about the linea mini 2023 and is the answer not in the manual?
Questions and answers