La Marzocco Linea Mini Manual
Hide thumbs
Also See for Linea Mini:
- Operating manual (140 pages) ,
- Detailed app manual (24 pages) ,
- Manual (8 pages)
Advertisement
manual
linea mini
La Marzocco's linea mini is a handmade, professional-grade
espresso machine for the home, reflecting the classic, iconic design
in a miniature version. The linea mini, with its stainless steel group
for coffee, and a boiler for steam and hot water, is prepared to brew
quality shots with freshly ground coffee, coffee capsules or pods as
well as tea or other hot beverages.
Advertisement
Table of Contents

Related Manuals for La Marzocco Linea Mini


Summary of Contents for La Marzocco Linea Mini
- Page 1 La Marzocco’s linea mini is a handmade, professional-grade espresso machine for the home, reflecting the classic, iconic design in a miniature version. The linea mini, with its stainless steel group for coffee, and a boiler for steam and hot water, is prepared to brew quality shots with freshly ground coffee, coffee capsules or pods as well as tea or other hot beverages.
-
Page 2: Table Of Contents
Operating Manual V1.2 - 11/2015 Chapters La Marzocco S.r.l. 1. Important Safeguards page 3 Via La Torre 14/H Località La Torre 2. General Information page 5 50038 Scarperia e San Piero (Florence) - ITALY 3. Machine Description page 8 www.lamarzocco.com... -
Page 3: Important Safeguards
1. Important Safeguards WARNING SAVE THESE INSTRUCTIONS IMPORTANT SAFEGUARDS When using electrical appliance is used by 7. The use of accessory appliances, basic safety or near children. attachments not precautions should always recommended by the 5. Unplug from outlet when be followed, including the appliance manufacturer not in use and before... - Page 4 WARNING SAVE THESE INSTRUCTIONS IMPORTANT SAFEGUARDS to “off,” then remove experience and knowledge, 15. The service area is plug from wall outlet. as long as they have been restricted to persons given supervision by a having knowledge and 12. Do not use appliance for person responsible for practical experience of the other than intended use.
-
Page 5: General Information
2. General Information WARNING WARNING WARNING This appliance is not intended The manufacturer declines The warranty will be void for use by persons (including any responsibility for any in case of: event leading to liability suits children) with reduced physical, •... - Page 6 About this manual This equipment must be installed to 6) We do not recommend using adapters, comply with applicable federal, state or multiple plugs and/or extension cords. This operating guide is an integral and local plumbing codes. If you cannot avoid using them, make essential part of the product and must be sure that they are exclusively of the kind supplied to users.
- Page 7 - do not allow children or untrained people 12) Do not obstruct air intake and exhaust 14) These instructions are also available in to use this device grilles and, in particular, do not cover the an alternative format on a website cup warmer tray with cloths or other items.
-
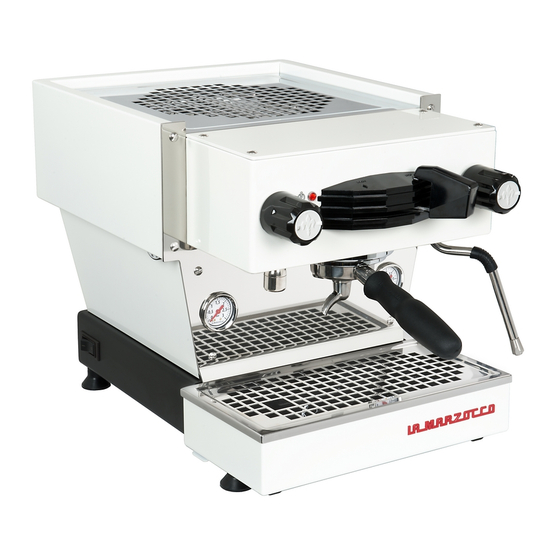
Page 8: Machine Description
3. Machine Description Cup tray Group activation Paddle Group head Hot water dispensing spout Power indicator light (red) Pressure gauge Pressure gauge Main power switch (steam boiler) (integrated brew group) Hot water activation knob Group cover Water tank indicator light (blue) Steam activation knob Steam wand... -
Page 9: Installation
70dBA. regarding potable water. The expansion valve can discharge In order to enable Espresso machine installation, linea mini water as hot as 200°F / 93°C. you to check if 1) Fill water reservoir with potable water. Adequate protection for handling... - Page 10 When by filling out the online water calculator anytime that the heating element is in the the linea mini is turned on the electronics on our website: LA MARZOCCO WATER “on” condition. If the pressure exceeds 12...
- Page 11 6) Machine plate: 7) Adjusting the expansion valve. The pressure in the integrated brew group should never exceed 12 bar. The valve is Machine CE plate The expansion valve is a component hot, so, using adequate protection, rotate that limits the maximum pressure in the expansion valve clockwise to increase the Integrated brew group.
- Page 12 8) Adjusting water pump pressure. 3. Adjust the water pump pressure to the NOTE: The water pump pressure should be desired measurement. The water pump is factory set at 9 bar adjusted when the machine is operating 4. Rotate clockwise to increase pressure pressure.
-
Page 13: Operation
Press down on the ground coffee with the supplied tamper and install WARNING Spring the portafilter on the linea mini. Move the The machine must not be dipped paddle handle from right to left to begin in, nor splashed with, water in brewing (see Fig.1 page 8). - Page 14 3. Dispensing steam. NOTE: 4. Dispensing hot water. It is important to have a sufficient In order to allow for any condensed water volume of liquid in the steaming pitcher. You may dispense hot water by using the in the wand to be released ALWAYS allow Therefore if you intend to steam small hot water nozzle.
-
Page 15: Key Features
6. Key Features coffee, along with the type of coffee blend N.B. WARNING used. The ideal grind can be determined by If the machine has not been used for more If the above-mentioned making various coffees using the amount than 8 hours or, in any case, after long instructions are not adhered to of ground coffee that you would normally periods of being idle, in order to use the... -
Page 16: Preventative Maintenance And Cleaning
7. Preventative Maintenance and Cleaning 2. Cleaning the brewing system. WARNING WARNING Insert the blind filter into to the portafilter The expansion valve can Jets of water should not be used and put the correct amount of espresso to clean the machine, nor should discharge water as hot as 200°F cleaning product (following the product’s instructions) into the filter, engage the... - Page 17 3. Cleaning the body. NOTE: Cleaning frequency This cleaning schedule is based Wipe the stainless steel surfaces with a upon a moderate to average use (5-20) soft, non abrasive cloth in the direction of cups per day. If machine use is less than Daily • Portafilter the glazing marks, if any.
-
Page 18: Installation Guide
8. Installation Guide 1. Unpack linea mini Espresso Machine page 19 page 23 7. Adjust the expansion valve 2. Fill with water (initial fill) page 19 page 24 8. Monitor steam boiler pressure 3. Drain box alignment page 20 page 25 9 . - Page 19 Drain box box. Make sure the drain box is inserted fully. The water reservoir must make contact with the level indicators on the rear side. NOTE: The linea mini is configured to work with the water reservoir. Water reservoir Fill cover...
- Page 20 The drain box must be installed correctly for the machine to function properly. The drain box has two magnets that mate with two alignment grooves on the base of the linea mini. When installing the drain box, ensure that the alignment magnets are inserted into the alignment grooves.
- Page 21 WARNING The manufacturer declines any responsibility for any Turn on power by pressing the main power switch. The main event leading to liability suits power switch may be found on the left rear of the machine. whenever grounding has not been completed according to current local, national, and international regulations and electrical codes,...
- Page 22 Steam boiler Integrated brew group pressure gauge pressure gauge Next it will be necessary to check the expansion valve. As the integrated brew group heats to operating temperature the pressure in the integrated brew group will rise. There is an expansion valve behind the drain tray that allows some water to escape during this process to limit the maximum pressure in the integrated brew group to 12 bar.
- Page 23 Increase pressure Decrease pressure Please follow this procedure if it is necessary to adjust the expansion valve. First WARNING remove the drain box to access the expansion valve. The expansion valve protrudes The expansion valve can through the sheet metal, has the shape of a hexagon, is brass in color and 18 discharge water as hot as 200°F mm (tool).
- Page 24 You may also monitor the steam boiler heating progress by watching the steam boiler pressure gauge. The steam boiler is set at approximately 2.0 Bar of pressure at the factory. Once the pressure gauge reaches this point the heating will stop. Steam boiler Integrated brew group pressure gauge...
- Page 25 When the espresso machine is ready, (red indicator light ON) place ground coffee into the portafilter and activate the brewing process. Integrated brew Steam boiler group pressure gauge pressure gauge When brewing, the integrated brew group pressure should be between 8-10 bar. The steam boiler pressure should be set at 2 bar but can operate at any setting between 1.3 bar and 2 bar.
- Page 26 The temperature of the brewing water is measured at the most critical point in the integrated brew group where temperature fluctuation is the greatest. This parameter is set at the factory at a preset nominal temperature. The temperature of the water exiting the integrated brew group is held constant by means of the mass of the group casting.
-
Page 27: Troubleshooting
Troubleshooting Description Solution ▪ Check that the main switch is in position I ▪ Contact the service department The machine does not turn on ▪ Check the connection of the machine to the mains ▪ Check the water level in the reservoir, blue light on ▪...
Need help?
Do you have a question about the Linea Mini and is the answer not in the manual?
Questions and answers