Advertisement
Quick Links
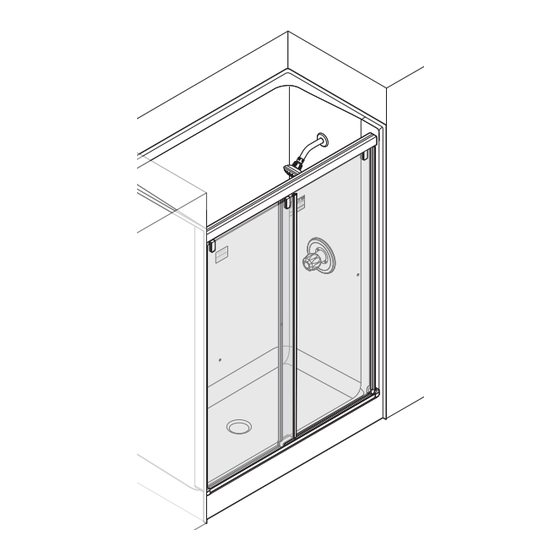
Frameless
Sliding
Mod Style Shower
and Bathtub Doors
For Delta 1/4 inch (6mm) Glass with Glazing
Puertas de bañera y ducha
de estilo modernista
Para vidrio Delta 1/4 pulg. (6 mm)
Vidrio con canal de protección
INSTALLATION GUIDE / GUÍA DE INSTALACIÓN
CAUTION: To reduce the risk of breakage, keep corner protectors on glass while installing.
PRECAUCIÓN: Durante la instalación, coloque vidrio o protectores de esquinas para reducir el riesgo de romperse.
Consult your local plumbing codes prior to installation.
Consulte los códigos de fontanería locales antes de la instalación.
Recommended Clearance Heights for Installation:
For Shower: 74 Inches (188 cm)
For Tub: 61.75 Inches (157 cm
Recommended Installation Wall Heights for Installation:
For Shower: 71.25 Inches (181 cm)
For Tub: 59 Inches (150 cm)
IMPORTANT: To complete an entire door installation, you
will need the following:
1. One carton containing (2) Glass Panels
2. One carton containing (1) Track Assembly Kit
3. One carton containing Door Handle(s)
• DO NOT CONTACT STORE FOR REPLACEMENT PARTS!
• PLEASE CONTACT 1-800-964-4850 FOR ASSISTANCE
• DO NOT DISCARD CARTONS!
• SEE PAGES 5-6 TO IDENTIFY CARTON PARTS LOCATION
• ¡NO SE COMUNIQUE CON LA TIENDA PARA SOLICITAR
PIEZAS DE REPUESTO!
• POR ASISTENCIA COMUNÍQUESE CON EL NÚMERO
1-800-964-4850
• ¡NO DESECHE LAS CAJAS!
• EN LAS PÁGINAS 5 A 6 PODRÁ IDENTIFICAR LA
UBICACIÓN DE LAS PARTES DE LAS CAJAS
Altura libre recomendada para la instalación:
Para la ducha: 74 pulgadas (188 cm)
Para la bañera: 61,75 pulgadas (157 cm)
Altura recomendada de la pared de instalación para la
instalación:
Para la ducha: 71,25 pulgadas (181 cm)
Para la bañera: 59 pulgadas (150 cm)
IMPORTANTE: para completar toda la instalación
de la puerta, necesitará lo siguiente:
1. Una caja con (2) paneles de vidrio
2. Una caja con (1) Kit de montaje de rieles
3. Una caja con manijas para la puerta
1
STOP
PARE
AUGUST 2019
Advertisement

Related Manuals for Delta Frameless Sliding Mod Style


Summary of Contents for Delta Frameless Sliding Mod Style
- Page 1 • DO NOT DISCARD CARTONS! and Bathtub Doors • SEE PAGES 5-6 TO IDENTIFY CARTON PARTS LOCATION For Delta 1/4 inch (6mm) Glass with Glazing • ¡NO SE COMUNIQUE CON LA TIENDA PARA SOLICITAR PIEZAS DE REPUESTO! Puertas de bañera y ducha •...
- Page 2 Cinta adhesiva de protección Sellador de silicona 100 % - Transparente Tijeras para chapa fina IMPORTANT: To install your Delta shower door unit, IMPORTANTE: Para instalar la unidad de puerta de ducha you must: (1) completely read all instructions, warnings, Delta, debe: (1) leer completamente todas las instrucciones, cautions, and care and maintenance information;...
-
Page 3: Before You Start
If you see any wear or damage to your glass panels call Delta Customer Care to receive a replacement panel at 1-800-964-4850. CAUTION... -
Page 4: Antes De Comenzar
Delta para recibir un panel de reemplazo a 1-800-964-4850. PRECAUCIÓN La instalación de los paneles de vidrio con mellas, astillas o rayones puede provocar lesiones, daños a la propiedad... - Page 5 GLASS CARTON PARTS IDENTIFICATION / IDENTIFICACIÓN DE LAS PARTES DE LA CAJA DEL VIDRIO Discard hardware and instructions that are included in the glass panel carton. Hardware and instructions for Mod Shower and Tub Door installation are located in track assembly carton. STOP Deseche los accesorios y las instrucciones incluidas en la caja del panel de vidrio.
- Page 6 TRACK ASSEMBLY CARTON PARTS IDENTIFICATION / IDENTIFICACIÓN DE LAS PARTES DE LA CAJA DEL MONTAJE DE LOS RIELES Y LA MANIJA TRACK ASSEMBLY CARTON CAJA DEL MONTAJE DE LOS RIELES BB CC DD EE FF GG HH MM NN OO PP QQ RR SS Part Description Qty.
- Page 7 DOOR ASSEMBLY / MONTAJE DE LA PUERTA CAUTION: To reduce the risk of breakage, which may result in personal injury, property damage or product failure, DO NOT set glass panels on a hard surface or on their edge. PRECAUCIÓN: Para reducir el riesgo de rotura, que puede provocar lesiones, daños a la propiedad o fallas del producto, NO coloque los paneles sobre una superficie dura ni sobre su borde.
- Page 8 HARDWARE / ERRAJE M4 x 22mm M5 x 12 Truss Head Screw Pan Head Screw (Included in Damper Box) Tornillo de cabeza #6 x 3/8" Tornillo de cabeza alomada BT Tapping Screw segmentada and O-Ring (incluido en la caja Junta tórica y tornillo del amortiguador) autorroscante BT #8-18 x 1.5"...
- Page 9 CAUTION: This MOD Shower Door may be unlike other door installations. To avoid personal injury or property damage, identify components and read all instructions before installing. PRECAUCIÓN: Esta puerta de ducha de estilo modernista puede ser diferente de otras instalaciones de puertas. Para evitar lesiones o daños a la propiedad, identifique los componentes y lea todas las instrucciones antes de la instalación.
- Page 10 (sill) depth is 3" (7.6 cm). If threshold (sill) depth is not that deep, call DELTA Customer Service at 1-800-964-4850. Place corner bumper (L) into the location against sill and side wall as shown. The decorative line on the side of the bumper should be horizontal as indicated in picture 3.
- Page 11 Place collar template (QQ) against wall 7/8" (22mm) from front edge and position on top of bumper (L). Coloque la plantilla del collarín (QQ) contra la pared 7/8" (22 mm) desde el borde frontal y colóquela sobre la parte superior del tope (L). Top View/ Top View/ Vista superior...
- Page 12 FOR A SHOWER ENCLOSURE Mark top two holes in collar template (QQ) and then remove template. FOR A TUB ENCLOSURE Mark middle two holes in collar template (QQ) and then remove template. NOTE: Holes MUST be marked at collar template height. If side walls are too short, this product cannot be installed into your shower environment.
- Page 13 FOR SHOWER ENCLOSURE, ENSURE HOLES ARE LOCATED 69-7/8" (177.5CM) AND 68-3/4 (174.6CM) UP FROM TOP OF CORNER BUMPER. FOR TUB ENCLOSURE, ENSURE HOLES ARE LOCATED 57-11/16" (146.5CM) AND 56-1/2 (143.6CM) UP FROM TOP OF CORNER BUMPER. Drill a 1/8" pilot hole at each location. Next, redrill a 5/16"...
- Page 14 Install collar (F) and secure into anchors with two screws (BB). Angled corners of collar should face up as shown. Hand tighten until fully secure. Repeat for other side of enclosure. Instale el collarín (F) y asegúrelo en los anclajes con dos tornillos (BB).
- Page 15 Top track / Using a pencil or other marking tool (such as masking Rail supérieur tape), mark distance "A" along top track (A). Double- check measurement before cutting. IMPORTANT: Incorrect measurement may prevent proper door installation. " " Double-check measurement. "...
- Page 16 you drill into studs. PRECAUCIÓN Para evitar el riesgo de lesiones o daños al producto, asegúrese de perforar en los montantes. Lower the top track (A) down onto the installed collars to check fit. Remove top track to install dampers. Any gaps must be less than 1/8"...
- Page 17 Using a pen or other marking tool, mark holes on top track (A) in the alignment grooves. Remove damper template (RR). Repeat for other end of top track (A). Con un lapicero u otro marcador, marque los orificios en el carril superior (A) en las ranuras de alineación. Retire la plantilla del amortiguador (RR).
- Page 18 Slide a damper (B) into one end of top track (A), aligning holes in damper spacers with holes drilled in previous step. NOTE: Make sure damper orientation is correct. Catch Mechanism should be towards the outer ends of the Top Track. Deslice un amortiguador (B) hacia un extremo del carril superior (A), alineando los orificios en los espaciadores del amortiguador con los orificios perforados en el paso...
- Page 19 Set dampers (B) by sliding clips towards center of top track until damper catches lock into place. Repeat for all four dampers. Once the installation is complete, the damper catch should reset automatically during use. Ajuste los amortiguadores (B) deslizando los sujetadores hacia el centro del carril superior (A) hasta que el amortiguador se enganche firmemente en la posición correcta.
- Page 20 If you see any wear or damage to your glass panels, call Delta Customer Care to receive a replacement panel at 1-800-964-4850. The glass carton may contain instruction sheets and other hardware.
- Page 21 Using a measuring tape, measure the width of one of the glass panels (J). (Both panels are identical.) Subtract 1-3/8" (3.5 cm) from this measurement. This will be Measurement “B”. Width of glass panel - 1 3/8" = ________ measurement “B” Con una cinta métrica, mida el ancho de uno de los paneles de vidrio (J).
- Page 22 Double-check measurement and subtraction before cutting. Using a miter box for alignment, cut glazing channel (N) with fine-tooth hack saw. If needed use a metal file to smooth rough edges. Clean glazing channel of shavings. IMPORTANT: DO NOT stand on or use a vice to hold glazing channel while cutting.
- Page 23 After testing the fitment, apply a small bead of 100% clear silicone into base of glazing end caps (O). Glazing channels (N) should not need this additional adhesive. Después de probar que calzan correctamente, aplique una pequeña capa de silicona transparente 100 % en la base de los esquineros de protección (O).
- Page 24 Remove screw (MM) and cover (NN) from roller assembly (E). Retire el tornillo (MM) y la cubierta (NN) del conjunto de rodillos (E). CAUTION: Keep corner protectors on glass during installation to reduce the risk of glass breakage which may result in personal injury, property damage, or product failure.
- Page 25 CAUTION Inside door / Place bushing (II) into hole at top of glass panel (J). Align To avoid risk of injury or product damage, make sure that Puerta interior roller gasket (HH) hole with bushing. you drill into studs. If roller gasket (HH) overlaps a warning label, move warning label toward center of glass.
- Page 26 CAUTION CAUTION Risk of injury or product damage. During installation, tempered glass should not come in contact with metal parts or Wear safety glasses and gloves when drilling or cutting hard surfaces (tile/concrete flooring) or it may shatter. Gaskets to avoid risk of injury. or bushings must always be used between glass and metal.
- Page 27 Outside door / Install roller by aligning slot on roller clamp (GG) with tab Puerta exterior on roller base (JJ). Wheels on roller should be on OPPOSITE side as glass label. Secure with screws (KK) and screw (LL) through bushing by manually tightening.
- Page 28 Install roller cover (NN) and secure with screw (MM). Repeat for remaining door hangers. NOTE: shower enclosure and top track have been removed in image for clarity. Instale la cubierta de rodillo (NN) y asegure con el tornillo (MM). Repita el procedimiento para los suspensores de la puerta restantes.
- Page 29 y esquinas afiladas. CAUTION To reduce the risk of breakage, which may result in personal injury, property damage, or product failure, DO NOT set panels on a hard surface. CAUTION PRECAUCIÓN To reduce the risk of breakage, which may result in Para reducir el riesgo de rotura, que puede provocar personal injury, property damage, or product failure, DO lesiones, daños a la propiedad o fallas del producto, NO...
- Page 30 Measure distance "C" between the bumpers (L) at bottom of enclosure. C = distance between the bumpers. Mida la distancia "C" entre los topes (L) en la parte inferior del recinto. C = distancia entre los topes. Bottom track / Using a pencil or other marking tool (such as masking Riel inferior tape), mark distance "C"...
- Page 31 Double-check measurement before cutting. Using a miter box, cut the bottom track (K) with fine-toothed hack CAUTION saw. If needed, use a metal file to smooth rough edges. Clean metal shavings from bottom track with a vacuum To avoid risk of injury or product damage, make sure that or cloth.
- Page 32 Remove bottom track (K) from enclosure. Retire el carril inferior (K) del recinto. CAUTION INSTALLING THE CENTER GUIDE On the vertical leg of the bottom track (K), locate the To avoid risk of injury or product damage, make sure that center.
- Page 33 On underside of bottom track (K), apply a thick bead of sealant between neighboring pair of supports as shown in picture 49. En el lado de abajo del carril inferior (K), aplique un cordón denso de sellador entre el par de soportes adyacentes como se muestra en la imagen 49.
- Page 34 Place bottom track (K) in and down on top of sill such that bottom track is aligned under glass panels. Remove any excess sealant from track area. IMPORTANT: Using the corner of a folded paper towel or cloth, clear away any excess sealant from beneath the inner overhang of the bottom track (M) as shown.
- Page 35 Test-fit corner bumper (L) with both glass panels. Mark bumper location using a pencil or masking tape. Bumpers should have similar locations compared to front of sill. Slide glass panels to center of enclosure and remove corner bumper (L). Compruebe el ajuste del tope de esquina (L) con ambos paneles de vidrio.
- Page 36 For optimal water retention, the inner door panel should be closest to the shower head during use. Para obtener la retención de agua óptima, el panel de puerta interior debe ser el más cercano al cabezal de ducha durante el uso. Identify the two angle blade seals (G).
- Page 37 On the outer glass panel, install remaining angle blade seal (G) on edge of glass furthest from shower head. Align seal with TOP glass panel such that the seal will not interfere with bottom bumper. Angled blade of seal should orient INTO the shower as shown.
- Page 38 Identify blade seal (I). This component will have a straight blade. Install blade seal (I) to the inside of inner door glass panel (J). Blade portion should face outward towards outer door. Align seal with TOP of glass panel. NOTE: See illustration bubble for proper orientation of seals.
- Page 39 Delta pivoting door knobs are not designed for use with Delta sliding tub and shower doors. IMPORTANTE Las manijas de la puerta pivotada de Delta no están diseñadas para usarse con puertas corredizas de ducha y bañera de Delta. Insert a rubber gasket into both handle post and handle escutcheon.
- Page 40 Option 1 Option 2 Opción 1 Opción 2 Option 1: For handles that insert INSIDE the post ends, Carefully rotate handle to align un-installed post with apply a thin bead of silicone sealant onto the OUTSIDE bottom pre-drilled hole. Insert a rubber gasket into both handle 1/4"...
- Page 41 Installation is complete. Concluyó la instalación.
- Page 42 Add sealant as needed to ensure watertight seal. See steps 49 and 59. If additional sealant is insufficient, please return to local Home Depot store for assistance or call Delta Customer Service at 1-800-964-4850. 3. The glass panels do not track into the bottom bumpers.
- Page 43 El carril superior debe cortarse correctamente. Consulte los pasos 12 a 14. Si el carril superior se cortó de manera incorrecta, vaya a la tienda Home Depot local para que le ayuden o llame a Atención al cliente de Delta por el 1-800-964-4850.
Need help?
Do you have a question about the Frameless Sliding Mod Style and is the answer not in the manual?
Questions and answers