
Related Manuals for SPORTNOW A71-036V00


Summary of Contents for SPORTNOW A71-036V00
- Page 1 IN230800064V01_FR A71-036V00 IMPORTANT - CONSERVEZ CES INFORMATIONS POUR VOTRE CONSULTATION ULTÉRIEURE: LISEZ ATTENTIVEMENT INSTRUCTIONS D'ASSEMBLAGE...
- Page 5 Consignes de sécurité concernant le filet de protection Évitez de rebondir contre le filet du trampoline. Assurez-vous qu'aucun feu n'est allumé à proximité de l'enceinte. En cas de vent, les étincelles et les braises pourraient se propager loin et endommager le filet. Les trampolines équipés d'un filet peuvent être ...
-
Page 6: Instructions D'assemblage
LISTE DE CONTRÔLE POUR L'INSPECTION PAR L'UTILISATEUR : Les composants du trampoline peuvent se détériorer s'ils sont exposés au soleil, à la pluie, au sel et à la chaleur. Avant chaque utilisation, inspectez le trampoline et remplacez les pièces usées, endommagées ou manquantes par des pièces recommandées par le fabricant. - Page 10 -10-...
- Page 11 -11-...
- Page 12 -12-...
- Page 13 -13-...
- Page 14 -14-...
- Page 15 (2-7). -15-...
- Page 16 -16-...
- Page 17 (2-2) (2-1) -17-...
- Page 18 -18-...
- Page 19 -19-...
- Page 20 2-10 2-11 2-12 Type A Type B -20-...
-
Page 21: Assembly Instruction
IN230800064V01_EN A71-036V00 6 (183cm) Trampoline 244cm) Trampoline 3 Legs 10 (305cm) Trampoline 4 Legs 12 (366cm) Trampoline 5 Legs 13 (396cm) Trampoline 6 Legs 14 (427cm) Trampoline 15 (457cm) Trampoline 16 (488 m) Trampoline IMPORTANT, RETAIN FOR FUTURE REFERENCE: READ CAREFULLY... - Page 22 IMPORTANT MESSAGE WARNING - PLEASE READ ADULT ASSEMBLY REQUIRED CHOKING HAZARD Small Parts. NOT for children under 3 years of age. WARNING: While every attempt is made to ensure the highest degree of protection in all equipment, we cannot guarantee freedom from injury. The user assumes all risks of injury due to use.
- Page 23 Please read these warnings and the information in this manual in its entirety. Failure to comply with the following instructions may increase the risk of serious injury and/or death: ● Ensure the trampoline has been assembled correctly, per the instructions in the manual. ●...
-
Page 24: Care And Use
● Mount and dismount from the trampoline and enclosure with care as injury may result. Children should be assisted when entering and exiting the trampoline to reduce the risk of falling. ● The frame of your trampoline set is made of steel and it will conduct electricity. - Page 25 -25-...
- Page 26 -26-...
- Page 27 -27-...
- Page 28 -28-...
- Page 29 G. Attach the W-shape leg base (5) onto the leg extension tubes, as shown in Fig. 4. Ensure they are securely in place, then attach the remaining tubes (5). -29-...
- Page 30 -30-...
- Page 31 -31-...
- Page 32 -32-...
- Page 33 The key to safe bouncing on a trampoline is maintaining control and avoiding reckless behaviour. Here are the guidelines: - Bounce on the centre of the mat in a controlled manner. - Bouncing should be low; high, reckless bouncing is not allowed. To gain control or stop bouncing, keep your feet in contact with the mat, then absorb the trampoline's rebound by bending your knees and waist.
- Page 34 -34-...
- Page 35 STEP 1: Insert the pole tube into the loop of the round bolt (2-7). -35-...
- Page 36 STEP 2: Align the holes and secure the poles with the long bolt (2-5), plastic spacer (2-3) and dome nut (2-6). -36-...
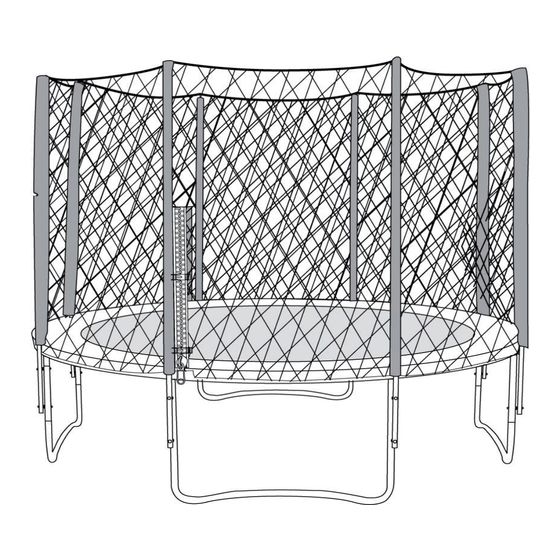
- Page 37 STEP 3: Place parts (2-2) onto parts (2-1). STEP 4: Carefully and evenly pull down the safety net (2-8), then attach the safety net to the backside of the trampoline. Using the elastic fastening ties, secure it to the inner straps of the jumping pad.
- Page 38 -38-...
- Page 39 -39-...
- Page 40 6. Trampoline adder ssembly Warning: Remove the ladder while trampoline is in use. adder art Ref No. Picture Description Quantity / pc(s) 2-10 Frame poles 2-11 Plastic step board 2-12 Screw set Type A Type B -40-...
- Page 41 -41-...
Need help?
Do you have a question about the A71-036V00 and is the answer not in the manual?
Questions and answers