Advertisement
Quick Links
JetNet3008G V2
Quick Installation Guide v1.1
Copyright
Copyright © 2014 all rights reserved. No part of this publication may be reproduced, adapted,
stored in a retrieval system, translated into any language, or transmitted in any form or by any
means without the written permission of the supplier.
About the Quick Installation Guide
is Quick Installation Guide is intended to guide professional installer to install and con gure
the JetNet 3008G v2. It covers procedures to assist you in avoiding unforeseen problems.
Introduction
JetNet 3008G is an 8-port full Gigabit Industrial Ethernet Switch, conforming IEEE 802.3u
and 802.3ab standard, supports 8 10/100/1000 Based TX.
metal case design to operate in harsh environment (-40~70°C ). It features one relay output to
alarm users if a port link fails or with the power fails. Alarm can be enable/disabled by a dip
switch. JetNet 3008G v2 is recommended to be powered by DC 24V with 9-60V ranged.
Package Check List
JetNet 3008G V2 Ethernet switch
Quick Installation Guide
Installation
Mount the unit
Din-Rail mount: Mount the din-rail clip on the rear of JetNet 3008G V2 on the DIN rail. For
information about the DIN Rail installation, please refer to user's manual.
Grounding JetNet 3008G v2
ere is one grounding screw on the bottom side of JetNet 3008G V2. Connect the earth
ground screw of JetNet 3008G V2 to the grounding surface to ensure safety and prevent noise.
Wiring the Power Inputs
1. Insert the positive and negative wires into the V+ and Vcontact on the terminal block
connector.
2. Tighten the wire-clamp screws to prevent the power wires loosened.
Note:
e recommended working voltage is DC 24V. (Input range: DC9~ 60 V)
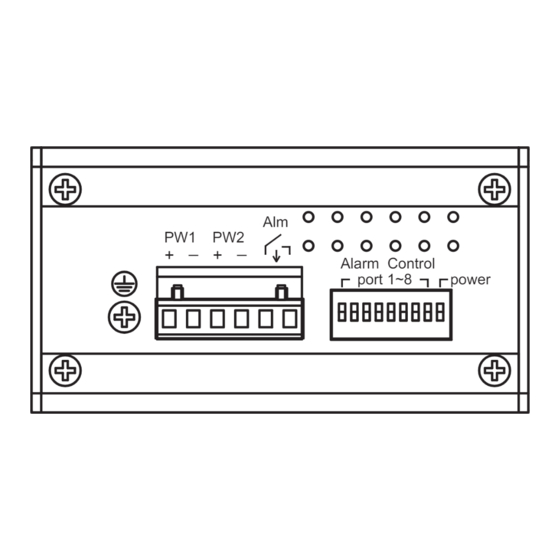
Wiring the Relay Output
e relay output contacts are at the right side of the terminal block connector as shown below.
By inserting the wires and settings the DIP switch of the respective alarm function to "ON",
e JetNet 3008G adopts rugged
relay output alarm will detect port or power fault, and avoid form a short circuit.
relay output is "Normal Open". For more information, please refer Manual chapter for more
detail.
Note:
e relay contact only support 0.5A current, DC 24V. It does not recommend apply
higher voltage and current that over this speci cation.
Connecting to Network
Connecting the Ethernet Port: Connect one end of an Ethernet cable into the UTP port of
JetNet 3008G v2, while the other end is connected to the attached networking device. UTP
port support auto MDI/MDIX function.
blinking for packet transmit and receive.
o for 10/100Mbps link.
Alm
PW1
PW2
_
_
+
+
Alarm Control
port 1~8
power
e alarm
AC/DC Power Supply
DC9-60V, UL Listed
DC Power Output
DC 9-60V, UL Listed
_
V
AC Power Input
12-24AWG
V +
Alm
PW1
PW2
_
_
+
+
AlarmControl
AC/DC Power Supply
port 1~8
power
DC9-60V, UL Listed
_
V
12-24AWG
AC Power Input
V +
DC Power Output
DC 9-60V, UL Listed
e LNK/ACT LED will turn on for link up and
e Speed LED will turn on for Gigabit link and turn
Alarm System
Maximum 0.5A/24V
Extra Power
Alm
System
PW1
PW2
_
_
+
+
AlarmControl
port 1~8
power
DIP Switch Setting
Pin No. #
Status
Descrip�on
ON
To enable port link down alarm at this port.
P1 to P8
(Pin1 ~ 8)
Off
To disable port link down alarm at this port.
ON
To enable power failure alarm.
P9
Off
To disable power failure alarm.
Note: After adjusting the DIP-switch, please reboot the unit to activate the new settings.
Support
5 Years Warranty
Each of Beijer Electronics 's product is designed, produced, and tested with high industrial
standard. Beijer Electronics warrants that the product(s) shall be free from defects in materials
and workmanship for a period of ve (5) years from the date of delivery provided that the
product was properly installed and used.
is warranty is voided if defects, malfunctions or failures of the warranted product are caused
by damage resulting from force measure (such as oods, re, etc.), other external forces such
as power disturbances, over spec power input, or incorrect cabling; or the warranted product is
misused, abused, or operated, altered and repaired in an unauthorized or improper way.
Attention! To avoid system damage caused by sparks, please DO NOT plug in power
connector when power is on.
The product is in compliance with Directive 2002/95/EC and 2011/65/EU of the European
Parliament and of the Council of 27 January 2003 on the restriction of the use of certain
hazardous substances in electrical and electronics equipment (RoHS Directives & RoHS 2.0)
Advertisement

Related Manuals for Beijer Electronics JetNet3008G V2


Summary of Contents for Beijer Electronics JetNet3008G V2
- Page 1 12-24AWG 5 Years Warranty Quick Installation Guide Each of Beijer Electronics ’s product is designed, produced, and tested with high industrial standard. Beijer Electronics warrants that the product(s) shall be free from defects in materials AlarmControl AC/DC Power Supply...
- Page 2 12-24AWG 复制,改编,存储在检索系统中,翻译成任何语言,或以任何形式或方式传播。 所有产品的设计、制造及测试都是采用较高的工业标准。北尔电子保证自产品出货 日起提供最高5年之免费保修服务,保修期间如因零件损坏或制程不良而导致产品 关于快速安装指南 AlarmControl AC/DC Power Supply 故障,我们提供免费维修服务。自然外力(火、水、雷灾)所造成的产品故障,或 port 1~8 power DC9-60V, UL Listed 本“快速安装指南”旨在指导专业安装人员安装和配置JetNet3008G V2。它涵盖 其它外部因素如电源干扰、不当电源输入、不当接线等造成的损坏,不列入产品保 12-24AWG AC Power Input 了帮助您避免意外问题的程序。 固范围;此外,产品被误用、未经授权的修理及修改等行为将造成保固条款失效。 DC Power Output DC 9-60V, UL Listed 常规 注意! 请勿于电源开启时插拔接线端子,避免产生火花造成系统损坏。 注意: 继电器触点仅支持0.5A电流,DC 24V。不建议使用超过本规范的更高的电压 警告: 此符号表示您必须遵守的警告...
Need help?
Do you have a question about the JetNet3008G V2 and is the answer not in the manual?
Questions and answers