
Related Manuals for Geo FR 50


Summary of Contents for Geo FR 50
- Page 1 DE | EN | FR FR 50 Bedienungsanleitung user Manual Mode d‘eMploi www.geo-fennel.de www.geo-fennel.com www.geo-fennel.fr...
- Page 2 Sehr geehrter Kunde, vielen Dank für das Vertrauen, welches Sie uns beim Erwerb Ihres neuen geo-FENNEL-Gerätes ent- gegengebracht haben. Dieses hochwertige Qualitätsprodukt wurde mit größter Sorgfalt produziert und qualitätsgeprüft. Die beigefügte Anleitung wird Ihnen helfen, das Gerät sachgemäß zu bedienen. Bitte lesen Sie ins- besondere auch die Sicherheitshinweise vor der Inbetriebnahme aufmerksam durch.
- Page 3 EIGENSCHAFTEN · Für Rotationslaser mit rotem oder grünem Laserstrahl · Länge Empfangsfenster: 50 mm · Segmente der Pfeilanzeige im Display nehmen proportional zu/ab · Große Displays auf Vorder- und Rückseite · Ein-/ausschaltbare Hintergrundbeleuchtung für optimale Ablesung unter allen Bedingungen · Robustes Gehäuse - stoßfest - und Staub-/Wasserschutz IP 67 ·...
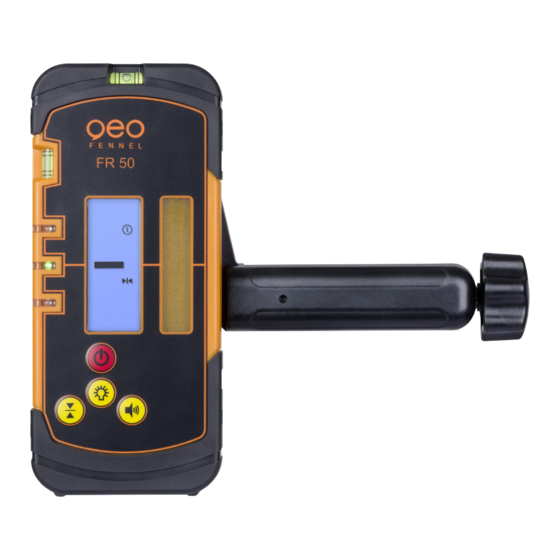
- Page 4 BeDIeneLemenTe BEDIENELEMENTE 1. Libelle (2) 2. Empfangsfenster 3. Display 4. Beleuchtung an/aus 5. Ton an/aus 6. Auswahl Genauigkeit 7 . AN-/ AUS-Schalter 8. LED-Anzeige / Referenzmarke 9. Magnet (2) 10. Hintere LED-Anzeige 11. Batteriefach 12. Hinteres Display 13. Nullmarke 14. Lautsprecher 15.
- Page 5 STROmVeRSORgung EINLEGEN DER BATTERIE · Batteriefachdeckel (11) öffnen. · 2 x AA Alkalinebatterie gemäß dem Installationssymbol ein- legen und dabei auf korrekte Polarität achten. Deckel wieder verschließen. · Zur Verlängerung der Lebensdauer der Batterie schaltet sich der Empfänger nach ca. 5 Min. ohne Anwendung automa- tisch ab.
- Page 6 Lautstärke einstellen Taste kurz drücken, um die Lautstärke einzustellen. (zur Bestätigung ertönt ein Piepton). (Bild rechts) mittel laut Beleuchtung ein-/ausschalten Taste drücken, um die Beleuchtung ein-/ auszuschalten. LASERLINIE DETEKTIEREN Laserlinie wird nicht Laserlinie befindet Laserlinie befindet Laserlinie befindet detektiert sich exakt auf der sich unterhalb der sich oberhalb der ·...
- Page 7 SIcheRheITShInweISe UMGANG UND PFLEGE Messinstrumente generell sorgsam behandeln. Nach Benutzung mit weichem Tuch reinigen (ggfs. Tuch in etwas Wasser tränken). Wenn das Gerät feucht war, sorgsam trocknen. Erst in den Koffer oder die Tasche packen, wenn es absolut trocken ist. Transport nur in Originalbehälter oder -tasche. ELEKTROMAGNETISCHE VERTRäGLICHKEIT Es kann nicht generell ausgeschlossen werden, dass das Gerät andere Geräte stört (z.B.
- Page 8 Dear customer, Thank you for your confidence in us having purchased a geo-FENNEL instrument. This manual will help you to operate the instrument appropriately. Please read the manual carefully - particularly the safety instructions. A proper use only guarantees a longtime and reliable operation.
- Page 9 PROPERTIES · For rotating lasers with red or green laser beam · Length of the receiving window: 50 mm · Segments of the arrow in the display increase/decrease proportionally · Large LCDs at the front and back side · Backlight can be switched on/off - for optimal reading in all conditions ·...
- Page 10 FeaTuReS FEATURES 1. Vial (2) 2. Receiving window 3. Display 4. Illumination on/off 5. Sond on/off 6. Accuracy selection 7 . Power ON/OFF 8. LED indication / reference mark 9. Magnets (2) 10. Back LED 11. Battery compartment 12. Back display 13.
- Page 11 pOweR SuppLy INSTALLATION OF THE BATTERIES · Open the battery compartment cover (11). · Insert 2 x AA Alkaline batteries according to the installation symbol (ensure correct polarity!). Close the cover. · In order to save battery power the receiver will automatically turn off if it has not received a laser scanning signal for 5 minutes.
- Page 12 Set the volume Press the button to set the volume requested. (a beep sounds to confirm) (fig. right) medium loud Switch on/off the lighting Press the button to switch on/off the lighting. DETECT THE LASER LINE The laser line is not The laser line is exact- The laser line is below The laser line is above...
- Page 13 SaFeTy nOTeS CARE AND CLEANING Handle measuring instruments with care. Clean with soft cloth only after any use. If necessary damp the cloth with some water. If the instrument is wet clean and dry it carefully. Pack it up only if it is perfectly dry. Transport in original container / case only.
- Page 14 1. Livré comme suit 2. Descriptif 3. Alimentation en courant 4. Opération 5. Consignes de sécurité LIVRé cOmme SuIT · Cellule de réception pour lasers rotatifs FR 50 · 2 x AA piles alcalines · Support de cellule en plastique · Mode d‘emploi...
- Page 15 PROPRIÉTÉS · Pour lasers rotatifs avec faisceau laser rouge ou vert · Longueur de la fenêtre de réception : 50 mm · Les segments de l'affichage fléché à l'écran augmentent/diminuent proportionnellement · Grands afficheurs à l'avant et à l'arrière · Rétroéclairage activable/désactivable pour une lecture optimale dans toutes les conditions ·...
- Page 16 DeScRIpTIF DESCRIPTIF 1. Nivelle (2) 2. Fenêtre de réception 3. Écran 4. Éclairage allumé/éteint 5. Son allumé/éteint 6. Sélection de la précision 7 . Bouton MARCHE/ARRêT 8. Indication LED / référence 9. Aimants (2) 10. Indication LED arrière 11. Compartiment piles 12.
- Page 17 aLImenTaTIOn en cOuRanT MISE EN PLACE DE PILES · Ouvrez le couvercle du compartiment de piles (11). · Mettez en place 2 x AA piles alcalines, conformément au symbole d‘installation (sur la face postérieur), en veillant à la polarité correcte. Fermez le couvercle. ·...
- Page 18 Réglez le volume Pressez le bouton pour régler le volume. (un bip de confirmation retentit) (image à droite) éteint moyen fort Allumez/éteignez l‘éclairage Pressez le bouton pour allumer/éteindre l‘éclairage. DÉTECTION DE LA LIGNE LASER La ligne laser n‘est La ligne laser se trou- La ligne laser se La ligne laser se pas détectée.
- Page 19 nOTIceS De SécuRITé NETTOYAGE ET REMISAGE Essuyer l‘instrument mouillé, humide ou sali en le frottant uniquement avec un tissu de nettoyage. Quant à l‘optique, la nettoyer avec un tissu fin comme p. ex. un tissu feutré de lunettes. Ne jamais mettre un instrument humide dans un coffret fermé! Le laisser sécher auparavant au moins pendant un jour dans un local chauffé! Transport seulement dans le coffret original.
- Page 20 Technische Änderungen vorbehalten. Kupferstraße 6 all instruments subject to technical changes. D-34225 Baunatal Sous réserve de modifications techniques. Tel. +49 561 / 49 21 45 +49 561 / 49 72 34 info@geo-fennel.de 07/2023 www.geo-fennel.de precision by tradition.
Need help?
Do you have a question about the FR 50 and is the answer not in the manual?
Questions and answers