
Related Manuals for Geo GeoDist 80


Summary of Contents for Geo GeoDist 80
- Page 1 DE | EN | FR GeoDist ® BEDIENUNGSANLEITUNG USER MANUAL MODE D‘EMPLOI www.geo-fennel.de www.geo-fennel.com www.geo-fennel.fr...
-
Page 2: Table Of Contents
Sehr geehrter Kunde, vielen Dank für das Vertrauen, welches Sie uns beim Erwerb Ihres neuen geo-FENNEL-Gerätes entgegengebracht haben. Dieses hochwertige Quali- tätsprodukt wurde mit größter Sorgfalt produziert und qualitätsgeprüft. Die beigefügte Anleitung wird Ihnen helfen, das Gerät sachgemäß zu bedienen. Bitte lesen Sie insbesondere auch die Sicherheitshinweise vor der Inbetriebnahme aufmerksam durch. -
Page 3: Lieferumfang
LIEFERUMFANG · Laserentfernungsmesser GeoDist ® · NiMH-Akkus · USB-Ladekabel · Holster · Handschlaufe · Bedienungsanleitung Technische Daten Messbereich 0,2 - 80 m* Genauigkeit Distanzmessung ±2 mm ** Genauigkeit Neigungsmessung ± 0,3° Laserklasse 2 / rot Stromversorgung NiMH Temperaturbereich -10°C - +40°C Messeinheiten m / ft / in / ft+in Staub-/Wasserschutz... - Page 4 FUNKTIONEN S. 8 · Horizontierungshilfen im Display S. 9 · Kamerafunktion · Messebene S. 10 · Addition / Subtraktion · Einzelmessung · Dauermessung S. 11 · Flächenberechnung · Volumenberechnung S. 12 · Pythagorasfunktion (Gesamthöhe) 2 Punkte · Pythagorasfunktion (Gesamthöhe) 3 Punkte S.
-
Page 5: Stromversorgung
STROMVERSORGUNG 3 X AAA NIMH-AKKUS EINLEGEN Achten Sie beim Einlegen der Akkus auf korrekte Polarität! AKKU LADEN Abdeckung der USB-Buchse (unten am Gerät) öffnen und Akku über den USB-Anschluss laden. Hierfür ein handelsübliches USB-Ladegerät z.B. vom Smartphone verwenden. Nach dem Ladevorgang die USB-Buchse wieder verschließen. -
Page 6: Bedienelemente
BEDIENELEMENTE 1. Messtaste (kurz: Einzelmessung / lang: Dauermessung) 2. Messmodus: alle Messmodi aufeinanderfolgend -> Ansteuerung jeweils über die Tasten 3. SET-Taste: Auswahl von Bluetooth / Messeinheit / Mess- ® ebene / 3D-Funktion / Bildschirmdrehung / History / zeitverzögerte Messung -> Ansteuerung jeweils über die Tasten 4. -
Page 7: Bedienung
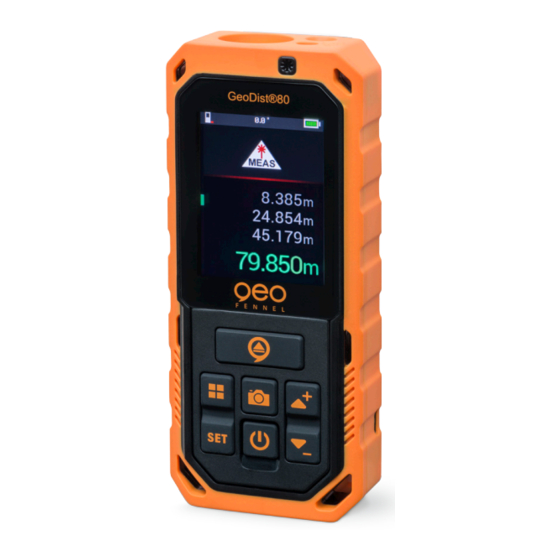
BEDIENUNG DISPLAYANZEIGE Gerät mit einschalten, drücken -> nebenstehende Displayanzeige erscheint. den gewünschten Parameter an- steuern. Der jeweils ausgewählte Punkt ist grün unterlegt. Parameter wie folgt festlegen: 1. Bluetooth -Funktion = an / aus (grau = aus) ® 2. Messeinheit = m / ft / in / ft+in ( , ,, 3. - Page 8 Winkelanzeige Mess- Batteriezustands- ebene anzeige Bluetooth ® Anzeige Neigungs- Messmodus anzeige Messmodus Messwert 1. Messwert 2. Messwert 3. Messwert Volumen HORIZONTIERUNGSHILFE IM DISPLAY Zur Erhöhung der Messgenauigkeit bei horizontalen Messungen bietet das Gerät Horizontierungshilfen im Display: Nummerische Neigungsanzeige: Halten Sie das Gerät möglichst bei 0°. Optische Hilfe: Grüner Balken –...
- Page 9 ALLGEMEINE HINWEISE · Nach 3 Minuten ohne Bedienung schaltet sich das Gerät automatisch ab. · Das Gerät speichert automatisch die letzten 1.000 Messwerte. · Der eingebaute Neigungssensor ist immer aktiv. · In allen Messmodi (außer Einzelmessung und Dauermessung) zeigt die rote Linie an, welche Größe als nächste gemessen wird.
- Page 10 ADDITION / SUBTRAKTION = addieren = subtrahieren etc. EINZELMESSUNG Gerät einschalten - Messmodus: Einzelmessung Zum Messen Messtaste drücken DAUERMESSUNG gedrückt halten. Vom Ausgangspunkt aus Gerät über den Zielpunkt bewegen. Zum Beenden wieder drücken. Anzeige: Maximum, Minimum und der zuletzt gemessene Wert. Navigation in den nachfolgenden Menüpunkten nach oder = auf /...
- Page 11 FLÄCHENBERECHNUNG drücken auswählen und bestätigen mit drücken für das 1. Maß drücken für das 2. Maß Anzeige Zeile 3: Fläche drücken für eine erneute Flächenberechnung, AUS-Knopf drücken, um die Funktion zu verlassen VOLUMENBERECHNUNG drücken auswählen und bestätigen mit drücken für das 1. Maß drücken für das 2.
- Page 12 PYTHAGORAS-MESSUNGEN WICHTIG - unbedingt beachten · Bei der Messung der Horizontaldistanz (2. Maß) muss die Messung im 90°-Winkel zur Messfläche erfolgen. Hierzu Neigungsanzeige verwen- den (0°). · Alle Messungen müssen vertikal in einer Linie liegen (ohne seitliche Abweichung). · Zur Erhöhung der Messgenauigkeit Stativ verwenden. PYTHAGORAS (2-PUNKT) drücken auswählen und bestätigen mit...
- Page 13 PYTHAGORAS (3-PUNKT / TEILHÖHE) drücken auswählen und bestätigen mit drücken für die Schrägdistanz oben drücken für die Schrägdistanz unten drücken für die Horizontaldistanz Anzeige Zeile 4: Teilhöhe INDIREKTE MESSUNGEN ÜBER NEIGUNG IN HOHER GENAUIGKEIT Wo direkte Messungen auf das Ziel nicht möglich sind, z.B. bei Glasfassa- den ohne Messreflektion oder wenn das Messobjekt verdeckt ist: Teilstrecken messen, fehlende Distanzen werden vom Gerät errechnet.
- Page 14 INDIREKTE MESSUNG 2 drücken auswählen und bestätigen mit drücken für Schrägdistanz oben (oberster Punkt) drücken für Schrägdistanz unten (unterster Punkt) Anzeige Zeile 1: Winkel Anzeige Zeile 2: Schrägdistanz oben Anzeige Zeile 3: Schrägdistanz unten Anzeige Zeile 4: Höhe PUNKT-ZU-PUNKT-MESSUNG drücken auswählen und bestätigen mit Gerät ruhig halten und Selbstkalibrierung unbedingt abwarten drücken für das 1.
- Page 15 TRAPEZMESSUNG 1 drücken auswählen und bestätigen mit drücken für das 1. Maß drücken für das 2. Maß drücken für das 3. Maß Anzeige Zeile 4: Länge der Schräge, z.B. Dachschräge TRAPEZMESSUNG 2 drücken auswählen und bestätigen mit drücken für das 1. Maß drücken für das 2.
- Page 16 FLÄCHENBERECHNUNG KREIS drücken auswählen und bestätigen mit drücken für den Durchmesser Anzeige Zeile 1: Durchmesser Anzeige Zeile 2: Umfang Anzeige Zeile 3: Fläche des Kreises ZYLINDERBERECHNUNG drücken auswählen und bestätigen mit drücken für den Durchmesser drücken für die Höhe Anzeige Zeile 1: Durchmesser Anzeige Zeile 2: Höhe Anzeige Zeile 3: Fläche des Zylinders Anzeige Zeile 4: Volumen des Zylinders...
- Page 17 ABSTECKFUNKTION drücken auswählen und bestätigen mit = Cursor bewegen = gewünschte Distanz einstellen = Absteckung starten Der rote Pfeil zeigt an, in welche Richtung das Gerät bewegt werden muss, um die gewünschte Distanz zu erreichen. Bei Annäherung an den Zielwert ertönt ein akustisches Signal. OFFSET-FUNKTION drücken auswählen und bestätigen mit...
- Page 18 ZEITVERZÖGERTES MESSEN drücken auswählen und bestätigen mit Die Messung startet nach 5 Sekunden. SPEICHERFUNKTION Das Gerät speichert automatisch die letzten1.000 Messwerte. Speicherabruf DATENEXPORT VIA USB GeoDist 80 mit USB-Kabel an PC/Laptop anschließen. ® Gerät im Explorer suchen und anklicken. In der angezeigten Excel-Datei sind alle im Gerät gespeicherten Messwerte aufgeführt.
- Page 19 CONNECT APP für Smartphones / Tablets ® iOS-Geräte ab iOS 7 .0 im App Store Android-Geräte ab Android 4.3 in Google Play Kompatibel mit Bluetooth 4.0 oder höher. ® Die Bedienungsanleitung zur App finden Sie auf unserer Webseite www.geo-fennel.de in der Rubrik Laser-Entfernungsmesser.
- Page 20 FEHLERBEHEBUNG Code Ursache Maßnahme Rechenfehler Messung gem. Bedienungsan- leitung wiederholen Überspannung Bitte kontaktieren Sie Ihren Händler. Akku zu schwach Akku laden Signal zu schwach oder Messung auf eine andere Ober- Messzeit zu lang fläche durchführen Signal zu stark Messung auf eine andere Ober- fläche durchführen außerhalb des Messbe- Messung innerhalb des...
-
Page 21: Sicherheitshinweisee
SICHERHEITSHINWEISE BESTIMMUNGSGEMÄSSE VERWENDUNG Das Gerät sendet einen sichtbaren Laserstrahl aus, um z.B. folgende Mess- aufgaben durchzuführen: Ermittlung von Distanzen. UMGANG UND PFLEGE Messinstrumente generell sorgsam behandeln. Nach Benutzung mit wei- chem Tuch reinigen (ggfs. Tuch in etwas Wasser tränken). Wenn das Gerät feucht war, sorgsam trocknen. - Page 22 EN 60825-1:2014. Das Gerät darf ohne weitere Sicherheitsmassnahmen eingesetzt werden. Das Auge ist bei zufälligem, kurzzeitigem Hineinsehen in den Laserstrahl durch den Lidschlussreflex geschützt. Laserwarnschilder der Klasse 2 sind gut sichtbar www.geo-fennel.de G E R MA N Y Laser am Gerät angebracht.
- Page 23 HAFTUNGSAUSSCHLUSS Der Benutzer dieses Produktes ist angehalten, sich exakt an die Anweisungen der Bedienungsanleitung zu halten. Alle Geräte sind vor der Auslieferung genauestens überprüft worden. Der Anwender sollte sich trotzdem vor jeder Anwendung von der Genauigkeit des Gerätes überzeugen. Der Hersteller und sein Vertreter haften nicht für fehlerhafte oder absichtlich falsche Verwendung sowie daraus eventuell resultierende Folgeschäden und entgangenen Gewinn.
- Page 24 Dear Customer, Thank you for your confidence in us, having purchased a geo-Fennel instrument. For the optimum performance of the instrument, please read this ma- nual carefully and keep it in a convenient place for future reference. This manual contains important safety information that should be read and understood before use.
- Page 25 EN E N SUPPLIED WITH · Laser distance meter GeoDist ® · NiMH rechargeable batteries · USB charging cable · Holster · Hand strip · User manual Technical data Measuring range 0,2 - 80 m* Measuring accuracy ±2 mm ** Tilt measurement accuracy ±...
- Page 26 FEATURES P . 30 · Levelling support in the display P . 31 · Camera function · Measuring reference P . 32 · Addition / subtraction · Single measurement · Contiuous measurement P . 33 · Area calculation · Volume calculation P .
- Page 27 POWER SUPPLY INSERT 3 X AAA NIMH BATTERIES Ensure correct polarity when inserting the batteries. CHARGE THE BATTERIES Open the cover of the USB plug (bottom of the instrument) and charge the batteries via the USB connection. For this use a standard USB charger, i.
- Page 28 OPERATIONAL ELEMENTS 1. Measuring key (press briefly: single measurement / press long: continuous measurement) 2. Measuring mode: all modes consecutively -> commanded with the keys 3. SET key: selection of Bluetooth / measuring unit / measuring ® reference / 3D function / display rotation / history / time- delayed measurement ->...
- Page 29 OPERATION DISPLAY INDICATION Power on the unit with and press -> the left display indication will appear. Select the requested parameter with The parameter selected is highlighted in green. Determine the parameter with as below: 1. Bluetooth function = on / off (grey = off) ®...
- Page 30 Angle display Measuring Battery status reference indication Bluetooth ® Measuring Digital mode level indication display Value measured Measuring mode 1. Value measured 2. Value measured 3. Value measured Volume HORIZONTAL LEVELLING - DISPLAY INDICATION In order to increase the measuring accuracy in horizontal direction the instrument offers a levelling support in the display: Numerical slope indication: Preferably keep the instrument at 0°.
- Page 31 GENERAL NOTES · After 3 minutes without operation the instruments powers off automa- tically. · The instrument automatically saves the last 1.000 measured values. · The integrated tilt sensor 360° is always active. · In all measuring modes (except single and continuous measurement) the red line shows which parameter will be measured next.
- Page 32 ADDITION / SUBTRACTION = add = substract etc. SINGLE MEASUREMENT Power on the unit - measuring mode: single measurement For taking measurements press CONTINUOUS MEASUREMENT Keep pressed. Sweep slowly the unit back and forth over the selected target point. Press to stop the continuous measurement.
- Page 33 AREA CALCULATION Press Select and confirm with Press for the first distance Press for the second distance Display indication line 3: area Press for a new area calculation, press the OFF button to quit this mode. VOLUME CALCULATION Press Select and confirm with Press for the first distance...
- Page 34 PYTHAGORAS MEASUREMENTS IMPORTANT - it is essential to observe the following · When measuring the horizontal distance (2nd dimension), the measure- ment must be taken at a 90° angle to the measuring surface. To do this, use the inclination indicator (0°). ·...
- Page 35 PYTHAGORAS (3-POINT / PARTIAL HEIGHT) Press Select and confirm with Press for the inclined distance top Press for the inclined distance bottom Press for the horizontal distance Display indication line 4: partial height INDIRECT MEASUREMENTS VIA INCLINATION WITH HIGH ACCURACY Where direct measurements to the target are not possible, e.g.
- Page 36 INDIRECT MEASUREMENT 2 Press Select and confirm with Press for the inclined distance top (top point) Press for the inclined distance botton (bottom point) Display indication line 1: angle Display indication line 2: inclined distance top Display indication line 3: inclined distance bottom Display indication line 4: height MEASUREMENT POINT-TO-POINT Press...
- Page 37 TRAPEZOID MEASUREMENT 1 Press Select and confirm with Press for the first distance Press for the second distance Press for the third distance Display indication line 4: length of the slope, i.e. slope of the roof TRAPEZOID MEASUREMENT 2 Press Select and confirm with Press...
- Page 38 CIRCLE AREA CALCULATION Press Select and confirm with Press for the diametre Display indication line 1: diametre Display indication line 2: circumference Display indication line 3: circle area CYLINDRICAL VOLUME Press Select and confirm with Press for the diametre Press for the height Display indication line 1: diametre Display indication line 2: height...
- Page 39 STAKE OUT FUNCTION Press Select and confirm with = move the cursor = set the required distance = start the stake out function The red arrow shows in which direction the unit must be moved to reach the distance required. When approaching the target an accoustic signal will sound.
- Page 40 TIME-DELAYED MEASUREMENT Press Select and confirm with The measurement starts after 5 seconds. MEMORY The instrument automatically saves the last 1.000 measured values. Data recall DATA EXPORT VIA USB Conncect the GeoDist 80 to a PC / laptop by means of the USB cable. ®...
- Page 41 7 .0 in the App Store Android units from Android 4.3 in Google Play Compatible with Bluetooth 4.0 or higher. ® You will find the user manual for the App on our homepage www.geo-fennel.de; category: laser distance meters.
- Page 42 TROUBLE SHOOTING Code Cause Corrective action Calculation error Repeat the measurement Excessive current Contact your dealer Battery weak Charge the battery Signal too weak or Change the target surface measuring time too long Signal too strong Change the target surface Out of measuring range Select the measuring distance within the range...
- Page 43 SAFETY NOTES INTENDED USE OF INSTRUMENT The instrument emits a visible laser beam in order to carry out the following measuring tasks (depending on the instrument): distance measurements. SPECIFIC REASONS FOR ERRONEOUS MEASURING RESULTS Measurements through glass or plastic windows; dirty laser emitting windows;...
- Page 44 EXCEPTIONS FROM RESPONSIBILITY The user of this product is expected to follow the instructions given in the user manual. Although all instruments left our warehouse in perfect condition and adjustment the user is expected to carry out periodic checks of the product’s accuracy and general performance. The manufacturer, or its representatives, assumes no responsibility of results of a faulty or intentional usage or misuse including any direct, indirect, consequential damage, and loss of profits.
- Page 45 60825-1:2014. It is allowed to use the unit without further safety precau- tions. The eye protection is normally secured by aversion responses and the blink reflex. The laser instrument is marked with class 2 warning labels. www.geo-fennel.de G ER M A N Y Laser IEC 60825-1:2014 P ≤...
- Page 46 Cher client, Nous tenons à vous remercier pour la confiance que vous avez témoignée, par l‘acquisition de votre nouvel instrument geo-FENNEL. Les instructions de service vous aideront à vous servir de votre instrument de manière adéquate. Nous vous recommandons de lire avec soin tout particulièrement les consignes de sécurité...
-
Page 47: Livré Comme Suit
LIVRÉ COMME SUIT · Télémètre laser GeoDist ® · Accus NiMH · Câble de charge USB · Étui · Dragonne · Mode d‘emploi Données techniques Portée 0,2 - 80 m* Précision mesure de distance ±2 mm ** Précision mesure d‘inclinaison ±... - Page 48 FONCTIONS P . 52 · Support de nivellement sur l‘écran P . 53 · Fonction caméra · Visée de mesure P . 54 · Addition / soustraction · Mesure simple · Mesure continue P . 55 · Cacul de surface ·...
-
Page 49: Alimentation En Courant
ALIMENTATION EN COURANT MISE EN PLACE DES ACCUS (3 X AAA NIMH) Attention à la polarité en mettant en place les accus! CHARGER L ‘ ACCU Ouvrez le couvercle de la douille USB (sol de l‘appareil) et chargez l‘accu via la connexion USB. Utilisez un chargeur standard USB p. e. d‘un Smartphone. -
Page 50: Description De L'apprareil
DESCRIPTION DE L‘APPAREIL 1. Bouton mesure (bref: mesure simple / long: mesure continue) 2. Mode de mesure: tous les modes de mesure consécutifs -> commande par les boutons 3. Bouton SET: sélection de Bluetooth / unité de mesure / visée ®... -
Page 51: Opération
OPÉRATION INDICATION ÉCRAN Mettez l‘instrument en marche avec pressez -> affichage de l‘écran comme à gauche. Commandez le paramètre démandé avec Le paramètre sélectionné est surligné en vert. Sélectionnez les paramètres avec comme suit: 1. Fonction Bluetooth = marche / arrêt (gris = arrêt) ®... - Page 52 Affichage angle Visée de mesure Affichage état de pile Bluetooth ® Affichage Affichage mode de inclinaison mesure Valeur de mesure Mode de mesure 1. valeur de mesure 2. valeur de mesure 3. valeur de mesure Volume NIVELLEMENT HORIZONTAL - AFFICHAGE DE L‘ÉCRAN Pour augmenter la précision de mesure pour des mesures horizontaux l‘appareil offre des supports de nivellement dans l‘écran: Affichage de l‘inclinaison numérique:...
- Page 53 INFORMATIONS GÉNÉRALES · Après 3 minutes sans opération l‘appareil s‘eteint automatiquement. · L ‘ appareil mémorise les 1.000 dernières valeurs de mesure automa- tiquement. · Le capteur d‘inclincaison intégré est toujours actif. · Dans tous les modes de mesure (sauf la mesure simple et continue) la ligne rouge affiche quelle valeur sera mesuré...
- Page 54 ADDITION / SOUSTRACTION Pressez bref -> additionner Pressez long -> soustraire etc. MESURE SIMPLE Mettez l‘instrument en marche - mode de mesure: mesure simple. Pour mesurer pressez: MESURE CONTINUE Maintenez pressé A partir du point de départ, déplacez l‘appareil sur le point cible. Pour termi- ner pressez Affichage: maximum, minimum et la dernière valeur mesurée.
- Page 55 CALCUL DE SURFACE Pressez Sélectionnez et confirmez avec Pressez pour la 1ère distance Pressez pour la 2ième distance Affichage ligne 3: la surface Pressez pour exécuter un autre calcul de surface; pressez le touche MARCHE/ARRÊT pour quitter ce mode. CALCUL DE VOLUME Pressez Sélectionnez et confirmez avec...
- Page 56 LES MESURES DE PYTHAGORE IMPORTANT - il est essentiel d‘observer les points suivants · Lors de la mesure de la distance horizontale (2e dimension), la mesure doit être effectuée à un angle de 90° par rapport à la surface de mesure. Pour ce faire, utilisez l‘indicateur d‘inclinaison (0°).
- Page 57 PYTHAGORE (3 POINTS / HAUTEUR PARTIELLE) Pressez Sélectionnez et confirmez avec Pressez pour la distance inclinée en haut Pressez pour la distance inclinée en bas Pressez pour la distance horizontale Affichage ligne 4: la hauteur partielle DES MESURES INDIRECTES VIA L‘INCLINAISON AVEC UNE GRANDE PRÉCISION Lorsque les mesures directes sur la cible ne sont pas possibles, par exemple sur des façades en verre sans réflexion de la mesure ou si l‘objet...
- Page 58 MESURE INDIRECTE 2 Pressez Sélectionnez et confirmez avec Pressez pour la distance inclinée en haut (point le plus haut) Pressez pour la distance inclinée en bas (point le plus bas) Affichage ligne 1: angle Affichage ligne 2: distance inclinée en haut Affichage ligne 3: distance inclinée en bas Affichage ligne 4: hauteur MESURE DE POINT À...
- Page 59 MESURE TRAPEZE 1 Pressez Sélectionnez et confirmez avec Pressez pour la 1ière distance Pressez pour la 2ième distance Pressez pour la 3ième distance Affichage ligne 4: longueur du biais, p.e. du pan du toit MESURE TRAPEZE 2 Pressez Sélectionnez et confirmez avec Pressez pour la 1ière distance Pressez...
- Page 60 CALCUL DU CERCLE Pressez Sélectionnez et confirmez avec Pressez pour le diamètre Affichage ligne 1: diamètre Affichage ligne 2: périmètre Affichage ligne 3: surface du cercle VOLUME CYLINDRE Pressez Sélectionnez et confirmez avec Pressez pour le diamètre Pressez pour la hauteur Affichage ligne 1: diamètre Affichage ligne 2: hauteur Affichage ligne 3: surface du cylindre...
- Page 61 FONCTION IMPLANTATION Pressez Sélectionnez et confirmez avec = agitez le curseur = réglez la distance désirée = démarrez l‘implantation La flèche rouge affiche dans quelle direction l‘appareil doit être agité pour atteindre la distance désirée. Rapprochant à la valeur cible un signal sonore retentit.
- Page 62 MESURE TEMPORISÉE Pressez Sélectionnez et confirmez avec La mesure démarra après 5 secondes. FONCTION MÉMOIRE L‘ appareil enregistre automatiquement les 1.000 dernières valeurs mesurées. Rappel de la mémoire TRANSFERT DES DONNÉSS VIA USB Connectez le GeoDist 80 avec un ordinateur portable/individuel par un ®...
- Page 63 à partir de iOS 7 .0 dans App Store Apparel Android à partir de Android 4.3 dans Google Play Compatible avec Bluetooth 4.0 ou mieux. ® Vous trouvez le mode d‘emploi pour l‘App sur notre site: www.geo-fennel.de dans la rubrique télémètres.
- Page 64 DÉPANNAGE Code Raison Action Erreur de calcul Répétez la mesure selon le mode d‘emploi Surtension Contactez votre distributeur Accu trop faible Chargez l‘accu Signal trop faible ou Mesurez sur une autre surface temps de mesure trop long Signal trop fort Mesurez sur une autre surface Mesure hors de la Effectuez la mesure dans la...
-
Page 65: Consignes De Sécuritée
CONSIGNES DE SÉCURITÉ UTILISATION CONFORME AUX PRÉSCRIPTIONS Le niveau projette un faisceau laser visible, pour effectuer p. ex. les travaux de mesures suivants: détermination de l‘hauteur, tracé d’angles droits, pointage de plans de référence horizontaux ainsi qu’obtention de points d’aplomb (dépendant de l‘instrument). CIRCONSTANCES POUVANT FAUSSER LES RÉSULTATS DE MESURES Mesures effectuées à... - Page 66 Les pictogrammes de danger de la classe 2 sont bien visibles sur l‘appareil. www.geo-fennel.de G E R M A N Y Laser IEC 60825-1:2014 P ≤...
- Page 67 EXCLUSION DE LA RESPONSABILITÉ 1. L ‘utilisateur de ce produit est tenu de respecter ponctuellement les in- structions du mode d‘emploi. Tous les instruments ont été très soigneu- sement vérifiés avant leur livraison. Toutefois, l‘utilisateur devra s‘assurer de la précision de ce niveau avant chaque emploi. 2.
- Page 68 GmbH Technische Änderungen vorbehalten. Kupferstraße 6 All instruments subject to technical changes. D-34225 Baunatal Sous réserve de modifications techniques. Tel. +49 561 / 49 21 45 +49 561 / 49 72 34 info@geo-fennel.de www.geo-fennel.de 03/2021 Precision by tradition.
Need help?
Do you have a question about the GeoDist 80 and is the answer not in the manual?
Questions and answers