Advertisement
Quick Links
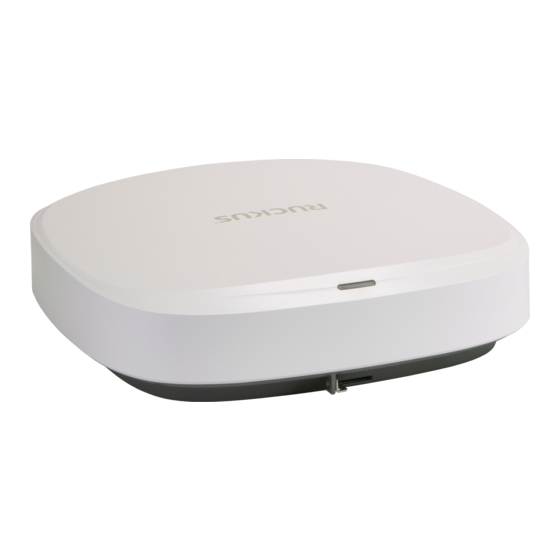
R770 Access Point
Quick Setup Guide
This Quick Setup Guide provides step-by-step instructions on how to install
and begin using your RUCKUS R770 tri-band 802.11be Wi-Fi 7 indoor Wi-Fi
access point (AP).
NOTE: The minimum software version for the R770 AP is SmartZone
(SZ) 7.0 or later.
FIGURE 1 R770 Access Point: Top View
This Guide in Other Languages
• 请从以下网站获得该指南的简体中文版
http://
docs.commscope.com/?docs-box.
• Vous trouverez la version française de ce guide à l'adresse suivante
http://docs.commscope.com/?docs-box.
• このガイドの日本語版は
http://docs.commscope.com/?docs-box
ご覧ください。
• 이 가이드의 한국어 버전은 웹 사이트
(http://docs.commscope.com/?
docs-box) 에서 확인하시기 바랍니다.
• Veja a versão em português (Brasil) deste guia em
docs.commscope.com/?docs-box
• Puede ver la versión en español (América Latina) de esta guía en
docs.commscope.com/?docs-box
Copyright
©
2023 CommScope, Inc. All rights reserved.
Published December 2023, Part Number 800-73222-001 Rev C
Before You Begin
Before deploying RUCKUS products, please check for the latest software
and the release documentation.
• Release Notes and other user documentation are available at
support.ruckuswireless.com/documents.
• Software upgrades are available at
software.
• Software license and limited warranty information are available at
http://support.ruckuswireless.com/warranty.
RUCKUS WLAN Configuration for 6.0-GHz APs
For configuring a 6.0-GHz WLAN, download the document from
support.ruckuswireless.com/documents/4017
Package Contents
A complete R770 installation package includes all of the following items:
• R770 Access Point
• One T-bar mounting bracket
• Four T-bar mounting clips
• One AP mounting kit
• Declaration of Conformity/Regulatory flyer
Required Hardware Tools
• Admin PC (computer with an Ethernet port and Wi-Fi adapter)
• CAT 6 (or better) Ethernet cable
• RUCKUS Wireless 48 VDC power adapter (902-1170-XX00) (sold
separately) or
802.3at/bt-compliant Power over Ethernet (PoE) switch or PoE injector
(902-1180-XX00)
Optional hardware and tools:
• Customer-ordered RUCKUS Wireless secure mounting bracket kit
(902-0120-0000):
– If you are mounting the AP on a flat surface using the secure
mounting bracket kit, then you need an electric drill with 4.75-mm
(3/16-in.) drill bits.
– If you are mounting the AP on a pipe or pole using the secure
mounting bracket kit, then you will also need a 38.1-mm to 63.5-mm
(1.5-in. to 2.5-in.) pipe or pole, two pole clamps, and hand tools to
tighten the clamps.
で
http://
http://
Step 1: Connecting Your Computer to the AP
1. If DC powered, connect your computer network port to the PoE port
on the AP using an Ethernet cable. Refer to
http://
2. Connect the DC cable of the DC power adapter to a convenient and
protected power source. Connect the DC output cable of the DC
power adapter to the 48 VDC port on the AP.
http://support.ruckuswireless.com/
https://
for reference.
Alternatively, connect the computer and the AP with a basic PoE
switch in the following ways:
3. Verify that the PWR LED on the AP is lit a steady green.
FIGURE 2 R770 AP Ports on the Bottom Panel
Figure
NOTE: Alternatively, connect the AP PoE port to a PoE injector or
switch for both power and network connectivity. Connect your
computer network port to the data port of the PoE Injector or to
another port of the switch, respectively.
NOTE: In general, switches must have the Link Layer Discovery
Protocol (LLDP) enabled. The PoE switch port must run the LLDP
and Power over Ethernet/MDI (BT6) for the R770 AP to operate in
full-power mode.
NOTE: If the AP is powered by 802.3at PoE, the supported feature
set is reduced. For the recent product data sheet, refer to
www.ruckusnetworks.com/products/wireless-access-points/.
a) Connect the AP to a switch port.
b) Connect the computer to another switch port and manually
assign an IP address to configure the AP.
2.
https://
Page 1 of 5
Advertisement

Subscribe to Our Youtube Channel
Related Manuals for Ruckus Wireless R770


Summary of Contents for Ruckus Wireless R770
- Page 1 Protocol (LLDP) enabled. The PoE switch port must run the LLDP This Quick Setup Guide provides step-by-step instructions on how to install and Power over Ethernet/MDI (BT6) for the R770 AP to operate in and begin using your RUCKUS R770 tri-band 802.11be Wi-Fi 7 indoor Wi-Fi full-power mode.
- Page 2 Step 2: Preparing Your Computer for AP Setup TABLE 1 R770 AP Ports TABLE 3 Default AP Settings (for your reference) Label Description Settings Band WLAN Names Default SSID NOTE: The following procedures assume Windows is the operating Names system. Procedures for other operating systems are similar.
-
Page 3: Step 6: Verifying The Installation
Step 5: Placing the AP in Your Site FIGURE 3 Attaching the T-bar Bracket to the AP FIGURE 4 Attaching the T-bar Bracket to the T-bar 1. Move the AP to its permanent location (accessible to both power and network connections). For installation instructions, refer to Mounting Instructions on page 3. -
Page 4: Caution Notices
FIGURE 5 Flat Surface Mounting 1. Screws 2. Anchors 4. Place the AP onto the mounting screws so the screw heads enter the keyholes on the AP enclosure, and push the AP down until the AP retainer tab snaps into place. Caution Notices A caution calls your attention to a possible hazard that can damage equipment. - Page 5 Copyright © 2023 CommScope, Inc. All rights reserved. Page 5 of 5 Published December 2023, Part Number 800-73222-001 Rev C...
Need help?
Do you have a question about the R770 and is the answer not in the manual?
Questions and answers