Advertisement
ATTENTIONS
This is the original instruction, please read all manual instructions carefully before operating. VEVOR reserves clear interpretation of our user manual. The appearance of the product shall be subject to the product you received. Please forgive us that we won't inform you again if there is any technology or software updates on our product.
- Please read the manual carefully before using it.
- Handle it carefully during operation, avoid throwing down or pressing it heavily.
- please keep distance from the system when charging.
- After being used, turn off the display and pull out all the connection joints.
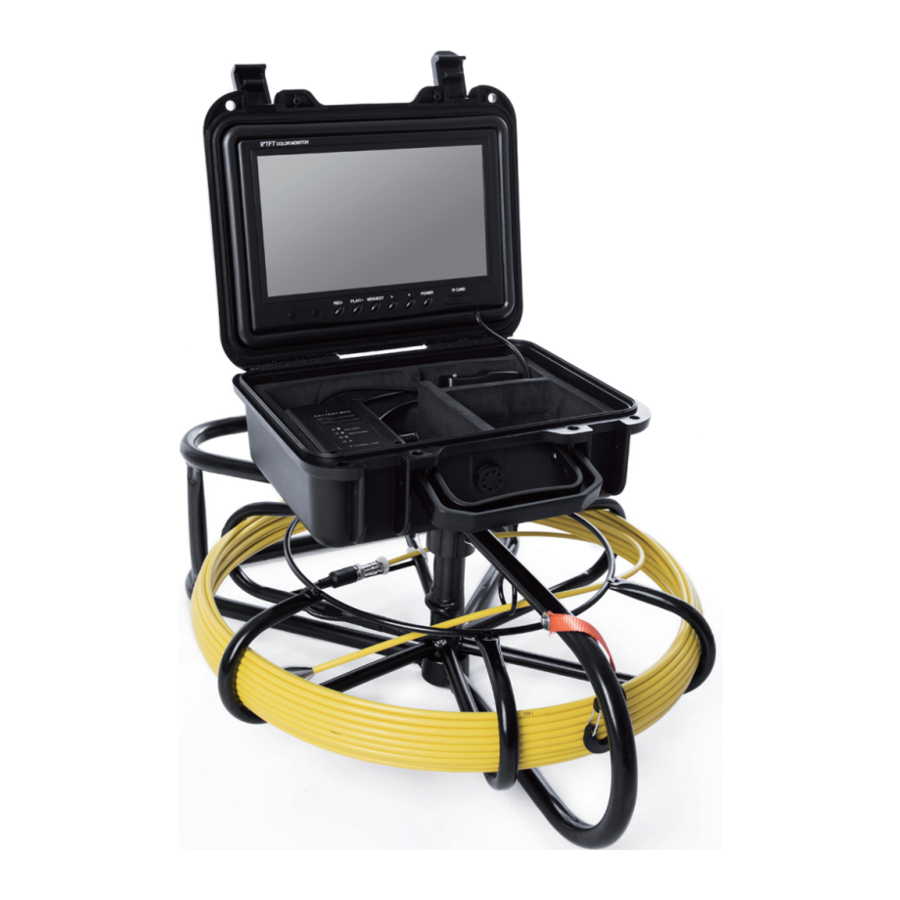
DESCRIPTION
- Colorful TFT LCD Screen.
- High resolution camera and clear picture.
- Night vision.
- High-quality special cable, waterproof and anti-corrosion/cold/tensile.
- 12V 4500MA lithium battery.
- With sun-visor for a bright environment outside.
- Range of Application: Water-supply pipe, Air-conditioner pipe, Cable pipe, Pipeline vacuum system, PLUNBIN pipe, Buildings, Sunken pipe.
- Operating Temp: -10°C to 60°C
PRODUCT SPECIFICATION
| Item: | Parameter |
| Charger: | AC100-240V DC12.6V 1000MA |
| Battery: | Lithium battery 12V4500MA |
| Continuous use time for battery: | Approximate 6h |
| Investigation depth: | 50m, 70m, 91.5m, 120m (selectable line length) |
| Material: | Fiber tube with high intensity |
| Camera light source: | With high white light |
| Camera material: | Stainless steel |
| Menu languages | Multi-language |
| Camera picture: | Colorful |
INSTRUCTION FOR PRODUCT
- Camera

- Metal Contact Chip
- Spring
- Highlight White Led
- Camera Lens

Product Specification
| Item: | Parameter |
| Camera diameter: | 23 mm |
| With the tube diameter: | >25mm |
| Camera light source: | 12 LED with high white light(adjustable) |
| Camera working voltage: | 5V |
| Lights' working voltage: | 12V |
| Waterproof: | IP68 |
| Camera material: | stainless steel |
| Camera size: | 143 mm* 23 mm |
| Camera protective cover parts material: | plastic-steel |
| Camera protective cover parts size 1: | 29mm* 40mm |
| Camera protective cover parts size 2: | 40mm* 90mm |
- Coil
Cable Length Scale the scaled cable can show the cable length
![]()
Fixed Buckle fixed the cable wheel
![]()
SPECIAL DETECTION CABLE FIXER
Useful Tool

- Cell Box

- Monitor Video
- Power of Monitor
- Adjacent Coil Plug
- AV Output
- Battery Indicator
- Power Input for Charger
- Light-Degree Adjustment for White Light LED
- Power Switch
- Power Light


System Installation
- Vital: turn off the power switch, connect the video camera and the monitor, or the video camera and the monitor may be damaged.
- Connect the camera to 3-coil plug, 2-cell box and the 1-monitor. (Pic.1)

- Turn on the power switch in the power box, the indicator light of the monitor is on, the switchboard starts.
- Install the video camera with the protective cover slightly and put it into the pipe, rotate the coil to a proper depth.
- Adjust LED light degree adjuster to proper light degree.
For videotape, refer to the DVR operation details (display operation: Recording Type ) - Switch video to another large screen through video line.
- After utilization, mover the camera from the pipe carefully, take a clean, soft and dry cloth to clear up it and put it back.

Charging
When the battery power is low, it needs charging, and the method is as below:
- Take out the battery and charger from the box.
- Connect the charger to the battery.
- Connect the charger to the alternating current of 100-240V. The red indicator means charging.
- The green indicator means finishing charging.
Notes: To make sure the battery using age longer, please recharge it timely; otherwise, it will make it can not recharged.
TROUBLE SHOOTING
| Problem | Solution |
Show blue screen |
|
Problems with LED lights |
|
Not running |
|
Photo/video cannot be saved |
|
Cannot format | Memory card is damaged. Replace the memory card. |
Unable to charge |
|
Broken cable |
|
Cable knotting |
|
Equipment cleaning | When cleaning the equipment, turn off the power before cleaning to avoid damage to the equipment. |
 | If the fault cannot be solved, please do not disassemble it by yourself. Please contact the after-sales service personnel. |
OPERATING INSTRUCTIONS FOR HD DVR
REC/-: To start/stop recording
Play/+: To switch between recording and photographing. (Please refer to the icon in the top left corner)
MENU: To access and loop the settings main menu / long press to rotate the screen 0, 90, 180 or 270 degrees
>: To zoom out
<: To zoom in the image 0-36X
POWER: To power on/off the display screen
- Main Menu Settings
- Press MENU button the setup menu: PICTURE; OPTION; TIME; PHOTO; VIDEO
- Press </> button to option sub-menu
- Press REC button to adjust the setting"s value OR press REC button enter/confirm
- Press PLAY button to exit
- Recording and Photographing
- Press PLAY button to switch between Recording and photographing. (please refer to the icon in the top left corner)
- Press REC button to start recording/photographing, then press REC button again to stop recording.
- Photo playback on monitor
- Loop pressMENU button to find PHOTO.
- Press </> button to find Playback.
- Press REC button to enter, then press </> to choose one and press REC button to playback.
- Press PLAY button to exit.
- Video playback on monitor
- Loop press MENU button to find RECORD.
- Press </> button to find Playback.
- Press REC button to enter, then press </> to choose one and press REC button to enter.
- Press REC button to playback.
- Press PLAY button to exit.
NEED HELP? CONTACT US!
Have product questions? Need technical support? Please feel free to contact us: CustomerService@vevor.com
Documents / ResourcesDownload manual
Here you can download full pdf version of manual, it may contain additional safety instructions, warranty information, FCC rules, etc.
Advertisement


Need help?
Do you have a question about the WP9600A and is the answer not in the manual?
Questions and answers