Advertisement
ATTENTIONS
- Please read the manual carefully before using it.
- Handle it carefully during operation, avoid throwing down or pressing it heavily.
- please keep distance from the system when charging.
- After being used, turn off the display and pull out all the connection joints.
DESCRIPTION
- Colorful TFT LCD Screen.
- High resolution camera and clear picture.
- Night vision.
- High-quality special cable, waterproof and anti-corrosion/cold/tensile.
- 12V 4500MA lithium battery.
- With sun-visor for a bright environment outside.
- Range of Application: Water-supply pipe, Air-conditioner pipe, Cable pipe, Pipeline vacuum system, PLUNBIN pipe, Buildings, Sunken pipe.
- Operating Temp: -10°C to 60°C
PRODUCT SPECIFICATION
| Item: | Parameter |
| Charger: | AC100-240V DC12. 6V 1000MA |
| Battery: | Lithium battery 12V4500MA |
| Continuous use time for battery: | Approximate 6h |
| Investigation depth: | 50m, 91. 5m (selectable line length) |
| Material: | Fiber tube with high intensity |
| Camera light source: | With high white light |
| Camera material: | Stainless steel |
| Menu languages | Multi-language |
| Camera picture: | Colorful |
Work Area Safety

Product Specification
| Item: | Parameter |
| Camera diameter: | 23 mm |
| With the tube diameter: | >25mm |
| Camera light source: | 12 LED with high white light (adjustable) |
| Camera working voltage: | 5V |
| Lights' working voltage: | 12V |
| Waterproof: | IP68 |
| Camera material: | stainless steel |
| Camera size: | 23mm |
| Camera protective cover parts material: | plastic-steel |
| Camera protective cover parts size 1: | 29mm* 40mm |
| Camera protective cover parts size 2: | 40mm* 90mm |

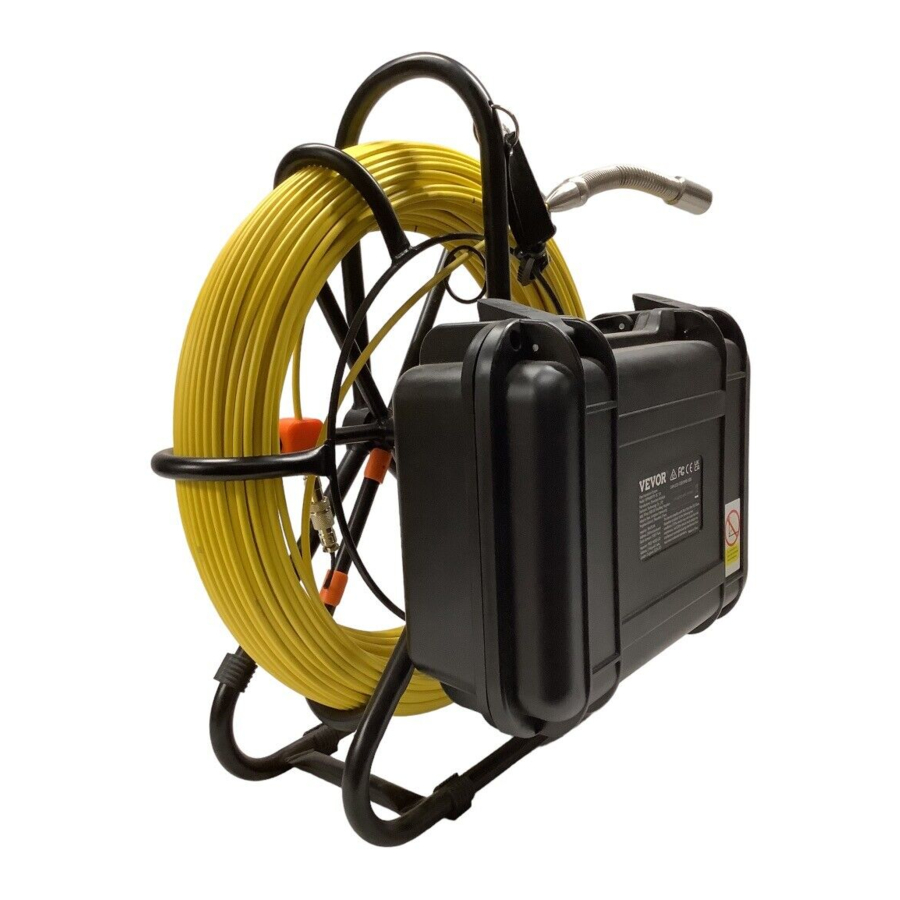
Coil
Cable Length Scale the scaled cable can show the cable length

Fixed Buckle fixed the cable wheel


Cell Box

- Monitor Video
- Power of Monitor
- Adjacent Coil Plug
- AV Output
- Battery Indicator
- Power Input for Charger
- light-Degree Adjustment for White Light Led
- Power Switch
- Power Light
System Installation
- Vital: turn off the power switch, connect the video camera and the monitor, or the video camera and the monitor may be damaged.
- Connect the camera to 3-coil plug, 2-cell box and the 1-monitor.
![]()
- Turn on the power switch in the power box, the indicator light of the monitor is on, the switchboard starts.
- Install the video camera with the protective cover slightly and put it into the pipe, rotate the coil to a proper depth.
- Adjust LED light degree adjuster to proper light degree. For videotape, refer to the DVR operation details (display operation: Recording Type )
- Switch video to another large screen through video line.
- After utilization, mover the camera from the pipe carefully, take a clean, soft and dry cloth to clear up it and put it back.

Charging
When the battery power is low, it needs charging, and the method is as below:
- Take out the battery and charger from the box.
- Connect the charger to the battery.
- Connect the charger to the alternating current of 100-240V. The red indicator means charging.
- The green indicator means finishing charging.
Notes: To make sure the battery using age longer, please recharge it timely; otherwise, it will make it can not be recharged.
TROUBLE SHOOTING
| Problem | Solution |
| Show blue screen |
|
| Problems with LED lights |
|
| Not running |
|
| Photo/video cannot be saved |
|
| Cannot format | Memory card is damaged. Replace the memory card |
| Unable to charge |
|
| Broken cable |
|
| Cable knotting |
|
| Equipment cleaning | When cleaning the equipment, turn off the power before cleaning to avoid damage to the equipment. |
| Warning | If the fault cannot be solved, please do not disassemble it by yourself. Please contact the after-sales service personnel. |
OPERATING INSTRUCTIONS FOR HD DVR
REC/-: To start/stop recording
Play/+: To switch between recording and photographing. (Please refer to the icon in the top left corner)
MENU: To access and loop the settings main menu / long press to rotate the screen 0, 90, 180 or 270 degrees
>: To zoom out
<: To zoom in the image 0-36X
POWER: To power on/off the display screen
- Main Menu Settings
- Press MENU button the setup menu: PICTURE; OPTION; TIME; PHOTO; VIDEO
- Press </> button to option sub-menu
- Press REC button to adjust the setting"s value OR press REC button enter/confirm
- Press PLAY button to exit
- Recording and Photographing
- Press PLAY button to switch between Recording and photographing. (please refer to the icon in the top left corner)
- Press REC button to start recording/photographing, then press REC button again to stop recording.
- Photo playback on monitor
- Loop press MENU button to find PHOTO.
- Press </> button to find Playback.
- Press REC button to enter, then press </> to choose one and press REC button to playback.
- Press PLAY button to exit.
- Video playback on monitor
- Loop press MENU button to find RECORD.
- Press </> button to find Playback.
- Press REC button to enter, then press </> to choose one and press REC button to enter.
- Press REC button to playback.
- Press PLAY button to exit.
512 HZ RECEIVER
Specifications
Sonde/Camera Locator
| Operating Frequency: | 512Hz |
| Modulation: | None |
Common
| Battery: | 6 AA Alkaline battery |
| Battery Life: | 4 hours intermittent use |
| Audio Output: | 50–1000Hz determined by signal strength |
| Weight: | Under 1. 6 lbs |
| Operating Temp: | -10°C to 60°C |
| Dimensions: | 535mmx110mmx50mm |
| Sensors: | Split angled sensor to derive peak and null signals |
INTRODUCTION
Your skill at handling this receiver and recognizing its strengths and weaknesses is what makes a locating job successful. Before taking them out on their first job, make sure you understand how the system works.
The 512 only has one mode which is"sonde"mode. In the sonde mode, the receiver searches for the signal transmitted by a small sonde or camera with a built-in transmitter that has been routed through a pipe. The sonde must emit a 512Hz signal and the receiver can determine the approximate depth of the target.
The 512 is designed to be intuitive and requires minimum of training for effective use of the instrument. The controls and the information display area are large and easy to understand. Yet they include everything necessary to control the receiver with your thumb.
The following sections will take you through all the steps necessary to use your equipment. We strongly recommend that you pay close attention to the section"Getting to know your tools", and come back to it when you are confused about the responses you are seeing on actual locating jobs.
KNOW YOUR ANALOG RECEIVER

GENERAL LAYOUT
Power on/off (keep pressing to power on; keep pressing to power off)
Near/Far Switch – Controls overall sensitivity. The"Far"position is recommended when starting to locate the sonde. As you app -roach the transmitter and the meter goes to full scale and you can't reduce the sensitivity any further, switch to"Near"to pinpoint its precise location.
Meter indicator – Indicates the strength of the peak signal (to the right) and the null signal (to the left).
Speaker – Allows you to hear the transmitter's signal beeping or continuous sound, depending on the transmitter use case. Battery indicator – Shows the status of the battery's health.
Instructions: Adjust the locator Near/Far Switch and Signal +/- according to the actual environment, then the locator can match transmitter better.
It is recommended to set into Far mode (Signal set to 9) at the beginning, and reduce the signal sensitivity grade when the LED screen shows very strong signal (you can hear the louder sound at the same time), then you can narrow the detection range.
GETTING TO KNOW YOUR TOOLS
Your 512 receiver supports the detection of any standard 512Hz sonde or camera in the market.
This type of sonde or camera is usually attached to devices that are sent through non-metallic sewer lines or water pipes. The emitted magnetic field easily passes through the walls of such pipes.
Since the signal being traced by the receiver is produced by the sonde or camera, there are some differences in the way the receiver is used when compared with normal cable or pipe tracing.
Let's practice using the 512.
Start by turning on the receiver and walking around and holding the receiver at waist height and walk towards general direction of the transmitter while slowly sweeping the receiver back and for the while pointing in the direction of the transmitter. You will notice that the signal will get louder. Turn the sensitivity down as needed to keep it in range as you get closer. When you're unable to keep the meter below full scale flip the switch to"Near".
Keep moving in the direction that makes the signal stronger. When you have reached the point that the signal seems to be the strongest and any direction you move makes it weaker, then you know you found the sonde which is directly below the center of the antenna rod.
Move to another place and seek this peak signal again and see if you always come back to the same spot for confirmation. You should find yourself right over the transmitter each time if you have followed each step correctly. Keep practicing until you get consistent results.
I keep finding "dead" spots!
That's good news! If you haven't noticed any"dead spots", let's go look for some. These dead spots are known as"nulls", and they are the key to accuracy. As we find nulls, notice that they happen at very sharp and precise places, unlike"peak signals" which are much more generalized. Let's look at a clear demonstration of a"peak" and a"null". Be sure to do all these tests with the receiver held at waist level.
Hold the receiver directly above the transmitter, parallel to the long axis of the transmitter.
The speaker is loud. This is a peak signal.

Now turn the receiver to be perpendicular to the transmitter. The signal will suddenly drop to almost nothing. This is called a"null". Move the receiver around a little to see how sharp and precise this null point is and how dependent it is on being exactly perpendicular.

Now let's look at some other places to find nulls. Back away from the transmitter and walk past it off to the end like the image below:
There was a null just as you crossed the axis of the transmitter, just like be fore this is called a"crossing null". Walk around and see that the crossing null is detected any time you cross either end of the transmitter, no matter how far away you are as long as you are within range. The transmitter with the receiver rod held straight in front of you and notice that you get a crossing null at two points of the circle, directly across from each other.
And on a line that runs right through the center of the transmitter, parallel with its long dimension.

What's so special about this? Well, imagine that you can't see the transmitter, which is just like a real-world situation. In fact, have someone put the transmitter under a box or newspaper and orient it in a way you can't see. Using the circle method, you can quickly determine which way the transmitter is lying. Using this method when locating the pipe, you can determine that the pipe lies along the line.
This is a useful method when trying to locate in unknown lines.
Now applying this to the job site.
Before starting any locating job, please ensure to follow these simple steps.
Survey the area before turning on the device. Once you have surveyed the area turn on the receiver and switch to"Far", and turn the sensitivity all the way up. Walk around the area where you will be locating and check for source of noise or electrical sources that can cause issues to the signal and pick up as if it's the transmitter. Mark any of these"hot spots"so you won't be fooled by them when you are locating.
Sonde locating
If you are locating a septic tank using a flushable transmitter, follow our flushing guidelines If the tank is close to the building, you should find it pretty quickly. If you suspect it is farther away, and its direction is uncertain, it can be helpful to tie a string or fishing line to the transmitter.
Before flushing it, letting it go only 3 to 8 feet on each flush, so you can follow it better.
Find the"Peak Spot".
Take the receiver in your hand and turn the sensitivity knob all the way up and flip the toggle switch to "Far". Hold the receiver parallel to the ground at waist level. Walk around the area you expect the transmitter to be in, moving the receiver in an arc, back and forth.

Listen to the strength of the signal and look at the right half of the meter. When it reaches full scale and you are unable to turn it down any further, flip the toggle witch to"Near". When you reach what seems to be the maximum signal, and every direction you move from there's a lower signal, you have reached the "Peak Spot".
Mark this spot and then move off in another direction and repeat the locating procedure. Keep doing this until you keep returning to the same spot. You should be able to narrow this rough-in area to within a few inches. If you are just locating a septic tank, and knowing its depth is not critical, you are ready to dig. The Peak Spot you have marked is directly above the transmitter, near the inlet baffle. Also be aware that if the transmitter is turning in the tank, it is virtually impossible to determine its depth. If you need to know the lay of the line or the depth of the line, read on.
Determine the lay of the line
Before you can determine the depth of your transmitter, you must establish the lay of line.
Do not skip this step!
Step 4 or 5 feet away from the Peak Spot you marked. Hold the receiver level straight in front of you at waist height, as before, but don't wave it back and forth, just hold it straight. Adjust the sensitivity so that the meter reads about the middle of the scale. Walk in a circle around the peak Spot, keeping your inside shoulder pointing at the Peak Spot. This would be called a "pylon turn" like if you were flying an airplane. As you walk the circle slowly, watch the meter and listen to the sound. At two distinct points in the circle, the signal strength will suddenly drop, then come back up as you move further.
These are "null" points. Take the time to precisely determine these points and mark them (the point is directly below the center of the rod). You will find that they are directly across the circle from each other, and describe a line that passes right through the peak area.

You have just identified the two"Crossing Nulls", and the line between them indicates the lay of the line is parallel to the axis of the transmitter, and we will assume for the moment that line is running straight through that point, along the line of the Crossing Nulls. If it takes a bend, you'll still have a good idea of where to look for it.
TROUBLESHOOTING
Two things to always check before you start a locate, and again if you have trouble:
Make sure the batteries in both your transmitter and receiver are working. If in any doubt, throw them out! A weak transmitter battery reduces its range, weak batteries in a receiver can make it act brain-damaged, as well as reducing the range.
Always test your transmitter and receiver above ground, for operation and range, before sending the transmitter down the line.
The signal from my transmitter suddenly quit. I was following it fine, then it disappeared.
Aside from checking batteries, 512Hz equipment will penetrate cast iron, but not steel, ductile iron or other metal.
A sudden loss of signal may also mean you have encountered a null, which is a normal part of locating. If the signal drop-off is at a particular spot, and the signal returns when you move a little further away than it is a null.
My transmitter and receiver seem to work, but I can't get further than about 3 feet away before the signal dies.
A big reduction in range often means a broken antenna on the receiver. It won't look broken, but even a hairline crack in the ferrite core inside the antenna tube can destroy its sensitivity.
It's easy for us to fix, but you have to send it in. A word of advice: never use the antenna rod for prying or digging or anything but locating. A hard case is a good investment for preventing antenna damage.
My system doesn't seem to be working, but I don't know how to tell if the problem is the transmitter or the receiver.
One obvious thing to try is a different receiver, or a different transmitter, but this is often not an available option if you don't own a lot of equipment. Replace the batteries in both before you go further.
An Ardy flushable transmitter can be tested by holding it near an AM radio tuned to a dead spot (no station) on the dial. If the transmitter is working, you'll hear its raspy "beep-beep" from the radio.
A receiver can be tested in a rudimentary way by turning it up and holding it near sources of electronic radiation-like a computer, a cell phone, a dimmer switch. You should hear some noise. If it remains silent, the receiver is probably malfunctioning.
We'll play a 512Hz tone over the phone, which you hold up to the receiver's antenna. If the receiver is working, the signal strength shown on the receiver will be strong. Please note that this test cannot be done with a cell phone, it must be an indoor land-line phone. Sadly, there is no phone test possible for the receiver.
NEED HELP? CONTACT US!
Have product questions? Need technical support? Please feel free to contact us:
CustomerService@vevor.com
EUREP GmbH
Unterlettenweg 1a,
85051 Ingolstadt, Germany
Eurep Uk Ltd
Unit 2264, 100 Ock Street, Abingdon
Oxfordshire England Ox14 5dh
EU Importer: WAITCHX
Address: 250 bis boulevard Saint-Germain 75007 Paris
UK Importer: FREE MOOD LTD
Address: 2 Holywell Lane, London, England, EC2A 3ET
Manufacturer: Shenzhen Woshijie Electronic Technology Co. , LTD
Add: 5Floor, B2B 501 Building Yingzhan Industry Park, Longtian Community, Pingshan District, Shenzhen, China
Documents / ResourcesDownload manual
Here you can download full pdf version of manual, it may contain additional safety instructions, warranty information, FCC rules, etc.
Advertisement


Need help?
Do you have a question about the WP9600FTR and is the answer not in the manual?
Questions and answers