
Related Manuals for ETC echoflex WTC


Summary of Contents for ETC echoflex WTC
- Page 1 Wireless TimeClock WTC Configuration Guide Version 2.1.0 Part Number: 8188M1430-2.1.0 Rev A Released: 2024-02...
- Page 2 To view a list of Echoflex trademarks and patents, go to echoflexsolutions.com/ip. All other trademarks, both marked and not marked, are the property of their respective owners. For a complete list of all third-party licenses that are fully incor- porated herein to the extent required by each third-party license terms and conditions, please visit etcconnect.com/licenses.
-
Page 3: Table Of Contents
Table of Contents Overview Features Document Conventions Help from Technical Services Technical Services Department Installation Prepare Accessories Connect the Wiring Install the Station Attach the Faceplate Replace the Battery User Interface Keypad Navigation Home Screen Getting Started Definitions Organize Wireless TimeClock Configuration Guide... - Page 4 Link and Configure About Events Event Actions Stage an Event Manual Override Temporary Configuration Configuration Parameter Main Menu Schedule an Event Define a Scene Action Define an OFF Action Define an ON to Level Action Define a Mask Action Define a Temp Config Action TimeClock Settings Current Time Time Style...
- Page 5 Holiday Shut-Off Duration Link or Unlink System Restore Defaults Reboot Show Seconds About Hold Options Timed Hold Indefinite Hold Recall Preset Record of Numbered Elements Configured Events 1 to 50 Configured Groups 1 to 24 Configured Scenes 1 to 15 Menu Flow Examples Compliance FCC Compliance...
- Page 6 Wireless TimeClock Configuration Guide...
-
Page 7: Overview
Overview The Wireless TimeClock (WTC) provides effortless time-based control for your Echoflex solution. Its comprehensive event scheduling cap- abilities, powerful grouping features, and mask- ing logic maximize energy efficiency to meet Title 24, IECC, and ASHRAE-90.1 energy requirements. The six-button user interface and large back-lit display allow for simple setup and operation. -
Page 8: Document Conventions
Document Conventions Configuration parameters are emphasized in italics. Switch actions (ON/OFF) and relay events (lights ON/OFF) are written in ALL CAPS. Button names appear in [Brackets] and key terms in the interface appear in Bold. This guide uses the following conventions to draw your attention to import- ant information. -
Page 9: Installation
Installation Note: Installation must follow all national and local codes for elec- trical equipment. Prepare To ensure optimal function, consider the installation environment and the following guidelines: • Indoor use only. Operating temperature 0°C to 40°C (32°F to 104°F), 5%–95% relative humidity (non-condensing). •... -
Page 10: Connect The Wiring
Connect the Wiring The WTC ships with a 24 V power terminal strip with wire pigtail, spacers, and all required screws and connectors for the installation. 24 V power pigtail receptacle RP-SMA connector Jumper setting port for external for antenna antenna Internal whip antenna... -
Page 11: Install The Station
Install the Station Receptacle spacers are provided to help align the station flush against the wall in flush-mount applications. The spacers are not required when installing the station into a surface-mount electrical box. Faceplate hooks Spacers Spacers 1. Insert the station and the connected wiring in the electrical box. 2. -
Page 12: Replace The Battery
Replace the Battery The CR2032 battery is only used to maintain time in case of a power out- age. Estimated battery life is up to 10 years, depending on usage. To replace the battery: 1. Remove the faceplate and unscrew the station from the electrical box to access the back cover. -
Page 13: Home Screen
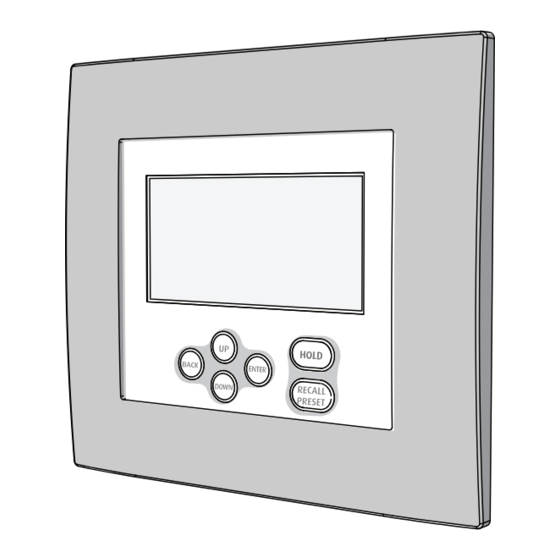
Use the [Up] or [Down] buttons to scroll through menu levels and options. Use the [Enter] button to make a menu selec- tion or to set a configuration parameter. Press [Back] to exit a menu or cancel a change without saving. Home Screen The Home Screen displays the date and time and system messages, such as active Holds. -
Page 14: Definitions
Definitions Scene – a lighting scenario that describes the overall lighting set in a space. A scene may require lighting fixtures to be ON at different intensity levels, OFF, or color temperature values to be set. A space may have several dif- ferent scenes. -
Page 15: Link And Configure
Note: Consider recording the assignments that you create for each numbered element. See Record of Numbered Elements on page 24. Link and Configure The WTC must be linked to the target lighting controllers to create lighting effects using scheduled events and scenes. Recommended steps, if the WTC is not pre-commissioned: 1. -
Page 16: Stage An Event
Mask - defines an event where controllers in a group ignore input from a type of transmitter. For example, a Mask will ensure that vacancy detected by an occupancy sensor does not turn the lights OFF during normal office hours. Temp Config - defines a temporary configuration for a designated group of controllers and channel(s). -
Page 17: Configuration Parameter
Configuration Parameter The Configuration Parameter number specifies which controller setting is to be temporarily altered. The table below describes the defined Config Param numbers. Config Setting Description Value Description Param Partial-ON Enable Yes or No Partial-ON Level Percentage: 0 to 100% Partial-OFF Enable Yes or No Percentage: 0 to 100%... -
Page 18: Main Menu
Main Menu The Main Menu provides access to set up and schedule events, settings, and link controllers. Press [Up], [Down], or [Enter] to wake up and navigate the Main Menu screen. To navigate the menu options, press [Up] or [Down] to scroll and press [Enter] to make a selection. -
Page 19: Define An Off Action
8. Select Next Event and enter an Event Number from 1–50, if you want to create a compound event. Define an OFF Action Schedule Event 1. Press [Enter] to select OFF as the event Event Number: Action. Action: Group Number: 2. -
Page 20: Define A Mask Action
• None, Every day, Weekdays, Weekends, or a day of the week. Select None if the event is going to be used in a compound event. If not None, define the setting for When and Time or Offset. 5. Select a reference time of day for When. •... -
Page 21: Define A Temp Config Action
7. Set a Time or an Offset, depending on the When option you selected. • If Time of Day was selected, specify the Time in hours and minutes 00h:00m (am or pm). • If an astronomical setting was selected, specify the Offset hours and minutes from the astronomical setting. - Page 22 • None, Every Day, Weekdays, Weekends, or a day of the week. Select None if the event is going to be used in a compound event. If not None, define the setting for When and Time or Offset. 8. Select a reference for When. •...
-
Page 23: Timeclock Settings
9. Set a Time or an Offset, depending on the When option you selected. • If Time of Day was selected, specify the Time in hours and minutes 00h:00m (am or pm). • If an astronomical setting was selected, specify the Offset hours and minutes from the astronomical setting. -
Page 24: Time Zone
Time Zone For accurate real-time and astronomical events, the WTC must be set to reflect your current time zone. Select the time zone based on hours offset from Greenwich Mean Time (GMT). See greenwichmeantime.com for a com- plete listing of GMT time zones. 1. -
Page 25: Manual Dst Dates
Manual DST Dates DST Start Date Set custom or manual Daylight Saving Time dates Month:: March as needed. Day of week: Sunday Occurence: Second 1. Select Manual DST Dates from the DST End Date Month: November TimeClock Settings menu, and press [Enter] Day of week: Sunday to select. -
Page 26: Flick Warn
Flick Warn Flick Warn is a feature that provides visual warning to occupants in a space when the next scheduled event is set to turn the lights OFF. See Define an OFF Action on page 13. When enabled, the lights flick OFF and ON once when the OFF action is pending, and stay ON for the duration of the con- troller’s configured Flick Warn timer (default 60 seconds). -
Page 27: Holiday Shut-Off Duration
Holiday Shut-Off Duration Set the Holiday Shut-Off duration, from one to seven days. The default shut-off duration is one day. 1. Select Start Holiday Shut-Off from the Holiday Shut-Off menu and press [Enter]. 2. Press [Down] to focus on Shut-Off for and press [Enter] to modify. 3. -
Page 28: Hold Options
1. Select Restore Defaults from the System menu, and press [Enter]. 2. Press [Up] or [Down] to scroll Pre-commissioned or Factory, and press [Enter] to select. 3. Press [Up] or [Down] to scroll Yes or No to confirm, and press [Enter] to select. -
Page 29: Timed Hold
Timed Hold A Timed Hold suspends all scheduled events for a configurable period of time. A countdown of the Time Remaining displays on the Home Screen. The default Timed Hold duration is two hours (120 min). See Timed Hold on page 19 to modify the Timed Hold duration to a value between 10 and 960 minutes. -
Page 30: Record Of Numbered Elements
Record of Numbered Elements Use the following tables to record the configured settings for each numbered element. Consider posting or sharing the information to inform users who need to know the settings. Configured Events 1 to 50 Number Description Number Description Event 1 Event 26... -
Page 31: Configured Groups 1 To 24
Configured Groups 1 to 24 Number Description Number Description Group 1 Group 13 Group 2 Group 14 Group 3 Group 15 Group 4 Group 16 Group 5 Group 17 Group 6 Group 18 Group 7 Group 19 Group 8 Group 20 Group 9 Group 21 Group 10... -
Page 32: Menu Flow Examples
Menu Flow Examples Main Menu Wireless TimeClock Configuration Guide... - Page 33 Manual DST Dates Wireless TimeClock Configuration Guide...
- Page 34 Status Messages - Holds v2.1.0 Wireless TimeClock Configuration Guide...
-
Page 35: Compliance
Compliance For current and complete compliance information, see the Echoflex Wireless TimeClock datasheet at echoflexsolutions.com. FCC Compliance Echoflex Wireless TimeClock (For any FCC matters): Echoflex Solutions, Inc. 3031 Pleasant View Road Middleton, WI 53562 +1 (608) 831-4116 echoflexsolutions.com This device complies with Part 15 of the FCC Rules. Operation is subject to the following two conditions: (1) this device may not cause harmful interference, and (2) this device must accept any interference received;... - Page 36 Corporate Headquarters n Middleton, WI, USA | +1 608 831 4116 © 2024 Echoflex Solutions, Inc. | Trademark and patent info: echoflexsolutions.com/ip echoflexsolutions.com | Email info@echoflexsolutions.com | Support service@echoflexsolutions.com Third-party license agreement info: etcconnect.com/licenses | Product information and specifications subject to change. Echoflex intends this document to be provided in its entirety. 8188M1430-2.1.0 Rev A Released 2024-02...
Need help?
Do you have a question about the echoflex WTC and is the answer not in the manual?
Questions and answers