Advertisement
Quick Links
Advertisement

Subscribe to Our Youtube Channel
Related Manuals for Kogan KASTMXAIN1A


Summary of Contents for Kogan KASTMXAIN1A
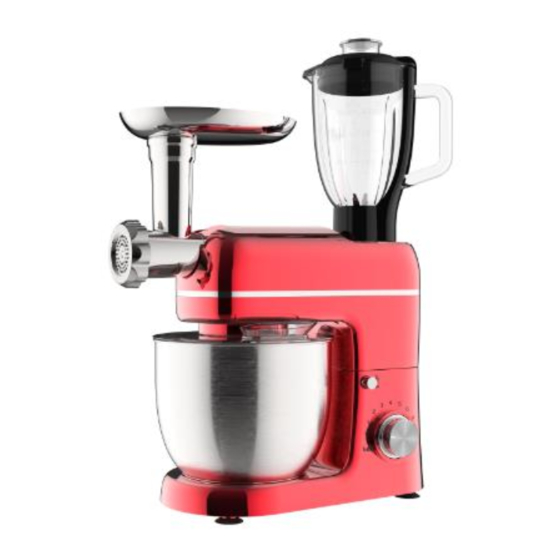
- Page 1 ALL IN ONE STAND MIXER KASTMXAIN1A...
-
Page 2: Table Of Contents
Safety & Warnings Overview Operation Cleaning & Care Specifications Notes... -
Page 3: Safety & Warnings
• Always inspect the appliance, power cord, and power plug for damage before use. If the supply cord is damaged, cease use immediately and contact help.Kogan.com for support. • It is recommended to protect the appliance with a fault current protective device (RCD with a release current up to 30mA). - Page 4 • Exercise caution when adding hot liquids to the food processor or blender, as they may be forcefully expelled due to rapid steaming. • Do not use the mixing, mincing, blending functions, sausage maker, noodle maker, and shredder maker simultaneously. Use only one function at a time. CAUTION:...
-
Page 5: Overview
OVERVIEW Accessories Bowl (3650ml max.) Whisk Beater Dough hook... - Page 6 Bowl lid Blender jar Jar lid Measuring cup Silicone ring Blade unit Mincing tube Hopper plate Food pusher Lock ring Sieve Cutting blade Feed screw Cutter housing Vegetable pusher Vegetable blade (x4) Pasta extruder (x3) Sausage separator plate Sausage casing tube...
-
Page 7: Operation
OPERATION Before First Use • Before using the appliance for the first time, read this user guide and ensure you are familiar with the assembly, operation and cleaning and care. • Wash all removable parts in warm water with a mild detergent. Ensure all parts are completely dry before assembly and operation. - Page 8 Note: When handling dense dough types, ensure that the appliance operates for no more than 10 minutes consecutively. After this period, allow the mixer to cool to room temperature. Setting the Speed • Plug the appliance into an electrical outlet and turn it on. It is advised to initiate operation at the lowest speed and gradually increase the speed.
- Page 9 Using the Mixer Accessories Bowl (3650ml) Whisk Beater Dough hook • Begin by placing all liquid ingredients into the bowl and then add the dry ingredients. Always remain near the kitchen machine during use. Add ingredients close to the sides of the bowl, avoiding direct placement into the rotating tool.
- Page 10 The blender can be used for pureeing very finely and for blending. It can be used to make dishes such as soups, sauces, milkshakes, baby food, vegetables, batters, purees, etc. If necessary, cut solid ingredients into smaller pieces before placing them in the blender. Assembling the Blender 2 Jar lid 3 Measuring cup...
- Page 11 Ensure that the appliance is switched off (selector is in the 0 position). Remove the rear cover, place the jar assembly onto the motor base and press down then rotate clockwise it until is securely in place. Rear cover Motor base Using the Blender Place the ingredients you wish to process into the Blender jar.
- Page 12 • • • • • • Tips: • To achieve optimal results when pureeing solid ingredients, place small portions into the glass jar one by one instead of adding a large quantity all at once. • When processing solid ingredients, cut them into small pieces (2-3cm) first. The maximum quantity of carrots should not exceed 400g.
- Page 13 Mincing Function The meat mincer attachment is designed for finely mincing meat and other ingredients. It is suitable for preparing dishes like ground meat, sausages, burgers, and more. Cut the meat or other solid ingredients into smaller pieces before feeding them into the mincer for optimal results.
- Page 14 Remove the front cover and position the mincer into the multi-function head by turning it anticlockwise in the vertical position. Position the Hopper plate (2) on the upright portion of the mincer housing. The appliance is now ready for mincing meat. Front cover Using the Food Mincer Cut the meat into approximately 2cm cubes (it is recommended to use sinewless,...
- Page 15 Sausage Function This attachment is used for creating various sausages. Assembling the Sausage Maker 2 Hopper plate 3 Feed screw 4 Food pusher 1 Mincing tube 5 Lock ring 6 Sausage 7 Sausage casing separator plate tube Insert the Feed screw (3) into the Mincing tube (1), putting the plastic end in first. Attach Sausage separator plate (6) and the Sausage casing tube (7) onto the Feed screw.
- Page 16 Remove the front cover and position the mincer into the multi-function head by turning it anticlockwise in the vertical position. Position the Hopper plate (2) on the upright portion of the mincer housing. The appliance is now ready for mincing meat. Using the Sausage Maker Place the ingredients in the tray, ensuring that only the pusher is used to gently guide the meat into the cutter housing.
- Page 17 Pasta/Noodle Maker The pasta maker attachment is crafted for creating fresh pasta and various other dough- based recipes. Before use, it is recommended to divide the dough into manageable portions, ensuring an optimal pasta-making experience. Assembling the Sausage Maker 2 Hopper plate 3 Feed screw 4 Food pusher 1 Mincing tube...
- Page 18 Detach the front cover and insert the pasta maker into the multi-function head by rotating it anticlockwise in the vertical position. Place the Hopper plate (2) on the upright section of the pasta maker housing. The appliance is now ready for crafting fresh pasta. Front cover Using the Pasta Maker Pass the prepared pasta mixture through the pasta maker.
- Page 19 This attachment is designed for precision and efficiency, allowing you to effortlessly prepare vegetables of different textures and sizes. Assembling the 1 Cutter housing 2 Vegetable pusher 3 Vegetable blade (x4) Place the Vegetable blade (3) of your choice (fine, chip, coarse, or section) into the Cutter housing (1).
- Page 20 Remove the front cover and insert the vegetable cutter into the multi-function head by rotating it anticlockwise in the vertical position. The appliance is now prepared for effortlessly slicing and dicing vegetables. Front cover Using the Vegetable Cutter Pass the prepared vegetable through the cutter housing. Using the Vegetable pusher (2) to gently guide the vegetable into the cutter housing.
- Page 21 Mixing/Knead Dough Utilize the dough hook for optimal results. A flour-to-water ratio of 5:3 is recommended. Begin mixing at speed 1 for 30 seconds, then transition to speed 2 for an additional 30 seconds, followed by speed 3 for approximately 3 minutes. Exercise caution not to exceed the maximum quantity when filling the mixing bowl.
- Page 22 Whipped Cream Pour cold cream into a cooled bowl. Put the bowl into the bowl bracket and whip. Avoid splashing by gradually increasing the speed to the wanted rate. Notes: Cream is whipped fast, so keep an eye during whipping. Amount Speed 1 cup...
-
Page 23: Cleaning & Care
CLEANING & CARE • • • Main Unit • Never immerse the main unit in water or other liquids. • Wipe the main unit and the mixer head with a damp cloth. Do not use scouring powder or other abrasive detergents which may scratch or dull the surface. •... -
Page 24: Specifications
SPECIFICATIONS Voltage 220-240V AC Power 1300W Speed Settings Pulse Function Kneader KB 10min Beater KB 10min Egg Beater KB 10min Blender KB 3min Grinder KB 10min Shredder KB 15min Sausage Maker KB 15min Noodle Maker KB 15min Ice Cream Maker KB 30min... -
Page 25: Notes
NOTES... - Page 28 Need more information?
Need help?
Do you have a question about the KASTMXAIN1A and is the answer not in the manual?
Questions and answers