Advertisement
Quick Links
Advertisement

Related Manuals for Alltion AM-6000


Summary of Contents for Alltion AM-6000
- Page 1 ALLTION GUANGXI INSTRUMENT Co., Ltd. Version:A0...
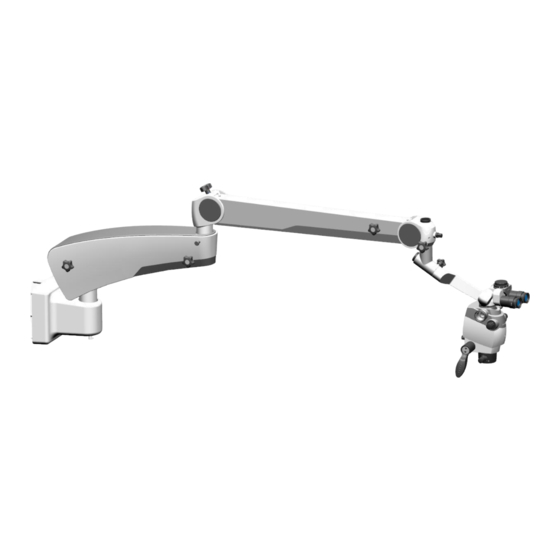
- Page 2 CONTENTS 120°CONNECTING ARM SIZE OF THE DEVICE AND HEAD ASSEMBLING INSTALLATION BINOCULAR HEAD AND REQUIREMENTS HAND GRIP ASSEMBLING LOW POSITION WALL POWER AND HDMI MOUNT ASSEMBLING CABLE PLUG-IN CROSSING ARM ASSEMBLING...
- Page 3 AM-6000 Low Position Wall Mount Installation Tutorial SIZE OF THE DEVICE A L LT I O N G U A N G X I I N S T R U M E N T C O LT D...
- Page 4 AM-6000 Low Position Wall Mount Installation Tutorial INSTALL ATION REQUIREMENTS 1, The customer selects the appropriate location for installation: (1) The wall should be as flat as possible, if the inclination angle is too large, which will affect the use effect;...
- Page 5 AM-6000 Low Position Wall Mount Installation Tutorial INSTALL ATION ORIENTATION REFERENCE Wall A L LT I O N G U A N G X I I N S T R U M E N T C O LT D...
- Page 6 AM-6000 Low Position Wall Mount Installation Tutorial INSTALL ATION ORIENTATION REFERENCE Microscope Installation Position Lay the dental chair flat, and the distance from the center of the head to the center of the wall- mounted bracket is about 1.3-1.4 meters.
- Page 7 AM-6000 Low Position Wall Mount Installation Tutorial LOW POSITION WALL MOUNT INSTALL ATION REFERENCE (1)Align all the expansion bolts first, put the mounting holes of the wall mount bracket through the bolts, and then lock the expansion bolts (note: the positioning direction is at below).
- Page 8 AM-6000 Low Position Wall Mount Installation Tutorial LOW POSITION WALL MOUNT INSTALL ATION REFERENCE (3) Align the positioning and assemble the column assembly to the bracket. (4)Install the cover plate assembly on the column assembly, the power plug passes through the column assembly, and the cover plate is locked with screws.
- Page 9 AM-6000 Low Position Wall Mount Installation Tutorial CROSSING ARM ASSEMBLING (1) Lock all the knobs, open the cross-arm bracket cover, and lift the cross-arm bracket to a certain distance; then pass the power cord and HD cable through the cross-arm bracket, and assemble the cross-arm bracket to the wall-mounted bracket.
- Page 10 AM-6000 Low Position Wall Mount Installation Tutorial 120°CONNECTING ARM AND HEAD ASSEMBLING retaining ring Limit pin Unfold the second crossing arm and move it to its lowest limit screw working position, and lock Use a flat-head screwdriver to Take off the retaining...
- Page 11 AM-6000 Low Position Wall Mount Installation Tutorial 120°CONNECTING ARM AND HEAD ASSEMBLING retaining ring The 120 degree Install the 120 Use a flat-head Tighten the connecting arm and degree connecting arm screwdriver to retaining ring head are installed into the front joint...
- Page 12 AM-6000 Low Position Wall Mount Installation Tutorial BINOCUL AR HEAD AND HAND GRIP ASSEMBLING Attach the handle Fit the binocular to the head onto the head and tighten the set screw A L LT I O N G U A N G X I I N S T R U M E N T C O LT D...
- Page 13 AM-6000 Low Position Wall Mount Installation Tutorial POWER AND HDMI CABLE PLUG-IN Connect the power cord and HDMI cable to the head Power cable and HDMI cable for the second wishbone Note: The red punctuation of the power cord should...
Need help?
Do you have a question about the AM-6000 and is the answer not in the manual?
Questions and answers