
Related Manuals for Alltion AM-2000


Summary of Contents for Alltion AM-2000
- Page 1 AM-2000 Surgical Microscope User's Manual (Please read the instruction carefully before using it) PA1805-UM01-EN Version:A4 2019-12-25 Alltion (Guangxi) Instrument Co., Ltd.
- Page 2 Alltion (Guangxi) Instrument Co., Ltd. Product Information: Name: Surgical Microscope Model:AM-2000 Production Date: See the instrument label for details Manufacturer: Alltion (Guangxi) Instrument Co., Ltd. Address: No. 10, 3rd Road , Wuzhou Industrial Park, Wuzhou, Guangxi, China E-mail: sales@alltion.com or sales@alltion-microscope.com...
-
Page 3: Table Of Contents
Alltion (Guangxi) Instrument Co., Ltd. Contents Safety Caution ................................1 Prompt Symbols ..............................1 Information Symbols .............................. 1 The meaning of other figures, symbols and contractions ................1 Structure and Composition ........................... 2 Range of Application .............................. 2 Contraindication ..............................2 Service Life ................................ - Page 4 Guidance and Statement from Manufacturer - Electromagnetic Immunity– for EQUIPMENT and SYSTEM that are not LIFE-SUPPORTING ..................... 39 Recommended separation distances between portable and mobile RF communications equipment and the AM-2000 ..............................40 Cleaning and Maintenance of the Instrument ....................41 Preventive maintenance and inspection ......................41 Clean the optical surface ............................
-
Page 5: Safety Caution
Results occurred after completion of related operations. The meaning of other figures, symbols and contractions Please refer to the User's Manual. Manufacturer PD Date of manufacture Authorized representative in the European Community CE label Power Switch No pushing AM-2000 User’s Manual | Safety Caution... -
Page 6: Structure And Composition
(including visual optical component, microscope body, objective lens and illuminating system). Range of Application The AM-2000 surgical microscope is a manual microscope for surgical microsurgery amplification, illumination, etc. It can assist you in microsurgery and fine examination in departments such as otolaryngology and dentistry. -
Page 7: Storage Environment
Please observe all symbols and labels of the instrument! The modification and repair of this instrument can only be performed by the ALLTION service personnel or others authorized by ALLTION. Do not place any container filled with liquid over the instrument. Confirm that no liquid can penetrate into the instrument. -
Page 8: Operating Requirements
Alltion (Guangxi) Instrument Co., Ltd. All wires and plugs work normally. The adopted power wires meet the design requirements of this instrument. Please do not place the equipment in a difficultly operation position. Operating requirements Please pay special attention to the PROMPT symbols on the instrument ( especially ... - Page 9 Alltion (Guangxi) Instrument Co., Ltd. AM-2000 User’s Manual | Safety Caution...
-
Page 10: Product Assembly
Optional Accessories List) Other installation modes are available Floor stand for option, please find the Optional Accessories List Chinese standard, USA standard and Power adapter Europe standard are available for option, subject to the order Product Assembly | AM-2000 User’s Manual... - Page 11 Alltion (Guangxi) Instrument Co., Ltd. AM-2000 User’s Manual | Product Assembly...
-
Page 12: Supporting Components
200mm to 300mm F200 objective lens F200 F250 objective lens F250 F300 objective lens F300 F350 objective lens F350 F400 objective lens F400 2:8 beam splitting, Beam splitter optional 5:5 beam splitting 10 30°Binocular Extender 30°angle Product Assembly | AM-2000 User’s Manual... - Page 13 Assistant Scope Connector 15 3-D Rotation Binocular Assistant Scope Connector 16 ALL-CAM2 1080P Full Function Camera 17 Fixed Stand Mount 18 Ceiling mount stand 19 Low-position wall mount stand 20 High-position wall mount stand AM-2000 User’s Manual | Product Assembly...
- Page 14 Alltion (Guangxi) Instrument Co., Ltd. Product Assembly | AM-2000 User’s Manual...
-
Page 15: Inspection Before Assembly
The product is the high precision instrument, please handle with care when taking it out, and make sure the components are put at the safe place. Before assembly, make sure the staffs have carefully read the User’s Manual and well know the assembly steps. AM-2000 User’s Manual | Product Assembly... -
Page 16: Installation Of Support System
Alltion (Guangxi) Instrument Co., Ltd. Installation of Support System Installation of Mobile Floor Stand Move the base (1) from the wood pallet, take away the plastic cover and the compression ring(3)firstly and put it aside; Put base (1) on the horizontal ground and lock four casters;... -
Page 17: Installation Of Fixed Floor Stand
M10 expansion bolt (4) in the installation hole, align the stand with the bolts, and tighten, assemble the decorative cover (5); Finish the installation of the fixed floor stand. AM-2000 User’s Manual | Product Assembly... -
Page 18: Installation Of Ceiling Mount
Alltion (Guangxi) Instrument Co., Ltd. Installation of Ceiling Mount The ceiling to assemble the ceiling mount must be made of concrete or material with higher hardness than concrete. Otherwise, it will be risk of falling down. Drill 6 holes in the ground with Φ14 driller,... -
Page 19: Installation Of Low-Position Wall Mount
Install the low-position wall mount (1) to the wall with hole by M10 expandable bolts (2), then tighten the nuts (3). 墙 Wall 壁 Finish the installation of the low-position wall mount. AM-2000 User’s Manual | Product Assembly... -
Page 20: High-Position Wall Mount
Alltion (Guangxi) Instrument Co., Ltd. High-Position Wall Mount The wall to install the high-position wall mount must be made of concrete or material with higher hardness than concrete. Otherwise, it will be risk of falling down. The wall to install the high-position wall mounted support shall be smooth enough, otherwise, it will cause the product to be tilted after installation. -
Page 21: Installation Of Cross Arm System
Once the cross arm bracket is installed in place, insert the power plug into the power connector (7) and fix the cable to the cable holder (8). Install the plastic cover (1) on the cross arm (3), finish installation. AM-2000 User’s Manual | Product Assembly... -
Page 22: Suspending Of Ceiling Mount
Alltion (Guangxi) Instrument Co., Ltd. Suspending of Ceiling Mount The suspending installation of first arm is applicable to ceiling mount System and high-position wall mount system. Because the first arm has certain weight and is long, please install by two operators together for safe installation. -
Page 23: Installation Of Objective Lens
M4 screws (3). Install the safety screws (2). Installation of Control handle Mount the control handle (3) into the microscope mount with two M4 screws (2). Installation of Decorative panel(1). AM-2000 User’s Manual | Product Assembly... -
Page 24: Installation Of Binocular Head Barrel
Alltion (Guangxi) Instrument Co., Ltd. Installation of Binocular Head Barrel Make sure that the locking screw (2) is completely loosened before installation; Align the binocular tube (1) at the positioning pin, and install it in the bayonet of microscope body (3);... -
Page 25: Wiring
Connect the attached power wire according to the following picture; If the specification of power cord plug does not match the local socket standard, please contact your local dealer or store for replacement. Network Power Supply AM-2000 User’s Manual | Product Assembly... -
Page 26: Installation Confirmation
Alltion (Guangxi) Instrument Co., Ltd. Installation Confirmation Check whether the threaded connection of all assembled positions have been tightened, judge whether the whole machine has completed installation; Loosen all locking knobs, check if the rotation and movement of all joints of the whole ... -
Page 27: Installation Of Supporting Components
For objective lens of other specifications, the installation methods are the same as “Large Objective Lens Installation”, as shown in Page 19. Installation of Other Parts For the installation methods of other accessory parts, please refers to the user manual of corresponding component. AM-2000 User’s Manual | Product Assembly... -
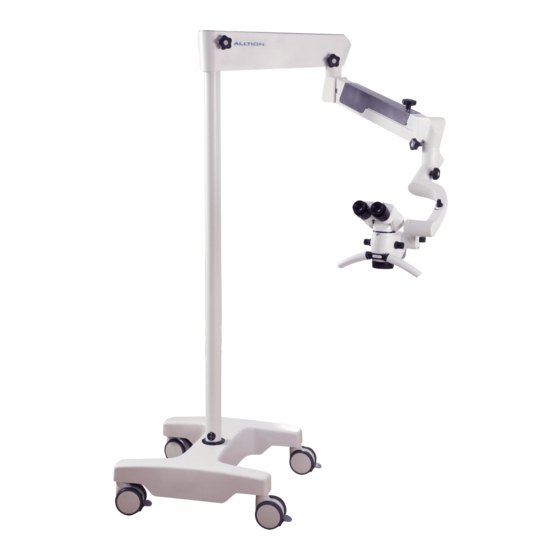
Page 28: Product Functions
Alltion (Guangxi) Instrument Co., Ltd. Product Functions Product Components Main body of microscope 180° binocular and eyepiece Objective lens 120° hanger bracket Cross arm bracket Mobile floor stand Fixed Stand Mount Low-position wall mount stand High-position wall mount stand 10 Ceiling mount stand | AM-2000 User’s Manual... -
Page 29: Main Body Lens Of Microscope
"" means small spot without color filter, “G” means green filter, “O” means orange filter. Optical zoom knob For manual adjustment of the optical magnification, and the numbers on the knob are magnification factors. AM-2000 User’s Manual | Product Functions... -
Page 30: 180°Binocular And Eyepiece
Alltion (Guangxi) Instrument Co., Ltd. 180°binocular and eyepiece Pupillary distance adjustment Rotate the binoculars with both hands, adjust the papillary to make two images through both of eyepieces into one. The number on the knob is the pupillary distance. Diopter adjustment The eyepieces provide diopter compensation at -6D and +6D. -
Page 31: Objective Lens
Alltion (Guangxi) Instrument Co., Ltd. Objective lens Focusing knob It is used for manually setting the image definition (focusing, working distance). AM-2000 User’s Manual | Product Functions... -
Page 32: 120°Hanger Bracket
Alltion (Guangxi) Instrument Co., Ltd. 120°Hanger bracket Friction adjustment knob for tilting motion (forwards/backwards) of the main lens of the microscope Used to adjust the friction of the pitching rotation of the main lens of the microscope (as indicated by the arrow on the left). -
Page 33: Cross Arm And Mobile Floor Stand\ Fixed Floor Stand\ Low-Position Wall Mount Stand
Power switch with green indicator It is used for starting and stopping the power supply of the instrument, when the instrument is started, the green indicator of the power switch turns on. Power interface Power supply interface. AM-2000 User’s Manual | Product Functions... - Page 34 Alltion (Guangxi) Instrument Co., Ltd. | AM-2000 User’s Manual Product Functions...
-
Page 35: Cross Arm And Ceiling Mount System/High-Position Wall Mount System
Power switch with green indicator It is used for starting and stopping the power supply of the instrument, when the instrument is started, the green indicator of the power switch turns on. Power interface Power supply interface. AM-2000 User’s Manual | Product Functions... - Page 36 Alltion (Guangxi) Instrument Co., Ltd. | AM-2000 User’s Manual Product Functions...
-
Page 37: Operation Of The Microscope
To terminate the operation of the equipment, please turn off the power switch or disconnect from the network power supply! Check if the bolts (1, 2, 3) have been locked; Check whether the objective lens (4) has been safely installed. AM-2000 User’s Manual | Operation of the Microscope... -
Page 38: Optical Adjustment Of Surgical Microscope
User with abnormal version and wearing glasses: adjust the diopter to 0; User with abnormal version and not wearing glasses: adjust the diopter till gaining clearest image. Finish optical adjustment. Operation of the Microscope | AM-2000 User’s Manual... -
Page 39: Performance Parameters
Alltion (Guangxi) Instrument Co., Ltd. Performance Parameters Basic dimension The basic dimensions of the whole machine and the motion range of the joint are shown in the following figure: AM-2000 User’s Manual | Performance Parameters... -
Page 40: Microscope Parameters
Electrical parameters Rated voltage DC12/3A (Adapter:Input:AC100-240V 50/60Hz,output:DC12V 3A) Input power 25-60VA Electrical safety IEC60601-1:2005 + A1:2012 standard IEC60601-1-2:2014 Lighting system LED bulb, life time is over 50,000 hours Noise ≤65dB Running mode Continuous running Performance Parameters | AM-2000 User’s Manual... -
Page 41: Electromagnetic Compatibility
Guidance and manufacturers declaration–electromagnetic emission The AM-2000 surgical microscope is intended for use in the electromagnetic environment specified below. The customer or the user of the AM-2000 surgical microscope should assure that it is used in such an environment. Complianc... -
Page 42: Guidance And Manufacturer's Declaration - Electromagnetic Immunity- For All Equipment And Systems
Guidance and manufacturer's declaration – electromagnetic immunity– for all EQUIPMENT and SYSTEMS The AM-2000 surgical microscope is intended for use in the electromagnetic environment specified below. The customer or the user of the AM-2000 surgical microscope should assure that it is used in such an environment. IEC 60601... -
Page 43: System That Are Not Life-Supporting
RF transmitters, an electromagnetic site survey should be considered. If the measured field strength in the location in which the AM-2000 is used exceeds the applicable RF compliance level above, The AM-2000 should be observed to verify normal operation. -
Page 44: And The Am-2000
AM-2000 The AM-2000 surgical microscope is intended for use in an electromagnetic environment in which radiated RF disturbances are controlled. The customer or the user of the AM-2000 surgical microscope can help prevent electromagnetic interference by maintaining a minimum... -
Page 45: Cleaning And Maintenance Of The Instrument
Please don't throw it at will. If there is special garbage disposal facility near you, use it as much as possible. The scrapped instruments shall be handled according to the provisions of local environmental protection laws for avoiding polluting the environment. AM-2000 User’s Manual | Cleaning and Maintenance of the Instrument... -
Page 46: Maintenance Related Information
The friction adjustment knob is See Page knob, and moderately adjust running stiffly adjusted too tight. 28-30 the friction. Optical Contact the local dealer or magnification Mechanical failure of the instrument after-sales service agent switching failure Maintenance related information | AM-2000 User’s Manual...
Need help?
Do you have a question about the AM-2000 and is the answer not in the manual?
Questions and answers