
Related Manuals for King Canada NOVA ECLIPSE


Summary of Contents for King Canada NOVA ECLIPSE
- Page 1 7” x 12” NOVA DVR METAL CUTTING BANDSAW MODEL: 59001 INSTRUCTION MANUAL COPYRIGHT © 2023 ALL RIGHTS RESERVED BY KING CANADA INC.
-
Page 2: Warranty Service Information
King Canada service centre. Contact your retailer or visit our web site at www.kingcanada.com for an updated listing of our authorized service centres. In cooperation with our authorized serviced centre, King Canada will either repair or replace the product if any part or parts covered under this warranty which examination proves to be defective in workmanship or material during the warranty period. -
Page 3: General Safety Rules
Keep you become tired or frustrated, leave it for a while and rest. work area well lighted. The NOVA ECLIPSE is intended for indoor 24. SECURE WORK. Use clamps or the vice to hold work when use only. -
Page 4: Electrical Information
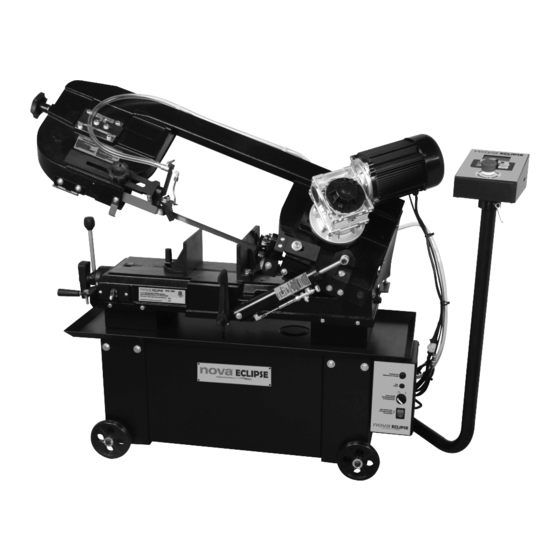
SPECIFICATIONS & ELECTRICAL INFORMATION NOVA ECLIPSE DVR SPECIFICATIONS Cutting capacity at 90° Rect. 7” x 12” / Diam. 7” Cutting capacity at 45° Rect. 4 -1/2” x 5” / Diam. 5” Speeds 80 - 340 FPM Blade 93” x 3/4” x 0.032”... - Page 5 GETTING TO KNOW YOUR NOVA ECLIPSE DVR BANDSAW Getting to know your NOVA Eclipse Bandsaw 1. Bandsaw base with wheels 14. Motor 2. Head limit switch 15. DVR control panel 3. Vise adjusting handle 16. LCD display 4. Vise tightening lever 17.
- Page 6 TRANSPORTATION & ASSEMBLY TRANSPORTATION This bandsaw weighs 295 lbs. It is recommended that this bandsaw be transported with the help of a lifting jack or jigger. Refer to Fig.3. ALWAYS KEEP PROPER FOOTING & BALANCE WHILE MOVING THIS BANDSAW. Only use a heavy duty fiber belt to lift machine. Bandsaw can be moved on floor using the included wheels.
- Page 7 NOVA ECLIPSE DVR FEATURES Nova Eclipse Bandsaw Features CONTROLLER USER GUIDE The Striatech integrated electrical drive system contains the Striatech motor with the Rotor Position Sensor (RPS), the drive control board and the Human-Machine Interface (HMI). The control board, RPS and HMI represent the control system of the drive. The Striatech motor is connected with the control board by six power wires and RPS cable (extensions included in package).
-
Page 8: Human Machine Interface (Hmi)
HUMAN MACHINE INTERFACE (HMI) Human Machine Interface Description The Human Machine Interface (HMI) provides a flexible choice of the drive parameters: Run/stop, motor speed, PI speed controller coefficients. The HMI contains 2-lines, 16-position LCD display and keyboard. The drive parameters can be set by decreasing/increasing values incrementally. Some parameter values can be stored in the EEPROM of the HMI. - Page 9 Pre-set speeds (F1 Non-ferrous, F2 Carbon Steel, F3 Stainless and F4 Tool Steel) The NOVA Eclipse comes equipped with several pre-set speeds, namely five pre-set speeds for four different materials. To select a profile, press the corresponding F key on the Input Controller until the desired profile appears. For example, if you wish to select the “Stainless Steel” option, simply press the F3 key until Stainless appears on the screen.
- Page 10 MAKING PROPER TOOTH SELECTION & BI-METAL SPEEDS AND FEEDS Making proper tooth selection continued..You need to consider: The width of the cut. That is, the distance in the cut that each tooth must travel from the point it enters the workpiece until it leaves the workpiece, and the shape of the workpiece.
- Page 11 BI-METAL SPEEDS AND FEEDS & ADJUSTMENTS Chip Inspection Blade Speed Material Alloy ASTM No. Ft/min M/min Chips are the best indicator of correct Stainless feed force. Monitor chip information Steel and adjust feed accordingly. 410, 502 Thin or powdered chips- Increase feed rate or reduce blade 440C speed.
- Page 12 ADJUSTMENTS Adjusting Blade Tension Proper blade tension is essential to long blade life, straight cuts, and efficient cutting. This bandsaw features a blade tension indicator to assist you with blade tensioning. Signs you do not have proper blade tension: 1. Blade stalls in the cut and slips on the wheels. 2.
- Page 13 ADJUSTMENTS Adjusting Feed Rate The speed at which the saw blade will cut through a workpiece is controlled by blade type, feed rate, and feed pressure. Note: If the coolant system is used during the cut, the feed rate can be increased by approximately 15%.
- Page 14 ADJUSTMENTS & OPERATION Installing and adjusting work stop To install work stop: 1. Insert work stop shaft (A) Fig.16 into opening and secure it by tightening hex. bolt (B) under the table. 2. Slide work stop (C) onto the shaft and tighten thumb screw (D) to secure it into position.
-
Page 15: Operation
OPERATION Operation tips The following tips will help you safely and effectively operate your bandsaw, and help you get the maximum life out of your saw blades. Tips for horizontal cutting: 1. Use work stop to quickly and accurately cut multiple pieces of stock to same length. 2. -
Page 16: Maintenance, Lubrication
MAINTENANCE, LUBRICATION & TROUBLESHOOTING CAUTION: MAKE SURE THE POWER CORD IS DISCONNECTED FROM THE POWER SOURCE BEFORE ATTEMPTING TO SERVICE, MAINTAIN OR LUBRICATE THIS BANDSAW. Cleaning Cleaning the bandsaw is relatively easy. Use a brush and a shop vacuum to remove chips and other debris from the machine. Keep the nonpainted surfaces rust-free with regular applications of a high-quality rust prevention coating. - Page 17 POSSIBLE CAUSE CORRECTIVE ACTION SYMPTOM 1. Blade guides worn. 1. Replace blade guides. Unusual wear on side/back of 2. Blade guide bearings not adjusted properly. 2. Adjust guide bearings per operator’s manual. blade. 3. Blade guide bearing bracket is loose. 3.Tighten guide bearing bracket.
- Page 18 ERROR CODES & FIRMWARE Error Codes Errors are indicated on the NOVA Eclipse Horizontal Bandsaw by the HMI screen displaying “Er” followed by the error code. Example: The motor is stopped when an error is displayed on the screen. The table below shows the possible error codes which can be displayed.
-
Page 19: Parts Diagram & Parts Lists
ELECTRICAL DIAGRAM PARTS DIAGRAM & PARTS LISTS Refer to the Parts section of the King Canada web site for the most updated parts diagram and parts list.
Need help?
Do you have a question about the NOVA ECLIPSE and is the answer not in the manual?
Questions and answers