Table of Contents
Advertisement
Quick Links
1
2
3
23/08/23
03/11/23
16/11/23
LOUISE
LOUISE
LOUISE
EN ORIGINAL INSTRUCTIONS
IMPORTANT - These instructions are for your safety.
Please read through them thoroughly prior to handling
the product and retain them for future reference.
V11123_5059340880747_MAND1_2223
5059340880747_MNL_EN_V03.indd 1
5059340880747_MNL_EN_V03.indd 1
4
5
XX/XX/23
XX/XX/23
Impala Ref: PRJ28835
NAME
NAME
EAN: 5059340880747
Page Size: A5
KNG:
KNG-XXXX-0001
EN 1800W 36cm
Hover lawnmower
MCB1018HVM
5059340880747
TTB1019HVM
5059340880778
16/11/2023 6:24 PM
16/11/2023 6:24 PM
Advertisement
Table of Contents

Subscribe to Our Youtube Channel
Related Manuals for Kingfisher MCB1018HVM


Summary of Contents for Kingfisher MCB1018HVM
- Page 1 LOUISE NAME NAME KNG: KNG-XXXX-0001 EN 1800W 36cm Hover lawnmower MCB1018HVM EN ORIGINAL INSTRUCTIONS 5059340880747 IMPORTANT - These instructions are for your safety. Please read through them thoroughly prior to handling the product and retain them for future reference. TTB1019HVM...
- Page 2 EN Parts A. x1 B. x1 C. x2 D. x1 E. x3 F. x3 G. x2 EN You will need (items not supplied) • Cross-head screwdriver • Suitable personal protective equipment EN Contents Machine description Safety Technical specification Before you start Functions &...
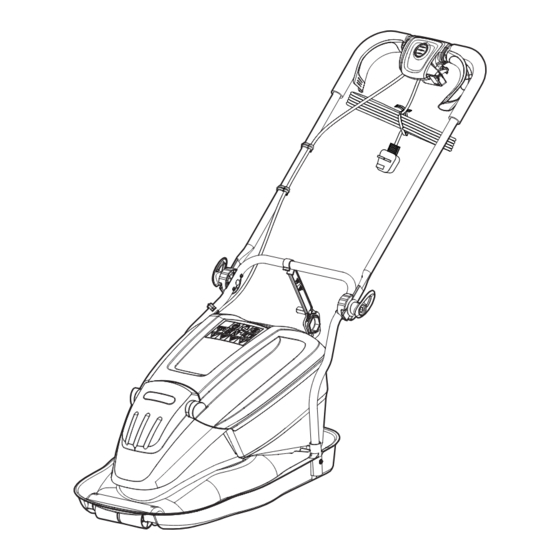
- Page 3 EN Machine description 1. Start lever (x2) 13. Collection chute 2. Safety lock-off button 14. Grass catcher 3. Grip handle 15. Screw (x2) 4. Cord strain-relief hook 16. Cutting deck 5. Power cord with plug 17. Cutting blade 6. Upper handle 18.
-
Page 4: Safety Warnings
EN Safety IMPORTANT READ CAREFULLY BEFORE USE. KEEP FOR FUTURE REFERENCE. Safety warnings 1. This product is not intended for use by persons (including children) with reduced physical, sensory or mental capabilities, or lack of experience and knowledge, unless they have been given supervision or instruction concerning use of the product by a person responsible for their safety. -
Page 5: Operation
2. While mowing, always wear substantial footwear and long trousers. Do not operate the product when barefoot or wearing open sandals. Avoid wearing clothing that is loose fitting or that has hanging cords or ties. 3. Thoroughly inspect the area where the product is to be used and remove all objects which can be thrown by the product. -
Page 6: Maintenance And Storage
12. Do not tilt the machine when switching on the motor, except if the machine has to be tilted for starting. In this case, do not tilt it more than absolutely necessary and lift only the part, which is away from the operator. 13. -
Page 7: Vibration And Noise Reduction
8. When servicing the blades be aware that, even though the power source is switched off, the blades can still be moved. 9. Replace worn or damaged parts for safety. Use only genuine replacement parts and accessories. 10. Wear strong work gloves when removing and reassembling the cutting blade. -
Page 8: Residual Risks
Emergency Familiarise yourself with the use of this machine by means of this instruction manual. Memorise the safety directions and follow them to the letter. This will help to prevent risks and hazards. • Always be alert when using this machine, so that you can recognise and handle risks early. - Page 9 Symbols On the machine, the rating label and within these instructions you will find among others the following symbols and abbreviations. Familiarise yourself with them to reduce hazards like personal injuries and damage to property. Watt Litres Volt Grams Alternating current Centimetre Frequency Millimetre...
- Page 10 Wear protective, slip-resistant footwear. Wear tight-fitted protective clothes. Switch the product off and disconnect the plug from the power supply before assembly, cleaning, adjustments, maintenance, storage and transportation. Mow across the face of slopes, never up and down. Inspect the area where the product is to be used and remove all objects which can be thrown by the product.
- Page 11 The machine complies with the applicable European directives and an evaluation method of conformity for these directives was done. Rating Label Explanation MCB1018HVM = Model number TTB1019HVM = Model number MCB = Mac Allister TTB = Titan 1018 = Sequential code...
- Page 12 The declared vibration value has been measured in accordance with a standard test method (according to EN 60335-2-77) and may be used for comparing one product with another. The declared vibration value may also be used in a preliminary assessment of exposure. WARNING! Depending on the actual use of the machine the vibration values can differ from the declared total! Adopt proper measures to protect...
-
Page 13: Lower Handle Assembly
NOTE: Take care of small parts that are removed during assembly or when making adjustments. Keep them secure to avoid loss. 01 Lower handle assembly 1. Insert the ends of the lower handle (7) into the slots on the cutting deck (16) (Fig. 1). 2. -
Page 14: Intended Use
EN Functions & Settings Intended use The 1800 W 36 cm hover lawnmower MCB1018HVM / TTB1019HVM is designated with a rated voltage of 220-240 V~. The machine is intended for mowing grass only in lawns and grassed areas in domestic and hobby gardens. - Page 15 Safety devices and operating controls DANGER! Risk of injury! The machine must only be put into operation if no faults are found. If the safety lock-off button (2) or start lever (1) is defective, do not use the machine and have it repaired or replaced by a qualified professional. WARNING! Do not make any adjustments to the safety devices or operating controls.
-
Page 16: Grass Catcher
03 Cord strain-relief hook The cord strain-relief hook (4) secures the power cord (5), preventing tangles, snags, or accidental disconnections while mowing. Loop the power cord (5) through this hook after plugging it in to enhance safety and cord management (Fig. 4). Fig. -
Page 17: Setting The Cutting Height
Setting the cutting height WARNING! Switch off and unplug the machine from the mains, and wait for the cutting blade (17) to come to a complete stop before adjusting the cutting height. WARNING! Always handle the cutting blade (17) with care, sharp edges could cause injury. - Page 18 Fig. 6 4. Refit the cutting blade (17). The cutting blade (17) is reversible and can be fitted either way up. 5. Hold the cutting blade (17) firmly, and securely tighten the blade bolt to a torque of 10 N•m (Fig. 7). Fig.
- Page 19 Selecting the collect/mulch mode NOTE: When dealing with tall grass growth, select the mulch mode to trim the long grass without collecting it. After the initial cut, perform a second pass using the machine in collect mode. This will result in a neat finish and effective grass collection.
- Page 20 Mowing WARNING! Keep the extension cord clear of the working area. Position the cord so that it will not get caught on other obstructions while the machine is in operation. WARNING! Release the start lever (1) to stop the machine when crossing any gravelled areas, debris such as stones can be thrown by a rotating blade.
-
Page 21: Mowing Tips
5. Once started, release the safety lock-off button (2). 6. Continue to hold the start lever (1) against the grip handle (3) as you mow. 7. To switch the machine off, release the start lever (1). WARNING! The cutting blade (17) keeps rotating for a few seconds after the machine has been switched off. -
Page 22: After Use
• When cutting thick grass, reduce your walking speed in order to allow for a more effective cut and a proper discharge of the grass clippings. • Set the lawn mower to the maximum cutting height when mowing on uneven ground or in tall growth. •... -
Page 23: General Cleaning
General cleaning NOTE: Do not use chemical, alkaline, abrasive or other aggressive detergents or disinfectants to clean this machine as they might be harmful to its surfaces. • Clean the machine with a dry cloth. Use a brush for areas that are hard to reach. •... -
Page 24: Maintenance
Maintenance Replace the cutting blade (17) after 50 hours of mowing or every 2 years, whichever comes first, regardless of its condition. If the cutting blade (17) is cracked or damaged, replace it with a new one. Never use a blade bolt if the insulated head is damaged, cracked, or missing. - Page 25 Repair This machine does not contain any parts that can be repaired by the consumer. Contact an authorised service centre or a similarly qualified person to have it checked and repaired. Storage • Clean the machine as described above. • Fold the upper handle (6) for storage (Fig.
-
Page 26: Troubleshooting
Troubleshooting Suspected malfunctions are often due to causes that the users can fix themselves. Therefore check the machine using this section. In most cases the problem can be solved quickly. WARNING! Only perform the steps described within these instructions! All further inspection, maintenance and repair work must be performed by an authorised service centre or a similarly qualified specialist if you cannot solve the problem yourself! - Page 27 EN Guarantee We take special care to select high quality materials and use manufacturing techniques that allow us to create products incorporating design and durability. This product has a manufacturer’s guarantee of 2 years against manufacturing defects, from the date of purchase (if bought in store) or date of delivery (if bought online), at no additional cost for normal (non-professional or commercial) household use.
-
Page 28: Availability Of Spare Parts
A better way to repair your tools Kingfisher takes special care in creating high-quality garden power tools that are designed to last. But if a fault develops with your garden power tool and you need to claim under the guarantee, the Customer Care and Technical Helpline can support with technical assistance or if required, arrange a free courier collection from your home, assess your garden power tool for fault, repair it, and return it. - Page 29 • MCB1018HVM/ TTB1019HVM • Serial number range 000001 - 999999 Name and address of the manufacturer or his authorised representative: Kingfisher International Products Limited 1 Paddington Square London W2 1GG United Kingdom This declaration of conformity is issued under the sole responsibility of the manufacturer.
- Page 30 Authorised signatory and technical file holder: Kingfisher International Products Limited 1 Paddington Square London W2 1GG, United Kingdom David Awe Group Quality Director On 15/11/2023 5059340880747_MNL_EN_V03.indd 30 5059340880747_MNL_EN_V03.indd 30 16/11/2023 6:25 PM 16/11/2023 6:25 PM...
- Page 31 Nazwa i adres producenta lub jego upoważnionego przedstawiciela: Denumirea și adresa producătorului sau a reprezentantului său autorizat: Nombre y dirección del fabricante o de su representante autorizado: Nome e endereço do fabricante ou do respetivo mandatário: Kingfisher International Products B.V., Rapenburgerstraat 175E, 1011 VM Amsterdam, The Netherlands This declaration of conformity is issued under the sole responsibility of the manufacturer.
- Page 32 The object of the declaration described above is in conformity with the relevant Union harmonisation legislation: L’objet de la déclaration décrit ci-dessus est conforme à la législation d’harmonisation de l’Union applicable: Wymieniony powyżej przedmiot niniejszej deklaracji jest zgodny z odnośnymi wymaganiami unijnego prawodawstwa harmonizacyjnego: Obiectul declarației descris mai sus este în conformitate cu legislația relevantă...
- Page 33 References to the relevant harmonised standards used or references to the other technical specifications in relation to which conformity is declared: Références des normes harmonisées pertinentes appliquées, y compris la date de celles-ci, ou des autres specifications techniques, y compris la date de celles-ci, par rapport auxquelles la conformité est déclarée: Odwołania do odnośnych norm zharmonizowanych, które zastosowano, wraz z datą...
- Page 34 și deținător al dosarului tehnic/firmante autorizado y titular del expediente tecnico/ signatário autorizado e detentor da ficha técnica Kingfisher International Products B.V., Rapenburgerstraat 175E, 1011 VM Amsterdam, The Netherlands...
- Page 35 Manufacturer: EN www.diy.com www.screwfix.com UK Manufacturer: www.screwfix.ie Kingfisher International Products Limited, To view instruction manuals online, 1 Paddington Square, London, W2 1GG, visit www.kingfisher.com/products United Kingdom EU Manufacturer: Kingfisher International Products B.V. Rapenburgerstraat 175E 1011 VM Amsterdam The Netherlands 5059340880747_MNL_EN_V03.indd 35 5059340880747_MNL_EN_V03.indd 35...
Need help?
Do you have a question about the MCB1018HVM and is the answer not in the manual?
Questions and answers