
Related Manuals for Kingfisher FPLMP129


Summary of Contents for Kingfisher FPLMP129
- Page 1 Petrol Lawnmower FPLMP129 EAN: 3663602423270 WARNING: Read the instructions before using the product! 3663602423270-GB-V04.indd 1 27/9/2018 10:06...
- Page 2 FPLMP129 Let’s get started... These instructions are for your safety. Please read through them thoroughly before use and retain them for future reference. Getting Started... Safety information Your product Before start Quick start more detail... Product functions Operation Care maintenance...
- Page 3 Safety information FPLMP129 Safety warnings Petrol powered lawnmowers safety warnings Read carefully before use. IMPORTANT Keep for future reference. WARNING! Your safety and the safety of others is very important. Of course, it is not practical or possible to warn you about all the hazards associated with operating or maintaining this product.
- Page 4 Safety information FPLMP129 5. Before using, always visually inspect to see that the blades, blade bolts and cutter assembly are not worn or damaged. Replace worn or damaged blades and bolts in sets to preserve balance. 6. CAUTION! Do not touch rotating cutting means.
- Page 5 Safety information FPLMP129 20. Do not tilt the product when starting the engine or switching on the engine, except if the product has to be tilted for starting. In this case, do not tilt it more than necessary and lift only the part which is away from the operator. Always ensure that both hands are in the operating position before returning the product to the ground.
- Page 6 Safety information FPLMP129 4. Never store the product with petrol in the tank inside a building where fumes can reach an open flame or spark. 5. To reduce the fire hazard, keep the engine, silencer and petrol storage area free of vegetative material and excessive grease.
- Page 7 Safety information FPLMP129 14. Check regularly for leaks from the fuel tank cap and fuel lines. 15. Tighten the fuel tank cap thoroughly after refilling the fuel tank. 16. Do not operate the product if it is leaking fuel. Do not remove the fuel tank cap while the engine is running.
- Page 8 Safety information FPLMP129 Emergency Familiarise yourself with the use of this product by means of this instruction manual. Memorise the safety directions and follow them to the letter. This will help to prevent risks and hazards. 1. Always be alert when using this product, so that you can recognise and handle like risks early.
- Page 9 Safety information FPLMP129 Symbols will On the product, the rating label and within these instructions you will find among others the following symbols and abbreviations. Familiarise yourself with them to reduce hazards like personal injuries and damage to property. Kilowatt...
- Page 10 Safety information FPLMP129 Press the primer 3 times before starting the cold engine. Inspect the area where the product is to be used and remove all objects which can be thrown by the product. If objects are hidden while operating, stop the engine and remove the objects.
- Page 11 Safety information FPLMP129 Wear tight-fitted protective clothing. Do not expose the product to rain or wet conditions. Open flames in the work area, around the product and in the vicinity of flammable materials are prohibited! Do not smoke in the work area, around the product and in the vicinity...
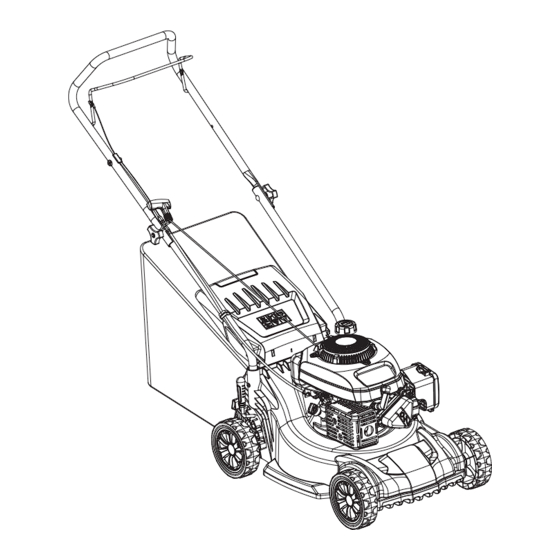
- Page 12 Your product FPLMP129 3663602423270-GB-V04.indd 12 27/9/2018 10:06...
- Page 13 Your product FPLMP129 1. Brake clutch 17. Handle support 2. Upper handle bar 18. Grass catcher 3. Mounting knob (x2) Grass catcher handle * 4. Mounting bolt (x2) Grass catcher hooks * 5. Lower handle bar 19. Wire clip 6. Fuel tank 20.
- Page 14 Your product FPLMP129 Technical specifications > General > Dimensions: > approx. 1320 1135 > Machine mass with empty tanks and in the normal operating configuration: approx. Fuel tank capacity: > ml (cm³) > Petrol type: #93, unleaded > Engine oil capacity: ml (cm³)
- Page 15 Your product FPLMP129 Vibration level > Hand-arm vibration a 4.97 > Uncertainty K: The sound values have been determined according to noise test code given in EN ISO 5395-1 EN ISO 5395-2, using the basic standards ISO 3744 11094. Wear hearing protection, especially when sound pressure is over dB(A).
- Page 16 Before you start FPLMP129 Unpacking NOTE: The product is heavy, ask another person for assistance if required. 1. Unpack all parts and lay them on a flat, stable surface. 2. Remove all packing materials and protective shipping materials, if applicable.
- Page 17 Before you start FPLMP129 Assembly WARNING! The product must be fully assembled before the operation! Do not use a product that is only partly assembled or assembled with damaged parts! Follow the assembly instructions step-by-step and use the pictures provided...
- Page 18 Before you start FPLMP129 NOTE: Ensure the hook for recoil starter handle (21) is assembled on the right-hand side of the upper handle bar. 3. Hold the upper handle bar (2) with the brake clutch (1) facing upwards. Align the mounting holes of the upper handle bars (2) and the lower handle bars (5).
- Page 19 Before you start FPLMP129 Grass catcher assembly 1. Attach the bag of the grass catcher (18) to the frame (Fig. 4). Grass catcher installation Always carry the grass catcher (18) by its handle (18a). 1. Lift the rear deflector guard (20) and hold it in place (Fig. 5, step 1).
- Page 20 Before you start FPLMP129 Fuel and engine oil This product is equipped with a 4-stroke engine. Before operation, it is necessary to add suitable fuel and engine oil separately. 1. Place the product on a stable, level surface. We recommend laying a non-flammable sheet under the product.
- Page 21 Before you start FPLMP129 NOTE: Petrol deteriorates over time. It may be difficult to start the engine if you use petrol which has been kept for more than days. Towards the end of the season, it is advisable to put only as much fuel in the tank (6) as you need for each use since it should be completely used up before storing the product.
- Page 22 Quick start FPLMP129 Operating controls Brake clutch Assemble Recoil starter handle Press primer Fuel tank cap 3times Hook for recoil starter handle Primer Air filter case Grass catcher Lever for Release cutting height drive bar adjustment Oil tank cap Spark plug...
- Page 23 Quick start FPLMP129 Preparation emble Adjust Add fuel Add oil Assemble Assemble Adjust Adjust Add fuel Add fuel Add oil Add oil Assemble Adjust Add fuel Add oil Starting s primer Pull brake Pull recoil Pull drive bar Operate Press primer...
- Page 24 FPLMP129 more detail... Product functions Operation Care maintenance Troubleshooting Recycling disposal Guarantee EC declaration of conformity 3663602423270-GB-V04.indd 24 27/9/2018 10:06...
- Page 25 Product functions FPLMP129 Intended use This petrol lawnmower FPLMP129 is designated with a power output of 1. The product is intended for mowing grass in domestic gardens only. It must not be used to mow unusually high, dry or wet grass (e.g. pasture grass), for shredding leaves or mulching.
- Page 26 Product functions FPLMP129 WARNING! Never twist the starter cord around your hand! Only pull on the recoil starter handle (22)! WARNING! Do not suddenly release the recoil starter handle (22)! Allow the rope to return slowly and in a controlled manner each time it is pulled!
- Page 27 Product functions FPLMP129 1. Lift the rear deflector guard (20) and hold it in place. 2. Lift the grass catcher hooks (18b) off the rods and place the grass catcher (18) on the ground. 3. Remove the grass clippings from the discharge chute (24) into the grass catcher (18).
- Page 28 Product functions FPLMP129 WARNING! Ensure that the lever (15) engages between two of the grooves! Primer The primer (9) is positioned in the front of the air filter case (10). Push the primer times before starting the cold engine (Fig. 13).
- Page 29 Operation FPLMP129 General operation tips 1. Before each use: > Check the product and accessories for damage and whether they are properly fixed. Do not use the product if it is damaged or shows and signs of wear and tear. Take care of any problem you find or have the product checked by qualified specialist.
- Page 30 Operation FPLMP129 NOTE: If the engine does not start after repeated attempts, repeat steps of the starting procedure. WARNING! The starting position should be as described in the instruction manual. Fig. illustrates the defined starting position. The operator should start the engine behind the upper handle bar (2). Do not start the engine while standing on the side of the product as shown on Fig.
- Page 31 Operation FPLMP129 NOTE: If the engine does not start, it may be flooded. Flooding is caused by too much fuel injected into the combustion chamber and can prevent the engine from starting. To resolve flooding follow the below procedure: 1. Remove the spark plug (8a) and dry it.
- Page 32 Operation/Care and maintenance FPLMP129 5. Mow in slightly overlapping rows. The most effective pattern for mowing lawns is straight lines along one of the sides. This keeps the rows even and ensures that all the lawn is cut without missing any spots (Fig. 16).
- Page 33 Care and maintenance FPLMP129 WARNING! Only perform repairs and maintenance work according to these instructions! All further works must be performed by a qualified specialist! Cleaning 1. Clean the product with a slightly damp cloth and mild soap. Use a brush for areas that are hard to reach.
- Page 34 Care and maintenance FPLMP129 Maintenance table with schedules 3663602423270-GB-V04.indd 34 27/9/2018 10:06...
- Page 35 Care and maintenance FPLMP129 Underbody and cutting means WARNING! Wear protective gloves when working on the cutting means (25) and close to it! Use proper tools to remove debris, e.g. a wooden stick! Never use your bare hands! Always use original spare parts for replacement. The cutting means must be replaced by an identical type with the reference number 1181206.
- Page 36 Care and maintenance FPLMP129 NOTE: Replace the cutting means (25) after hours of mowing, or years whichever is sooner regardless of condition. If the cutting means (25) is cracked or damaged, replace it immediately. 8. Lubricate the cutting means (25) after each use to prolong their lifespan. Apply lubrication oil/grease along the edges of the cutting means (25).
- Page 37 Care and maintenance FPLMP129 WARNING! Do not use the product with a defective or loose wire! Air filter NOTE: A properly maintained air filter (10a) helps to prevent dirt from entering the engine. Entering dirt can cause blockages that can lead to premature engine wear or problems with starting or running the engine.
- Page 38 Care and maintenance FPLMP129 2. Loosen the spark plug anti-clockwise using the multi-tool (26) and remove it carefully (Fig. 20). 3. Check the spark plug (8a) for damage and wear. The colour of the electrode should be light-brown. 4. Remove the deposits from the electrode with a soft wired brush. Avoid heavy cleaning of the electrode.
- Page 39 Care and maintenance FPLMP129 ully WARNING! Do not over tighten the spark plug (8a) to avoid any damage! Fuel NOTE: Petrol deteriorates over time. Engine starting may be difficult if you use petrol kept for more than days. 1. Empty the fuel tank (6) when storing the product over days to prevent the fuel deteriorating.
- Page 40 Care and maintenance FPLMP129 3. Check the oil level frequently while filling. Wipe off oil dipstick and insert it into the tank opening without tightening the cap, and then remove the dipstick again. 4. The oil level must be between the oil level markings (approx.
- Page 41 Care and maintenance FPLMP129 Repair This product does not contain any parts that can be repaired by the consumer. Contact an authorised service centre or a similarly qualified specialist to have it checked and repaired. Storage NOTE: Good storage conditions are important for keeping your product trouble- free.
- Page 42 Troubleshooting FPLMP129 Suspected malfunctions are often due to causes that the operators can fix themselves. Therefore check the product using this section. In most cases, the problem can be solved quickly. WARNING! Only perform the steps described in these instructions! All further...
- Page 43 Troubleshooting FPLMP129 Problem Possible cause Solution Engine Dirt, water or stale fuel in the Drain fuel and clean tank. Fill difficult fuel tank the tank with clean, fresh fuel to start Air filter is dirty Clean air filter or loses...
- Page 44 Recycling and disposal/Guarantee FPLMP129 Recycling and disposal 1. Old products are potentially recyclable and do not, therefore, belong in your household rubbish. You are requested to assist us and our contribution to saving resources and protecting the environment by handing in this product to an equipped collection centre (if there is one available).
- Page 45 EC declaration of conformity FPLMP129 Kingfisher International Products Limited 3 Sheldon Square London W2 6PX United Kingdom Declare that the product Petrol Lawnmower 129 cm FPLMP129 Serial number: from 000001 999999 Complies with the essential health and safety requirements of the following directives:...
- Page 46 Manufacturer: Kingfisher International Products Limited, 3 Sheldon Square, London, W2 6PX United Kingdom Distributor: B&Q plc, Chandlers Ford, Hants, SO53 3LE United Kingdom, www.diy.com SFD Limited Trade House, Mead Avenue, Yeovil, BA22 8RT United Kingdom www.screwfix.com 3663602423270-GB-V04.indd 46 27/9/2018 10:07...
Need help?
Do you have a question about the FPLMP129 and is the answer not in the manual?
Questions and answers
Здравствуйте, где можно купить ручной стартер
We're can I buy a replacement oil cap cover that has the dip stick on it