Advertisement
Table of Contents
- 1 Table of Contents
- 2 Technical and Legal Information
- 3 Technical
- 4 Your Product
- 5 Before You Start
- 6 Quick Start
- 7 Product Functions
- 8 Operation
- 9 Care and Maintenance
- 10 Troubleshooting
- 11 Recycling and Disposal
- 12 Guarantee
- 13 Customer Care and Technical Helpline
- 14 Availability of Spare Parts
- Download this manual
Advertisement
Table of Contents

Related Manuals for Kingfisher FPLM132H-6


Summary of Contents for Kingfisher FPLM132H-6
- Page 1 FPLM132H-6 5059340359427...
-
Page 2: Table Of Contents
Let’s get started These instructions are for your safety. Please read through them thoroughly before use and retain them for future reference. started... Getting Technical and legal information Technical Your product Before you start Quick start more detail... Product functions Operation Care and maintenance Troubleshooting... -
Page 3: Technical And Legal Information
FPLM132H-6 Technical and legal information Safety warnings Petrol powered lawnmowers safety warnings IMPORTANT Read carefully before use. Keep for future reference. WARNING! Your safety and the safety of others is very important. Of course, it is not practical or possible to warn you about all the hazards associated with operating or maintaining this product. - Page 4 Technical and legal information FPLM132H-6 Safety warnings Preparation 1. While mowing, always wear substantial footwear and long trousers. Do not operate the product when barefoot or wearing open sandals. 2. Thoroughly inspect the area where the product is to be used and remove all objects which can be thrown by the product.
-
Page 5: Technical
FPLM132H-6 Technical and legal information Ensure that the brake wire (3) can be smoothly operated (i.e. is not catching or kinking in any way). Operation 1. Do not operate the engine in a confined space where dangerous carbon monoxide fumes can collect. - Page 6 Technical and legal information FPLM132H-6 Safety warnings 17. Ensure and regularly check that all starting interlocks operator presence controls properly functioning. 18. Stop the product according to instructions in this manual before leaving the operator's position and park it in a safe location.
- Page 7 FPLM132H-6 Technical and legal information >inspect for damage >replace or repair any damaged parts >check for and tighten any loose parts • whenever you leave the product, • before refuelling. 25. Never touch the exhaust, exhaust guard or cooling fins when the engine is hot.
- Page 8 Technical and legal information FPLM132H-6 Safety warnings 4. Never store the product with petrol in the tank inside a building where fumes can reach an open flame or spark. 5. To reduce the fire hazard, keep the engine, silencer and petrol storage area free of grass, leaves, or excessive grease to reduce the fire hazard.
- Page 9 FPLM132H-6 Technical and legal information 3. Never refuel indoors. Exhaust gases and fuel fumes are noxious. 4. Never use the product in environments where there is a risk of explosion. Fuel fumes can ignite. 5. Never breathe in any fuel fumes, when you are refuelling the product.
- Page 10 Technical and legal information FPLM132H-6 Safety warnings 17. Do not operate the product if it is leaking fuel. Do not remove the fuel tank cap while the engine is running. 18. Use only an approved container for this purpose. 19. Do not store cans of fuel or refill the fuel tank in any...
- Page 11 FPLM132H-6 Technical and legal information 5. Maintain this product in accordance with these instructions and keep it well lubricated (where appropriate). 6. Plan your work schedule to spread any high vibration tool use across a longer period of time. Emergency Familiarise yourself with the use of this product by means of this instruction manual.
- Page 12 Technical and legal information FPLM132H-6 Safety warnings 1. Health defects resulting from vibration emission if the product is being used over long periods of time or not adequately managed and properly maintained. 2. Injuries and damage to property due to broken application tools or the sudden impact of hidden objects during use.
- Page 13 FPLM132H-6 Technical and legal information Lock / to tighten or Unlock / to loosen. secure. CAUTION! CAUTION / WARNING! WARNING! Read the instruction manual. DANGER! NOTE: Wear hearing protection. Wear eye protection. Wear respiratory protection. Wear protective gloves. Wear protective, slip-resistant footwear.
- Page 14 Technical and legal information FPLM132H-6 Symbols Add engine oil. engine. Press the primer 3 times before starting the cold engine. Mow across the face of slopes, never up and down. Inspect the area where the product is to be used and remove all objects which can be thrown by the product.
- Page 15 FPLM132H-6 UK Conformity Assessed. FPLM132H-6 750 g/h NP130F...
- Page 16 FPLM132H-6 F5RTC NP130 92,94 2,01...
-
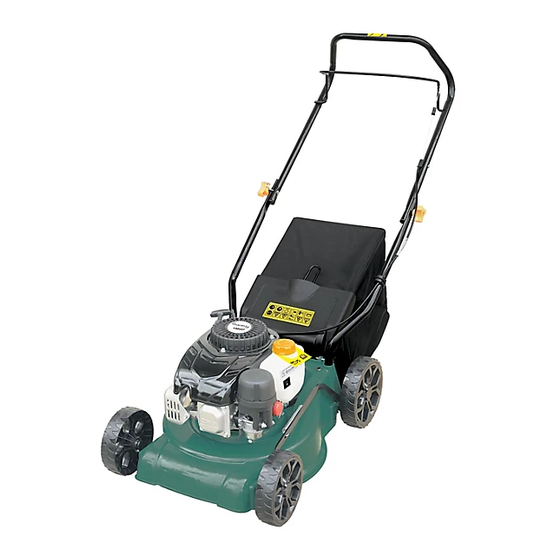
Page 17: Your Product
FPLM132H-6 Your product Your product MNL_FPLMP99H-4_GB_V05_200911.indd 17 9/11/20 5:23 PM... - Page 18 Your product FPLM132H-6 Your product 1. Upper handle bar 18. Rear wheel (x2) 2. Brake lever 19. Handle support screw (x2) 3. Brake wire 20. Handle support 4. Mounting knob (x2) 21. Oil tank cap 5. Mounting bolt (x2) a) Oil drain screw 6.
-
Page 19: Before You Start
FPLM132H-6 Before you start Unpacking NOTE: The product is heavy, ask another person for assistance if required. 1. Unpack all parts and lay them on a flat, stable surface. 2. Remove all packing materials and shipping devices, if applicable. 3. Make sure the delivery contents are complete and free of any damage. If you find that parts are missing or show damage do not use the product but contact your dealer. - Page 20 Before you start FPLM132H-6 Assembly NOTE: Take care of small parts that are removed during assembly or when making adjustments. Keep them secure to avoid loss. Low handle bars 1. Put the product on the ground. 2. Insert the lower handle bars (7) into the handle supports (20). Align the mounting holes of the lower handle bars (7) and the handle supports (20) (Fig.
- Page 21 FPLM132H-6 Before you start 6. Secure the bars on the other side by turning the remaining mounting knob (4) through the thread of the mounting bolt (5) (Fig. 3, step 2). Fig. 2 Fig. 3 7. Fix the brake wire (3) with the wire clip (6) on the lower handle bar (7) (Fig. 4).
- Page 22 Before you start FPLM132H-6 Assembly Grass catcher 1. The grass catcher (23) was already assembled, but make sure that the grass catcher rubber clips (23e) was secured on the supporting rod (23c) (Fig. 5) before use. Fig. 5 2. Open the rear deflector guard (22) and hold it in position (Fig. 6, step 1).
- Page 23 FPLM132H-6 Before you start 1. Place the product on a stable, level surface. We recommend laying a non- WARNING! 3. Always dispose of fuel, used oil and objects contaminated with them in accordance with local regulations. Fuel NOTE: This product is not supplied with fuel! Before operating separately.
- Page 24 Before you start FPLM132H-6 Fuel and engine oil NOTE: engine if you use petrol which has been kept for more than 30 days. Towards the end of the season, it is advisable to put only as much fuel in the tank as you need for each use, since it should be completely used up before storing the product.
-
Page 25: Quick Start
FPLM132H-6 Quick start Operating controls Brake lever Recoil starter Fuel tank cap handle Air filter case Primer Lever for cutting height adjustment Spark plug connector Oil tank cap MNL_FPLMP99H-4_GB_V05_200911.indd 25 9/11/20 5:23 PM... - Page 26 Quick start FPLM132H-6 Set up Assemble Adjust Add fuel Add oil Start Press primer 3 Pull back the Pull recoil starter Operate brake lever (2) times handle (25) until and hold it in (for cold engine) engine starts position Stopping...
-
Page 27: Product Functions
FPLM132H-6 Product functions Intended use This petrol lawnmower FPLM132H-6 is designated with a power output of 2.0 kW. The product is intended for mowing grass in domestic gardens only. It must not be used to mow unusually high, dry or wet grass, e.g. pasture grass, or to shred leaves. - Page 28 Product functions FPLM132H-6 Fig. 12 Fig. 13 WARNING! Never twist the starter cord around your hand! Only pull on the recoil starter handle (25)! Do not suddenly release the recoil starter handle (25)! Allow the starter cord to return slowly and in a controlled manner each time it...
- Page 29 FPLM132H-6 Product functions Grass catcher 1. Lift the rear deflector guard (22) and hold it in place. 2. Lift the grass catcher hooks (23b) off the slots and remove the grass catcher (23). 3. Remove the grass clippings from the rear discharge chute (26) into the grass catcher (23).
- Page 30 Product functions / Operation FPLM132H-6 Primer The primer (11) is positioned in the front of 3 times before starting the cold engine (Fig. 15). Fig. 15 General operation 1. Before each use: • Check the product and accessories for damage and whether they are •...
- Page 31 FPLM132H-6 Operation Starting/Stopping WARNING! high grass! Clean the underside of the deck! Start the engine carefully according to instructions. Keep your feet well away from the blade (27)! Do not tilt the product when starting the engine. Start 1. Press the primer (11) 3 times (Fig. 16, step 1).
- Page 32 Operation FPLM132H-6 Starting/Stopping Fig. 17 NOTE: Flooding is caused by too much fuel injected into the combustion chamber and can prevent a product from starting. Follow below procedure: 1. Remove the spark plug (15a) and dry it. 2. Pull the recoil starter handle (25) for several times to drain the fuel from the combustion chamber.
- Page 33 FPLM132H-6 Operation Mowing 1. Make sure that the lawn is clear of stones, sticks, wire or other objects that could damage the product or its engine. 2. Do not cut wet grass because it tends to stick to the underbody of the product, preventing the proper discharge of grass clippings, and it could also cause you to slip and fall.
- Page 34 Care and maintenance FPLM132H-6 The golden rules for care WARNING! Proper maintenance is essential for safe and trouble free operation. Improper maintenance, or failure to address a problem instantly can cause a malfunction which can result in serious injury or even death.
- Page 35 FPLM132H-6 Care and maintenance Maintenance WARNING! It requires to tip the product when performing maintenance, therefore the fuel tank must be empty otherwise the fuel can leak out and result in a fire or explosion. NOTE! Always empty the fuel tank and keep the air filter (10a) upside.
- Page 36 Care and maintenance FPLM132H-6 Maintenance Underbody and cutting device WARNING! Wear protective gloves when working on the cutting device (27) and close to it! Use proper tools to remove debris, e. g. a wooden stick! Never use your bare hands! Always use original spare parts for replacement.
- Page 37 FPLM132H-6 Care and maintenance NOTE: Replace this cutting device (27) after 50 hours mowing or 2 years whichever is sooner regardless of condition. If the cutting device is cracked or damaged, you must immediately replace it with a new one.
- Page 38 Care and maintenance FPLM132H-6 Maintenance debris is present, clean more often). 2. Screw the latches (10c) anticlockwise to disengage and open the cover (10b) (Fig. 21). 5. Close the cover (10b) and ensure the latches (10c) engage properly. Fig. 21...
- Page 39 FPLM132H-6 Care and maintenance Fig. 22 Fig. 23 3. Check the spark plug (15a) for damage and wear. The colour of the electrode should be light-brown. 4. Remove the deposits from the electrode with a soft wired brush. Avoid heavy cleaning of the electrode.
-
Page 40: Operation
Care and maintenance FPLM132H-6 Maintenance Fig. 25 Checking engine oil NOTE: Check the oil level and quality before each use. The oil must be replaced after every 6 months or after 50 hours of operation. 1. Unscrew and remove the oil tank cap (21). -
Page 41: Care And Maintenance
FPLM132H-6 Care and maintenance 3. Loosen and remove the oil drain screw (21a) to empty the oil into the oil collecting container (Fig. 26). 4. Screw the oil drain screw (21a) back in and tighten it. 5. Wipe spilled oil up. - Page 42 Care and maintenance FPLM132H-6 Repair This product does not contain any parts that can be repaired by the consumer. Contact an authorised service centre or a similarly qualified person to have it checked and repaired. Storage NOTE: Good storage conditions are important for keeping your product trouble free.
-
Page 43: Troubleshooting
FPLM132H-6 Troubleshooting Troubleshooting Suspected malfunctions are often due to causes that the users can fix themselves. Therefore check the product using this section. In most cases the problem can be solved quickly. WARNING! Only perform the steps described within these... - Page 44 Troubleshooting FPLM132H-6 Troubleshooting Problem Possible cause Solution 4. Engine 4.1. Spark plug is defective 4.1. Install new, correctly operates gapped plug erratically 4.2. Spark plug gap is 4.2. Set gap between incorrect electrodes at 0.6 to 0.8 mm 4.3. Air filter is dirty 4.3.
-
Page 45: Recycling And Disposal
FPLM132H-6 Recycling and disposal / Guarantee Recycling and disposal Old products are potentially recyclable and do not, therefore, belong in your household rubbish. You are requested to assist us and our contribution to saving resources and protecting the environment by handing in this product at an equipped collection centre (if there is one available). -
Page 46: Customer Care And Technical Helpline
A better way to repair your tools A better way to repair your tools Kingfisher takes special care in creating high-quality garden power tools that are designed to last. But if a fault develops with your garden power tool and you... -
Page 47: Availability Of Spare Parts
Eire: 1800 932226 Opening hours are Monday – Friday, 8am-5pm Availability of Spare Parts Contact the customer service helpline for assistance or visit: www.kingfisher-spares.com For assistance contact the customer services helpline: UK 0800 0789647 uk@Kingfisherservice.com EIRE 1800 932226 eire@kingfisherservice.com Further information about this product can also be found at: www.kingfisher.com/products... - Page 48 EC declaration of conformity MNL_FPLMP99H-4_GB_V05_200911.indd 46 9/11/20 5:23 PM...
- Page 49 Authorised signatory and technical file holder/signataire et responsable de la documentation technique authorisé/ podmiot uprawniony do wystawienia i adres prezechowywania dokumentacji technicznej/semnatar autorizat și deținător al dosarului tehnic/firmante autorizado y titular del expediente tecnico/ signatário autorizado e detentor da ficha técnica Kingfisher International Products B.V., Rapenburgerstraat 175E, 1011 VM Amsterdam,...
- Page 50 EC declaration of conformity MNL_FPLMP99H-4_GB_V05_200911.indd 48 9/11/20 5:23 PM...
- Page 51 Kingfisher International Products Limited 3 Sheldon Square, London, W2 6PX United Kingdom www.kingfisher.com/products...
Need help?
Do you have a question about the FPLM132H-6 and is the answer not in the manual?
Questions and answers
My mower FPLM132H-6 the engine is running fast burning quite a lot of fuel over a one hour sesion, when stoped is difficult to restart when warm. do you have any suggestions as to the problem
The likely causes for the Kingfisher mower FPLM132H-6 running fast, consuming a lot of fuel, and having difficulty restarting when warm include:
1. Dirty air filter – A clogged air filter can cause the engine to run rich, using more fuel and affecting performance. Solution: Clean the air filter.
2. Incorrect spark plug gap or defective spark plug – This can lead to erratic operation and poor restarting. Solution: Check the spark plug, ensure the gap is 0.6 to 0.8 mm, and replace if defective.
3. Stale or contaminated fuel – Old or dirty fuel can make the engine hard to start and run inefficiently. Solution: Drain the tank and refill with clean, fresh fuel.
4. Clogged fuel tank vent – This can affect fuel flow and engine operation. Solution: Clean or replace the fuel tank cap.
This answer is automatically generated
are you sale the basket