
Related Manuals for Crestron DIN-KXI


Summary of Contents for Crestron DIN-KXI
- Page 1 View this document in HTML crestron.com/docs/9408 Product Manual DIN-KXI KNX Secure IP Gateway, DIN Rail Mount Crestron Electronics, Inc.
- Page 2 United States and/or other countries. Other trademarks, registered trademarks, and trade names may be used in this document to refer to either the entities claiming the marks and names or their products. Crestron disclaims any proprietary interest in the marks and names of others. Crestron is not responsible for errors in typography or photography.
-
Page 3: Table Of Contents
ETS Software Configuration SIMPL Configuration IP Address Configuration DHCP Address Static IP Address Interface to KNX Operation Factory Reset Programming Mode Resources Crestron Support and Training Programmer and Developer Resources Product Certificates Related Documentation Product Manual — Doc. 9408A Contents • iii... -
Page 4: Din-Kxi
KNX system. It is capable of addressing and controlling up to 1,000 datapoints and receives power over the KNX bus. The DIN-KXI can also be used as a programming interface for KNX devices using ETS5 and ETS6 software. -
Page 5: Features
DIN Rail Installation The 1M 18 mm (0.70 in) wide DIN-KXI snaps onto a standard DIN rail for installation in a wall mount enclosure. Wiring connections are made using screw terminals positioned along the bottom, clearly accessible from the front for easy installation and servicing. All setup controls and indicators are positioned on the center front panel. -
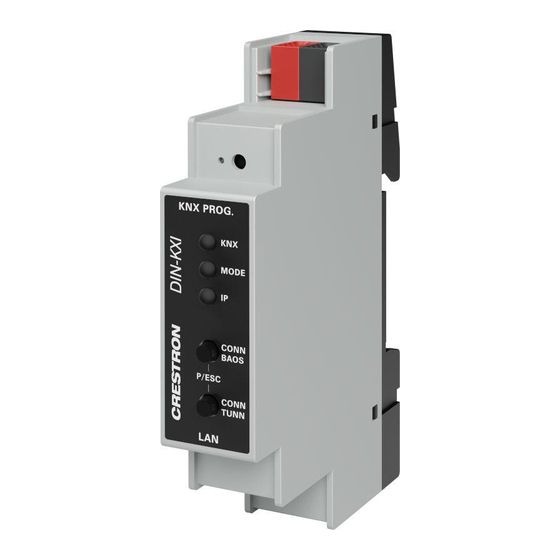
Page 6: Physical Description
Physical Description The DIN-KXI provides the following connectors, controls, and indicators. The following illustrations shows the front, top, and bottom of the DIN-KXI. For additional details, refer Specifications on page 8 Operation on page DIN-KXI Front View DIN-KXI Top and Bottom View Product Manual —... - Page 7 CONN TUNN: Provides manual configuration and selection of a tunnel connection. ⑧ P/ESC: Press CONN BAOS and CONN TUNN to exit manual configuration. ⑨ RJ-45: Connects to the LAN to provide communications between the control system and DIN-KXI. 7 • DIN-KXI Product Manual — Doc. 9408A...
-
Page 8: Specifications
Specifications Product specifications for the DIN-KXI. Product Specifications Power KNX Bus 20mA Communications KNX over TP (Twisted Pair); Interface protocol: cEMI; Max. APDU length: 55; Device model: System B; KNXnet/IP Security (AES-128); Compatible with ETS5 and ETS6 Ethernet Supports ARP, ICMP, IGMP, UDP/IP, TCP/IP, DHCP, and Auto IP;... - Page 9 1 DIN module space (18 mm) Dimensions Height 91 mm (3.57 in.) Width 18 mm (0.70 in); 1M wide Depth 60 mm (2.36 in.) Weight 40 g (1.41 oz) Compliance Regulatory Model: M202234003 9 • DIN-KXI Product Manual — Doc. 9408A...
-
Page 10: Dimension Drawings
Dimension Drawings Product Manual — Doc. 9408A DIN-KXI • 10... -
Page 11: Installation
Installation This section provides the following information: • In the Box • Mounting • Wiring 11 • DIN-KXI Product Manual — Doc. 9408A... -
Page 12: In The Box
In the Box Qty. Description DIN-KXI, KNX Secure IP Gateway, DIN Rail Mount Additional Items KNX Certificate Label (2062600) Product Manual — Doc. 9408A DIN-KXI • 12... -
Page 13: Mounting
1. Hang the DIN-KXI on the top of the DIN rail. When the DIN-KXI is mounted, the certificate label with the serial number, MAC address, and KNX certificate number may not be visible. A duplicate of the KNX certificate label (2062600) is included that can be placed inside the enclosure. - Page 14 3. Use a small, flat-head screwdriver to pull the DIN rail release tab down. 4. Tilt the bottom of the DIN-KXI away from the bottom of the DIN rail and then remove the device. Product Manual — Doc. 9408A DIN-KXI • 14...
-
Page 15: Wiring
Wiring NOTE: When wiring the DIN-KXI, connect the device to the KNX bus that uses a KNX power supply. KNX Bus Connection To wire the KNX bus, connect the black (-) and red (+) terminals to the KNX bus LAN Connection To connect to the local LAN, connect an ethernet cable to the RJ-45 port. -
Page 16: Configuration
Configuration This section provides the following information: • Acquire with KNX Secure • Datapoint Configuration • IP Address Configuration • Interface to KNX Product Manual — Doc. 9408A DIN-KXI • 16... -
Page 17: Acquire With Knx Secure
Acquire with KNX Secure Use the info on the KNX label to acquire the DIN-KXI. The Factory Key (FSDK) for the device is on the DIN-KXI label and also on the spare label that is provided. On the label, the Factory Key (FSDK) is labeled Cert. - Page 18 3. Add the DIN-KXI to ETS software. The Factory Key can be entered on the Security tab or before downloading the device. Scan the QR code on the label using the device running the ETS software or enter the certificate number (Cert) manually.
- Page 19 Help (F1) file (PDF) that is provided for the module. 5. In the Parameters tab, select Datapoints and then configure the datapoints in ETS software and the SIMPL program. For details, refer to Datapoint Configuration on page 19 • DIN-KXI Product Manual — Doc. 9408A...
-
Page 20: Datapoint Configuration
Datapoint Configuration Configure up to 1,000 datapoints in the system using ETS software and SIMPL modules. NOTE: When the configuration is changed, the settings must be downloaded onto the DIN-KXI. For details, refer to ETS Software documentation. ETS Software Configuration Each data point gets a group address, in order to send to the bus. -
Page 21: Simpl Configuration
SIMPL Configuration For each datapoint configured in ETS software, use SIMPL to configure the Crestron control system to interface with the KNX system. In SIMPL, go to Crestron Modules > System Control and then use the DIN KXI modules. Each Crestron module allows specific KNX commands or signals to be sent or read. One module can provide control, feedback, or both. - Page 22 These modules are required: One DIN KXI IO module to communicate with the DIN-KXI. One DIN KXI x Bit or DIN-KXI x Byte module per KNX object. SIMPL Modules The DIN-KXI modules can control datapoints with these Bit and Byte types.
- Page 23 DIN-KXI 4 Byte Datapoint 12: 4 Byte, Unsigned Value Datapoint 13: 4 Byte, Signed Value Datapoint 14: 4 Byte, Float Value Datapoint 15: 4 Byte, Access DIN-KXI 6 Byte Datapoint 251.600: 6 Bytes, Color RGBW DIN-KXI 14 Byte Datapoint 16: 14 Byte, String...
-
Page 24: Ip Address Configuration
ETS Software documentation. ETS Software - IP Address Properties DHCP Address The DIN-KXI uses DHCP (default setting) to obtain an IP address. The DHCP server will assign an IP- address to the Crestron DIN-KXI. Product Manual — Doc. 9408A... -
Page 25: Static Ip Address
Static IP Address To use a static IP address: 1. Go to the DIN-KXI properties and then select IP. 2. Select Use a static IP address. 3. Enter the IP Address, Subnet Mask, and Default Gateway. 25 • DIN-KXI Product Manual — Doc. 9408A... -
Page 26: Interface To Knx
Interface to KNX The DIN-KXI can act as an interface to KNX system and allow multiple simultaneous connections. NOTE: When the configuration is changed, the settings must be downloaded onto the DIN-KXI. For details, refer to ETS Software documentation. In order to use this function, configure the connections using the Manage Configured Connections screen in ETS software. - Page 27 There are nine tunneling connections available to the KNX bus. ETS Software - Tunneling Interface Connections 27 • DIN-KXI Product Manual — Doc. 9408A...
-
Page 28: Operation
Operation Use the buttons located on the front of the DIN-KXI to factory reset the device or enter programming mode. Factory Reset To factory reset the device: 1. Disconnect the device from the KNX bus to turn it off. 2. Press and hold KNX Prog. Do not release the button. -
Page 29: Resources
Resources The following resources are provided for the DIN-KXI. NOTE: You may need to provide your Crestron.com web account credentials when prompted to access some of the following resources. Crestron Support and Training Crestron True Blue Support Crestron Resource Library Crestron Online Help (OLH) Crestron Training Institute (CTI) Portal... - Page 30 Crestron Electronics, Inc. Product Manual — Doc. 9408A 15 Volvo Drive, Rockleigh, NJ 07647 03/28/24 Tel: 888.CRESTRON Specifications subject to Fax: 201.767.7656 change without notice. www.crestron.com...
Need help?
Do you have a question about the DIN-KXI and is the answer not in the manual?
Questions and answers