
Related Manuals for Raytools BW240 Series


Summary of Contents for Raytools BW240 Series
- Page 1 BW240 SERIES Transmission-type Laser Welding Head User Manual Email: sales@raytools.com Website: www.raytools.ch...
- Page 2 2022/4/8 Establish the user manual 2022/4/8 Thank you for purchasing this product from RayTools. The user manual includes detailed introductions for using BW240. IF there is any other question, contact us without worry. Please read this manual carefully before using the welding head and other BW240-related equipment, which enables users to use it better.
- Page 3 ▪ Read and understand basic safety instructions and operations. ▪ Must have studied the relevant regulations and safety instructions and understand the possible hazards. ▪ Comply with relevant regulations and implement corresponding protective measures. RayTools AG © Copyright www.raytools.ch...
- Page 4 Storage and Transportation ▪ Observe the storage temperature range allowed by the technical data. ▪ Take reasonable measures to prevent fire, vibration, or impact. ▪ Do not store in or near the magnetic field. RayTools AG © Copyright www.raytools.ch...
-
Page 5: Table Of Contents
2.6 Focus Adjustment ........................8 3 Maintenance ....................9 3.1 Cover Glass: Installation and Disassembly ................9 3.2 Cover Glass Cleaning ......................10 3.3 Collimation Lens Maintenance ....................11 3.4 Focus Lens Maintenance .....................12 3.5 Consumables: Material Code ....................13 RayTools AG © Copyright www.raytools.ch... -
Page 6: Overview
▪ Drawer style holder for cover glass ▪ Efficient water cooling system ▪ High-quality gas flow design ▪ Various options of fiber interfaces ▪ Diversified expansion modules ▪ Reliable sealing design RayTools AG © Copyright V1.0 www.raytools.ch 1 | 13... -
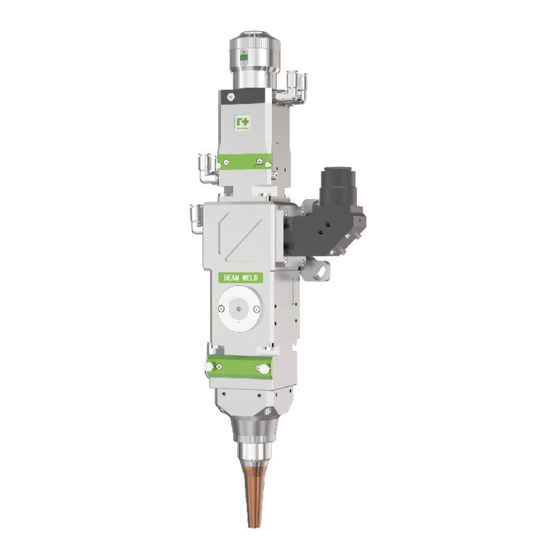
Page 7: Structure Diagram
1.2 Structure Diagram Fiber Interface Top Cover Glass Collimation Module Beam Combiner CCD Interface Focus Module Bottom Cover Glass Tip Assembly Fig. 1-1 Product Structure RayTools AG © Copyright V1.0 www.raytools.ch 2 | 13... -
Page 8: Installation And Operation
Fasten BW240 to the machine tool by installing a mounting plate. The size and site of holes on the plate are shown below. Suggestion: For a stable welding effect, please Install the laser head perpendicular to the processing surface, and ensure that the laser head is locked, with no shaking while processing. RayTools AG © Copyright V1.0 www.raytools.ch 3 | 13... - Page 9 Model description Take BW2406F1B21 as an example: BW240 Series BW240 Power rating of the welding head: 6KW Wavelength Fiber interface: QBH Optical configuration: 100:250 With CCD module Without lens temperature monitoring RayTools AG © Copyright V1.0 www.raytools.ch 4 | 13...
-
Page 10: Water & Gas Circuit Connection
> 0.4Mpa Entry temperature ≥ room temperature > dew point Hardness (relative to CaCO3) < 250mg/L PH range 6 to 8 (deionized or distilled water) Particle size allowed 200μm (diameter) < RayTools AG © Copyright V1.0 www.raytools.ch 5 | 13... - Page 11 0.1Mpa. Adjustment can be taken for actual needs. Maximum content of water vapor (ppm) Maximum content of hydrocarbon (ppm) Nitrogen <5 ppm <1 ppm Argon <5 ppm <1 ppm Helium <5 ppm <1 ppm <5 ppm <1 ppm RayTools AG © Copyright V1.0 www.raytools.ch 6 | 13...
-
Page 12: Fiber Connection
Align the clean fiber end to QBH and ensure the red point on QBH and the longest groove on the fiber end are on one straight line. Insert the fiber end into QBH, then lift and rotate the outer sleeve until two contact surfaces fit. Fig. 2-3 QBH and Fiber End Connection RayTools AG © Copyright V1.0 www.raytools.ch 7 | 13... -
Page 13: Ccd Adjustment
M3x6 inner hex screws. Tighten the M3x3 jack screw to finish the field adjustment. Fig. 2-4 CCD Adjustment 2.6 Focus Adjustment Insert the hex key into the indicated position and rotate to adjust the focus with an adjustment range of ±11. RayTools AG © Copyright V1.0 www.raytools.ch 8 | 13... -
Page 14: Maintenance
Caution: Do not take out the seal ring on the cover glass with fingernails or any hard tool, which will cause gas leakage and serious damage to the lenses. Place the seal ring properly to guarantee its use. Fig. 3-1 Cover Glass: Installation and Disassembly RayTools AG © Copyright V1.0 www.raytools.ch... -
Page 15: Cover Glass Cleaning
Move the cleaning swab from the inside, anticlockwise, in a circular motion, with gentle force on the glass surface. Rotate the swab along the vertical axis gently to ensure the effect. Refer to figure (D). Fig. 3-2 Cover Glass: Cleaning RayTools AG © Copyright V1.0 www.raytools.ch... -
Page 16: Collimation Lens Maintenance
The collimation lens should be replaced while the laser processing head is removed from the machine. Only the way to change a collimation lens from Raytools will be illustrated in the manual. Using equipment from other manufacturers, please refer to the corresponding installation guides. -
Page 17: Focus Lens Maintenance
Reverse steps above. Caution: The focus lens consists of two plano-convex lenses. Put the convex faces upward; Caution: Any operation related to the lens should be done in a clean place. RayTools AG © Copyright V1.0 www.raytools.ch 12 | 13... -
Page 18: Consumables: Material Code
250mm 120AJ2100 BW2406F1B21 300mm 120AJ1600 3.5.4 Air knife Laser head Type Material code Short focal 120AJ0700 BW2406F1B21 Long focal 120AJ1700 3.5.5 Nozzle Laser head Type Material code BW2406F1B21 Coaxial nozzle 120AJ1604A RayTools AG © Copyright V1.0 www.raytools.ch 13 | 13...
Need help?
Do you have a question about the BW240 Series and is the answer not in the manual?
Questions and answers