
Related Manuals for Holy Stone HS360S


Summary of Contents for Holy Stone HS360S
- Page 1 Instructions For Use Gebrauchsanweisung V 1.0 HS360S +1(855) 888-6699 www.holystone.com usa@holystone.com (USA) eu@holystone.com (EU) ca@holystone.com (CA)
- Page 2 English 01-50 Deutsch 51-97...
-
Page 3: Table Of Contents
Contents Disclaimer & Warning .................. Safety Guidelines ................... Maintenance ....................Package Contents ..................Drone Details Drone ......................Battery of the Drone ................Transmitter Details Transmitter Functions ................LCD-Screen ....................Joystick Mode ....................Charging Drone Battery ................... Transmitter ....................Pre-Flight Preparations Download APP .................. - Page 4 Flight Functions Camera Adjustment .................. Zoom ......................Speed Switch ....................Emergency Stop ..................Photo/Video ....................GPS Return to Home ................. APP Operation Instruction Operation Interface ................... Beginner Mode ................... Follow Me ..................... TapFly ......................Point of Interest ..................Catapult ......................Spiral Up ......................
-
Page 5: Disclaimer & Warning
DISCLAIMER & WARNING 1. Please read this Disclaimer & Warning and Safety Guidelines carefully before using our product. This product is not recommended for people under the age of 14. By using this product, you hereby agree to this disclaimer and signify that you have read it fully. You agree that you are responsible for your own conduct and any damage caused while using this product, and any consequence. - Page 6 SAFETY GUIDELINES ④ Please perform a thorough check of the product before each use. Inspect the integrity of the parts, any signs of cracks and wear off on the propellers, battery power and effectiveness of the indicator, etc. If there is any problem found after checking the drone, please refrain from using it until the problem is resolved.
- Page 7 SAFETY GUIDELINES 2.3 Operation Requirements ① DO NOT use this product to follow any moving vehicles. ② During the flight, turn off the motors only in case of an emergency. ③ When the battery runs low, return the drone back to your starting point. ④...
- Page 8 SAFETY GUIDELINES ⑥ If the device is not going to be used for an extended period of time, please remove batteries to prevent potential damage to the drone from battery leakage. ⑦ Only use the USB charging cable that comes with the drone to charge the battery.
-
Page 9: Maintenance
MAINTENANCE ① Clean the drone after each use with a clean, soft cloth. ② Avoid prolonged exposure to direct sunlight and avoid buildup of heat on the drone or batteries. ③ This device is not waterproof. DO NOT allow it to get wet or submerged in water. -
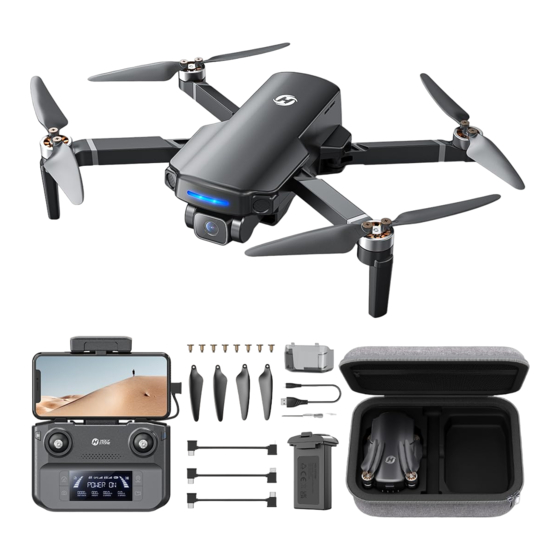
Page 10: Package Contents
PACKAGE CONTENTS Drone Transmitter Drone Battery USB Charging Propeller Cable Connection Cable Connection Cable Screwdriver (type-C) (lightning) Instructions For Use Gebrauchsanweisung V 1.0 HS360S +1(855) 888-6699 www.holystone.com usa@holystone.com (USA) eu@holystone.com (EU) ca@holystone.com (CA) Connection Cable Instructions For Use Joysticks (micro-USB) -06-... -
Page 11: Drone Details
DRONE DETAILS Drone Propeller A Propeller B Propeller B Propeller A Camera Optical Flow Module Drone Status Indicator Drone Battery -07-... -
Page 12: Battery Of The Drone
DRONE DETAILS Battery of the Drone Battery Level Indicator Power Switch Type-C Charging Port On/Off: Turn the battery on/off by pressing the power switch for 3 seconds. When the battery is on, the battery level indicators will display the current battery status. When the battery is powered off, all the indicators are out. -
Page 13: Transmitter Details
TRANSMITTER DETAILS Transmitter Functions Cellphone Holder Connection Cable Takeoff & Landing (short press) Emergency Stop (long press) Power Switch Left Joystick Right Joystick Speed Switch (short press) GPS Switch Return to Home (long press) Record Video Take Photo Storage Slots for Joysticks Charging Port Connection Port Camera Adjustment Dial... -
Page 14: Lcd-Screen
TRANSMITTER DETAILS LCD-Screen GPS Signal Strength Transmitter Battery Level Transmitter Signal Strength Transmitter Wifi Signal Photo/Record Indicator Flight Speed Drone Battery Level Drone Status Ascent/Descent Flight Distance Speed Flight Height Flight Speed When the battery level of the transmitter is low, its icon ( ) will start to flash. -
Page 15: Joystick Mode
JOYSTICK MODE Mode 2 (Left joystick as the gas joystick) Left Joystick Right Joystick Forward Ascend Descend Down Down Backward Left Right Left Right Fly to Fly to Rotate Left Rotate Right Left Right - - - - - - - - - - - - - - - - - - - - - - - - - - - - - - - - - - - - - - - - - - - - - - - - - - - - - - - - - - - Mode 1 (Right joystick as the gas joystick) Hold the ( ) button, short press the (... -
Page 16: Charging
CHARGING Drone Battery USB Adapter (5V/2.0A) Power Bank 1. Insert the Type-C plug of the charging cable into the drone battery. 2. Plug the other end of the cable into a USB adapter (5V/2A) or power- bank to start charging. 3. -
Page 17: Transmitter
CHARGING Transmitter USB Adapter (5V/2.0A) Power Bank 1. Insert the Type-C plug of the charging cable into the Type-C port of the transmitter. 2. Plug the other end of the cable into a USB adapter (5V/2A) or power- bank to start charging. 3. -
Page 18: Pre-Flight Preparations
PRE-FLIGHT PREPARATIONS Download APP Android APP on Google play The drone is equipped with a Live-Feed function. Please scan the corresponding QR-code above, and download the “HS FLY” app to use the related functions. Required operating systems: iOS 11.0 or above/Android 5.1 or above. Camera Cover 1. -
Page 19: Drone Battery
PRE-FLIGHT PREPARATIONS Drone Battery Installation: Push the battery into the fuselage. Make sure you hear a click when inserting the battery, which indicates that it is installed firmly. Remove: Press down on the snap and pull the battery out of the fuselage. ·... -
Page 20: Arms
PRE-FLIGHT PREPARATIONS Arms All arms of the drone are folded when it is packaged at the factory. First, unfold the front arms, then unfold the rear arms. TF Card Insert a TF card (not included) into the TF card slot before turning on the drone. -
Page 21: Propeller
PRE-FLIGHT PREPARATIONS Propeller marked Installation: Install the marked propellers to the marked motor shafts. Use the screwdriver to tighten the two screws in place. Install then the unmarked propellers to the unmarked motor shafts. Removal: Use the screwdriver to turn the screws anti-clockwise to remove them. -
Page 22: Joysticks
PRE-FLIGHT PREPARATIONS Joysticks Take the joysticks out of the storage slot and mount them onto the transmit- ter. -18-... -
Page 23: Flight
FLIGHT · To avoid unnecessary loss or damage, it is strongly recommended that the pilot flys this drone in an open, outdoor area. · All of the operations shown in this manual are demonstrated using MODE 2. Pairing ① Turning on the drone: Long press the power switch to turn on the drone. -
Page 24: Connection
FLIGHT Connection ① Cellphone Connection: Pull the cellphone holder out. Draw out the connection cable from the transmitter. (A Type-C connection cable is pre-installed. You will also receive a micro-USB and a Lightning type connection cable.) After setting the cellphone into the holder, use the cable to connect the transmitter with the cellphone. -
Page 25: Compass Calibration
FLIGHT Compass Calibration Step 1: Push both joysticks towards the inner, upper corners simultane- ously to start the compass calibration. The transmitter beeps once. Step 2: Rotate the drone horizontally (keeping it parallel to the floor) until the transmitter beeps once. Step 3: Point the head of the drone upward and rotate it till the transmit- ter beeps again, and the status LED of the drone turns solid blue.
Need help?
Do you have a question about the HS360S and is the answer not in the manual?
Questions and answers