Advertisement
Quick Links
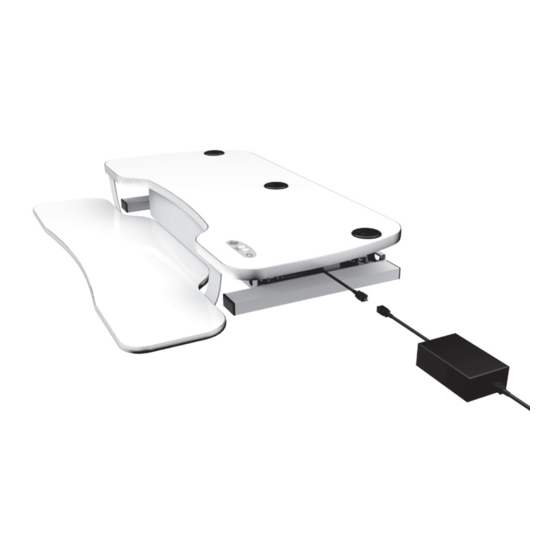
POWER PRO
With your Desktop Riser on a desk or table, locate the cable underneath the unit's top surface.
1
Connect that cable to the power supply included, and then plug the unit into a power outlet.
Push the button to raise the top surface of your desk riser to the maximum height. Secure the
2
power cord with clip on base as illustrated.
UP
DOWN
DOWN
Locate the 4 thumb screws in plastic bag (the shape of the thumb screws may be different from
3
the diagram. Insert the 4 thumb screws half way leaving a 1/4" gap between the thumb screw
and the bottom of the top surface.
®
MADE IN
AMERICA
DOWN
Elite Switch
UP
Pro Switch
UP
Pre-2021 Switch
American Manufacturing
Protected by US Patent No. 10,485,336 & 10,849,424
Assembly Instructions
Assembly Instructions
adult use only. Children
should not operate
this device.
Press once to activate child safety lock.
NOTE:
Power cord damage caused by failure to
properly secure cord away from scissor arm
mechanism and is not covered under warranty.
Lifetime Warranty
VDPP / VDPPD
REV. 02072022
This product is for
1 (888) 506-2931
engineering@versaproducts.com
Advertisement

Subscribe to Our Youtube Channel
Related Manuals for Versa Desk POWER PRO


Summary of Contents for Versa Desk POWER PRO
- Page 1 VDPP / VDPPD REV. 02072022 POWER PRO ® Assembly Instructions Assembly Instructions MADE IN AMERICA With your Desktop Riser on a desk or table, locate the cable underneath the unit’s top surface. Connect that cable to the power supply included, and then plug the unit into a power outlet.
- Page 2 VDPP / VDPPD REV. 02072022 POWER PRO ® Assembly Instructions Assembly Instructions MADE IN AMERICA Pick up the keyboard surface. Align the slots on the side brackets to meet the loosened thumb screws on both the left and right sides. Gently slide the keyboard tray brackets into the gap between the thumb screws and the top surface.
Need help?
Do you have a question about the POWER PRO and is the answer not in the manual?
Questions and answers